
| Navy | The Royal Australian Navy |
| Type | Heavy cruiser |
| Class | Kent |
| Pennant | D 84 |
| Built by | John Brown Shipbuilding & Engineering Company Ltd. (Clydebank, Scotland) |
| Ordered | 9 Apr 1925 |
| Laid down | 26 Aug 1925 |
| Launched | 17 Mar 1927 |
| Commissioned | 24 Apr 1928 |
| End service | 31 Aug 1954 |
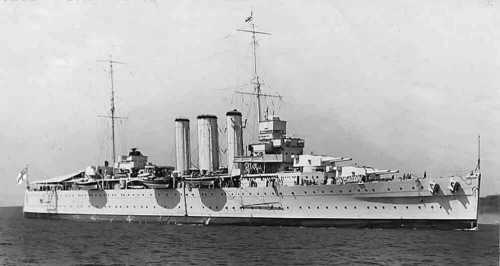
| History | HMAS Australia was ordered as part of a five year naval development programme. Originally completed with short funnels, which were later raised by 15 feet. This class of vessel was designed by Sir Eustace Tennyson d`Eyncourt. Although on paper, this class appeared to be inferior to contemporary cruisers of other navies. They were superior in sea going qualities and had accommodation and liability which was not equalised elsewhere. In addition a considerable amount of weight had been expended in structural strength, and internal protection. No attempt had been made to attain the high speeds, but the ideal being aimed at being the ability to sustain the designed speed indefinitely and in all weathers, without exceeding the normal horse power, actually over 34 kts has been maintained in service without in any way pressing the boilers. On 23 October 1928 October, she arrived in Sydney and spent the next six years in Australian waters. In December 1934, she sailed for UK on exchange with Sussex. In April 1936, she returned to Sydney and was employed in Australian and Pacific waters. In August she paid off into reserve, and a major refit was carried out. 4 twin 4” AA mounts replaced the original singles. In September 1939 her refit and modernisation was completed at Melbourne. In January 1940 she was in the Indian Ocean, on convoy escort duties for troop transports leaving from Sydney. In May she was escorting troop convoys from Wellington (New Zealand) to Sydney, Australia. In June the Australian naval board informed the Admiralty that the Commonwealth Government proposed that the cruiser should be placed at the Admiralty’s disposition immediately for service in Home or Mediterranean waters. That same month Italy declared war, HMAS Australia was in Simonstown, South Africa. For the remainder of that month she was involved in escort duties from Cape Town to Durban. In July, she was ordered by the C. in C. South Atlantic, Vice Admiral D'Oyly Lyon to sail and rendezvous with the cruiser HMS Dorsetshire and the aircraft carrier HMS Hermes off Dakar, an hour later she left from Freetown. Their task was to observe the French naval forces off Dakar. On the 12th, the British Government decided to take no further action against the French vessels in French colonial or North African ports. On the 20th, HMAS Australia joined the 1st cruiser squadron based at Scapa Flow. In August, in company with the cruiser HMS Norfolk she left Scapa Flow for Bear Island area tasked to intercept German fishing boats, however the mission was aborted due to bad weather. In September 1940, HMAS Australia was called upon to relieve the cruiser HMS Fiji after that ship had been damaged by torpedo from U-32 whilst escorting a Dakar bound convoy, she narrowly missed being torpedoed herself on the 8th, by U-56, but because of a malfunctioning torpedo, she escaped. On the 18th, three French cruisers left Dakar and HMAS Australia and the cruiser HMS Cumberland were ordered to shadow them. The French operation against Gabon was thus prevented and two of the French cruisers returned to Dakar (one had developed engine trouble earlier and was escorted to Casablanca). On the 23-24th of the same month British naval forces attacked Dakar for the purpose of preparing a landing force of Free French troops. HMAS Australia inflicted heavy shell hits on the large French destroyer L’Audacieux setting her on fire, her crew beached the vessel. The next day the cruiser shelled coastal batteries and the ships lying in the Harbour. She herself was under accurate fire from the French cruisers and whilst reversing course at the end of a run, she was twice hit aft, the 6"shells caused no casualties. At 0912 the cruiser Devonshire signalled "cruisers withdraw" it was during the withdrawal that HMAS Australia suffered her casualties. From the bridge an aircraft astern was seen to be shot down, but not until later was it learned that it was the cruiser`s Walrus which was lost together with its crew. On the 28th, the cruiser was instructed to return to the U.K. In October, she once again joined the Home Fleet, and was based at Greenock occupied mostly on patrol and escort work. On 18 November 1940, she docked at Liverpool for a refit, slight damage was suffered by her in the dock when a 500lb bomb fell near the port quarter damaging the aircraft catapult. In January 1941, HMAS Australia left Liverpool, as ocean escort to a convoy destined for the Middle East via the Cape, she entered the Indian Ocean on February, and on the 22nd of that month, turned the convoy (then off Mombassa and bound north for the Gulf of Aden) over to the cruiser HMS Hawkins, whilst she herself joined in the hunt for the German pocket battleship Admiral Scheer, which was reported to be in the area. After this fruitless search, she escorted the troop ships Mauretania and Nieuw Amsterdam from Colombo towards Australia to form part of convoy US-10, and arrived in Sydney on 24 March. April 1941 was spent escorting a convoy, and at the end of the month, she carried Admiral Colvin and his staff from Singapore to Sydney after the Singapore conference. June saw the cruiser escorting convoys in the Tasman Sea and for the remainder of 1941 she was on escort and patrol duties on the South Atlantic station, this period however, included a brief visit to Kerguelen Island, to seek a possible German raider. In December 1941 HMAS Australia was escorting a convoy between St. Helena and Capetown when on the 3rd, she was ordered by the Admiralty to hand over responsibility to HMS Dorsetshire and proceed at once towards Fremantle. This was consequent upon the loss of the Australian cruiser HMAS Sydney and the threatening situation in the Far East. On the 24th, in Sydney Rear Admiral Crace transferred his flag from HMAS Canberra to HMAS Australia. On the 28th, convoy ZK-5 with 3 large transports, 4,250 troops and 10,000 tons of supplies, set out from Brisbane for Port Moresby, escorted by HMAS Australia and the cruisers HMAS Canberra, HMAS Perth and HMNZS Achilles. In February HMAS Australia was operating with the ANZAC forces near the New Hebrides under the command of Rear Admiral Crace, RN. March saw her operating with the American navy as a covering group south east of Papua. In April 1942 the ANZAC Squadron became Task Force 44. During May HMAS australia was a member of the support forces for the American aircraft carriers involved in the air battle in the Coral Sea. In June she was still serving in the Pacific as a member of Task Force 44 in company with HMAS Canberra and HMAS Hobart, operating in Australian and New Zealand waters. Rear Admiral Crutchley, RN was in command. During July / August, Australia was employed as a member of the covering force for a troop transport convoy organised for the US landings on Guadalcanal, and at the end of August, Australia was deployed as a covering force for US carrier groups east of the Solomon Islands. In February 1943, HMAS Australia assisted the covering force south of Australia for the convoy code named "Pamphlet”, consisting of transport vessels conveying 3,000 men of the 9th Australian Division which was proceeding from Suez to Sydney and Melbourne. By March she was a member of Task Force 74 ,a part of the US 7th Fleet, commanded by Admiral Carpender. In June she was deployed in the Eastern Arafura Sea to cover the US landings on New Georgia (central Solomons) and in July she in company with HMAS Hobart were deployed from Espiritu Santo to the north west to make good the losses in the fighting off New Georgia, it was here that on 20 July the Hobart was torpedoed by the Japanese submarine I-11 (offsite link), and put out of action for nearly two years. In November, the Australian cruiser HMAS Shropshire joined HMAS Australia and was temporarily transferred from Milme Bay to the New Hebrides to reinforce the South Pacific forces. In December, Australia supported the landing of 1600 men of the 112th US Cavalry on Arawe (New Britain) later that month the US 7th amphibious force landed 13,000 troops of the US 1st marine division at Cape Gloucester, with fire support coming from Australia and Shropshire. HMAS Shropshire 1944 January, 2,400 troops of the 32nd US infantry division were landed near Saidor (New Guinea) HMAS Australia and HMAS Shropshire made up the covering force. In April they were the covering force for the US landings on Holandia and Aitape. During July they were deployed in shelling Japanese troops who were trying to break through to the west in the area of Aitape. In September they were employed in the shelling of Morotai prior to the US landings there and the covering of the forces October, covering force for the air attack on airfields on Mindanao. On 20 November 1944, a Japanese Kamakaze aircraft crashed into Australia causing heavy damage and casualties and forcing her withdrawal from further action. In January 1945, HMAS Australia gave fire support provided for the US landings in the Lingayen Gulf area, but on the 5th, Australia was seriously damaged by hits from five Kamikaze aircraft in this action, however she continued to carry out her bombardment duties until ordered to retire on the 9th. After this date she saw no more action. After the war she served as the RAN flagship for several years. Following repairs to the Kamikaze damage, partly carried out in Australia, and completed in the U.K., she had X turret removed and had a modern R.N. pattern director control tower on the bridge. She was fitted with type 285 radar, a high angle direction control tower with type 285 radar was fitted on the centre line, forward of the mainmast. She was unusual in that her 4"guns were mounted one deck lower. After recommissioning once more she became the Fleet Flagship. In 1950 Australia was deployed as a training ship. On 31 August 1954, the cruiser was finally paid off. On 25 January 1955 she was sold for scrap. On 26 March 1955 Australia left Sydney in tow, bound for the U.K. where she was broken up for scrap by Ward at Barrow-in Furness. |
Commands listed for HMAS Australia (D 84)
Please note that we're still working on this section
and that we only list Commanding Officers for the duration of the Second World War.
| Commander | From | To | |
| 1 | Capt. Robert Ross Stewart, RN | 28 Aug 1939 | 14 Aug 1941 |
| 2 | Capt. George Dunbar Moore, RAN | 14 Aug 1941 | 24 Dec 1941 |
| 3 | Capt. Harold Bruce Farncomb, RAN | 24 Dec 1941 | 8 Mar 1944 |
| 4 | Capt. Emile Frank Verlaine Dechaineux, DSC, RAN | 9 Mar 1944 | 21 Oct 1944 (+) |
| 5 | Cdr. Harley Chamberlain Wright, RAN | 22 Oct 1944 | 28 Oct 1944 |
| 6 | Capt. John Malet Armstrong, RAN | 29 Oct 1944 | 5 Aug 1945 |
| 7 | Cdr. Harley Chamberlain Wright, RAN | 6 Aug 1945 | 19 Nov 1945 |
You can help improve our commands section
Click here to Submit events/comments/updates for this vessel.
Please use this if you spot mistakes or want to improve this ships page.
Notable events involving Australia include:
1 Oct 1939
Operation OY 1.
The object of this operation was to test the air reconnaissance capabilities of the RAAF.
By 0600K/1, HMAS Canberra (Commodore W.R. Patterson, CVO, RN), HMAS Australia (Capt. R.R. Stewart, RN), HMAS Hobart (Capt. H.L. Howden, RAN) and HMAS Adelaide (Cdr. H.A. Showers, RAN) had taken up positions of the coasts of New South Wales and Victoria.
Aircraft took off from Laverton, Richmond and Archerfield to search to a depth of 80 miles. Aircraft also took off from Canberra to search to a depth of 160 miles.
The exercises were completed around 1900K/1.
On completion of the exercises HMAS Canberra, HMAS Hobart and HMAS Adelaide set course for Sydney. HMAS Australia set course for Melbourne. (1)
12 Oct 1939
HMAS Canberra (Commodore W.R. Patterson, CVO, RN) and HMAS Australia (Capt. R.R. Stewart, RN) made rendezvous near Gabo Island to investigate the possible warship reported in that area the previous day.
As no warship was sighted, they proceeded towards Sydney, conducting exercises en-route. (1)
13 Oct 1939
HMAS Canberra (Commodore W.R. Patterson, CVO, RN), HMAS Australia (Capt. R.R. Stewart, RN) and HMAS Adelaide (Cdr. H.A. Showers, RAN) conducted exercises off Sydney before they entered harbour. (2)
20 Oct 1939
HMAS Canberra (Commodore W.R. Patterson, CVO, RN), HMAS Australia (Capt. R.R. Stewart, RN) and HMAS Adelaide (Cdr. H.A. Showers, RAN) conducted exercises off Sydney. (2)
24 Oct 1939
HMAS Australia (Capt. R.R. Stewart, RN) and HMAS Adelaide (Cdr. H.A. Showers, RAN) conducted exercises off Sydney on completion of which both proceeded on patrol.
HMAS Australia arrived in Port Philip from patrol on 26 October and HMAS Adelaide returned to Sydney on the same day. (3)
2 Nov 1939
During 2/3 November 1939, HMAS Canberra (Capt. W.R. Patterson, RN, flying the flag of Rear-Admiral J.G. Crace, RN), HMAS Australia (Capt. R.R. Stewart, RN) and HMAS Adelaide (Cdr. H.A. Showers, RAN) conducted exercises off Sydney. (4)
8 Nov 1939
During 8/9 November 1939, HMAS Canberra (Capt. W.R. Patterson, RN, flying the flag of Rear-Admiral J.G. Crace, RN), HMAS Australia (Capt. R.R. Stewart, RN) and HMAS Adelaide (Cdr. H.A. Showers, RAN) conducted exercises off Sydney.
On completion of the exercises late afternoon of the 9th, HMAS Canberra and HMAS Australia returned to Sydney while HMAS Adelaide set course for Brisbane. (5)
10 Nov 1939
HMAS Canberra (Capt. W.R. Patterson, RN, flying the flag of Rear-Admiral J.G. Crace, RN), HMAS Australia (Capt. R.R. Stewart, RN) returned to Sydney from exercises. (1)
15 Nov 1939
HMAS Canberra (Capt. W.R. Patterson, RN, flying the flag of Rear-Admiral J.G. Crace, RN), HMAS Australia (Capt. R.R. Stewart, RN) arrived at Jervis Bay from exercises and patrol.
Around 1345K/15, they departed again as two unidentified ships had been reported on the 13th near Archer Point and Double Island.
HMAS Canberra then proceeded northwards while HMAS Australia proceeded southwards. It was however soon apparent from air searches that no unidentified (enemy) ships were operating off the Australian east coast. HMAS Australia then also turned to the north. (1)
17 Nov 1939
HMAS Adelaide (Cdr. H.A. Showers, RAN) departed Sydney to make rendezvous with HMAS Canberra (Capt. W.R. Patterson, RN, flying the flag of Rear-Admiral J.G. Crace, RN), HMAS Australia (Capt. R.R. Stewart, RN) coming from Jervis Bay. Sheduled exercises however had to be cancelled due to the bad weather conditions and all ship entered Sydney harbour around 1200K/17 instead. (5)
20 Nov 1939
HMAS Canberra (Capt. W.R. Patterson, RN, flying the flag of Rear-Admiral J.G. Crace, RN), HMAS Australia (Capt. R.R. Stewart, RN) and HMAS Adelaide (Cdr. H.A. Showers, RAN) conducted exercises off Sydney.
On completion of the exercises in the evening, HMAS Canberra and HMAS Australia set course for Melbourne while HMAS Adelaide remained on patrol off Sydney returning to harbour the following morning. (5)
22 Nov 1939
Around 1100K/22, HMAS Canberra (Capt. W.R. Patterson, RN, flying the flag of Rear-Admiral J.G. Crace, RN), HMAS Australia (Capt. R.R. Stewart, RN) arrived at Port Melbourne from Sydney. (6)
28 Nov 1939
Around 1100K/28, HMAS Canberra (Capt. W.R. Patterson, RN, flying the flag of Rear-Admiral J.G. Crace, RN), HMAS Australia (Capt. R.R. Stewart, RN) arrived at Albany from Port Melbourne.
They both fuelled from the Australian Royal Fleet Auxiliary tanker Kurumba (3798 GRT, built 1916) and then departed independently for patrol and subsequent exercises on 2 December. (6)
2 Dec 1939
Around 0600H/2, HMAS Sydney (Capt. J.A. Collins, RAN) made rendezvous with HMAS Canberra (Capt. W.R. Patterson, RN, flying the flag of Rear-Admiral J.G. Crace, RN) and HMAS Australia (Capt. R.R. Stewart, RN). Exercises were then carried out until 1100H/2, when HMAS Sydney parted company to return to Fremantle where she arrived around 1800H/2. (7)
3 Dec 1939
Around 1100K/28, HMAS Canberra (Capt. W.R. Patterson, RN, flying the flag of Rear-Admiral J.G. Crace, RN), HMAS Australia (Capt. R.R. Stewart, RN) arrived at Albany from patrol and exercises.
They both fuelled from the Australian Royal Fleet Auxiliary tanker Kurumba (3798 GRT, built 1916).
Around 1400H/3, HMAS Canberra departed for Williamstown followed by HMAS Australia around 1.5 hours later.
The cruisers joined company around 0800H/4 and then proceeded to Williamstown where they arrived around 1545K/6. (8)
7 Dec 1939
HMAS Canberra (Capt. W.R. Patterson, RN, flying the flag of Rear-Admiral J.G. Crace, RN), HMAS Australia (Capt. R.R. Stewart, RN) departed Williamstown for Sydney where they arrived around 1100K/8.
(8)
21 Dec 1939
Around 1300K/21, HMAS Canberra (Capt. W.R. Patterson, RN, flying the flag of Rear-Admiral J.G. Crace, RN), HMAS Australia (Capt. R.R. Stewart, RN) departed Sydney to proceed to Jervis and for patrol respectively.
HMAS Canberra stayed at Jervis Bay overnight before proceeding to make rendezvous with HMAS Australia off Sydney the following day.
HMAS Australia proceeded to a position 90 nautical miles to the south-east of Sydney after which she commenced to patrol to the north-north-east until it was time to proceed to the rendezvous with HMAS Canberra off Sydney.
After having made rendezvous on 22 December the heavy cruisers conducted exercises until entering Sydney harbour around 2200K/22. (8)
6 Jan 1940
Convoy US 1.
Troop convoy from New Zealand and Australia to Suez.
The convoy departed Wellington, New Zealand on 6 January 1940 and on departure was made up out of the following troopships: Empress of Canada (British, 21517 GRT, built 1922), Orion (British, 23371 GRT, built 1935), Rangitata (British, 16737 GRT, built 1929) and Strathaird (British, 22281 GRT, built 1932).
On departure from Wellington the convoy was escorted by the battleship HMS Ramillies (Capt. H.T. Baillie-Grohman, OBE, DSO, RN), heavy cruiser HMAS Canberra (Capt. W.R. Patterson, RN, flying the flag of Rear-Admiral J.G. Crace, RN) and the light cruiser HMS Leander (from the New Zealand Division) (Capt. H.E. Horan, RN).
Two more troopships joined the convoy in New Zealand waters, these were: Dunera (British, 11162 GRT, built 1937) and Sobieski (Polish, 11030 GRT, built 1939).
The convoy then set course for Australia.
On 9 January the troopships: Orcades (British, 23456 GRT, built 1937), Orford (British, 19941 GRT, built 1928), Otranto (British, 20026 GRT, built 1925) and Strathnaver (British, 22283 GRT, built 1931) departed Sydney to join the convoy which they did the next day. They were being escorted by the heavy cruiser HMAS Australia (Capt. R.R. Stewart, RN).
HMS Leander was then detached while HMAS Sydney (Capt. J.A. Collins, RAN) joined the convoy on the 10th but already left again the day after when she was detached at 0238K/11 to search for a missing aircraft. As it was later reported that the aircraft had crashed on land the search was soon abandoned.
HMS Ramillies also made a brief stop for a few hours at Sydney on the 9th before rejoining the convoy.
On the 12th the troopship Empress of Japan (British, 26032 GRT, built 1930) joined the convoy coming from Melbourne.
On 18 January the light cruiser HMAS Adelaide (Capt. H.A. Showers, RAN) near Fremantle joined the convoy escort.
The convoy arrived at Fremantle later the same day.
On 20 January, the convoy departed Fremantle escorted by the battleship HMS Ramillies and the heavy cruisers HMS Kent (Capt. D. Young-Jamieson, RN) and Suffren (Capt. R.J.M. Dillard).
HMAS Canberra and HMAS Australia had departed a few hours earlier to patrol the area. They returned to Fremantle on 21 January.
The convoy arrived at Colombo on 30 January and entered the harbour as did HMS Ramillies. HMS Kent and Suffren kept patrolling off the harbour until the convoy set sail again on 1 February but now escorted by the battleship HMS Ramillies, the aircraft carrier HMS Eagle (Capt. A.R.M. Bridge, RN), heavy cruiser HMS Sussex (Capt. A.R. Hammick, RN, flying the flag of Rear-Admiral A.J.L. Murray, DSO, OBE, RN) and the light cruiser HMAS Hobart (Capt. H.L. Howden, RAN). HMS Ramillies and HMS Sussex had sailed with the convoy from Colombo, the other two escorts came from Trincomalee. HMS Kent and Suffren then entered Colombo. At Colombo the convoy had been joined by the French troopship Athos II (French, 15276 GRT, built 1927).
On 6 February 1940 the destroyer HMS Westcott (Lt.Cdr. W.F.R. Segrave, RN) joined the convoy coming from Colombo. On joinig the convoy she was oiled by HMS Sussex.
Early on the 7th, HMAS Hobart proceeded ahead to Aden with three of the troopships.
At dawn of the 8th the convoy arrived off Aden and three more of the troop transports entered the harbour. The remainder proceeded towards the Red Sea now escorted by HMS Sussex and HMAS Hobart. Aircraft from HMS Eagle patrolled in the area while HMS Ramillies fuelled in the outer anchorage.
The transports that had entered Aden left there on 9 February escorted by HMS Sussex as this cruiser had turned back when off the Perim Strait. HMS Sussex and HMS Westcott now escorted these ships until they met HMAS Hobart which had now dispersed the first group of transports in 22°30'N.
HMS Sussex then turned back to proceed to Aden leaving the transports of the second group to HMAS Hobart which then escorted the transports to 22°30'N when they were dispersed. HMS Westcott went on to Suez with the Rangitata. HMAS Hobart then also set sourse to return to Aden. (9)
15 Feb 1940
HMAS Canberra (Capt. W.R. Patterson, RN, flying the flag of Rear-Admiral J.G. Crace, RN), HMAS Australia (Capt. R.R. Stewart, RN) departed Sydney for exercises and a short patrol. They returned the following day. (1)
23 Feb 1940
HMAS Canberra (Capt. W.R. Patterson, RN, flying the flag of Rear-Admiral J.G. Crace, RN), HMAS Australia (Capt. R.R. Stewart, RN), HMAS Manoora (Cdr. A.H. Spurgeon, RAN) and HMAS Westralia (Cdr. A.S. Rosenthal, RAN) departed Sydney for exercises.
HMAS Adelaide (Capt. H.A. Showers, RAN) also departed Sydney for trials and then to join the exercises. She carried out a full power trial during which a speed of 24.8 knots reached.
On completion of the exercises HMAS Adelaide and HMAS Westralia set course for Melbourne while HMAS Australia set course for Brisbane.
HMAS Canberra and HMAS Manoora returned to Sydney. (10)
29 Feb 1940
Around 2100K/29, HMAS Canberra (Capt. W.R. Patterson, RN, flying the flag of Rear-Admiral J.G. Crace, RN) departed Sydney and then proceeded northwards to make rendezvous with HMAS Australia (Capt. R.R. Stewart, RN) which had departed Moreton Bay (near Brisbane) around 1630K/28.
Rendezvous was affected around 0300K/1 and both cruisers then proceeded southward to join other RAN ships for exercises. (11)
1 Mar 1940
HMAS Canberra (Capt. W.R. Patterson, RN, flying the flag of Rear-Admiral J.G. Crace, RN), HMAS Australia (Capt. R.R. Stewart, RN), HMAS Adelaide (Capt. H.A. Showers, RAN) and HMAS Manoora (Cdr. A.H. Spurgeon, RAN) conducted exercises off Jervis Bay. On completion of the exercises they all proceeded to Sydney arriving there later the same day. (12)
5 Mar 1940
Around 1400K/5, HMAS Canberra (Capt. W.R. Patterson, RN, flying the flag of Rear-Admiral J.G. Crace, RN) and HMAS Australia (Capt. R.R. Stewart, RN) departed Sydney for exercises.
Around 1540K/5, HMAS Adelaide (Capt. H.A. Showers, RAN) departed Jervis Bay to join the heavy cruiser for exercises.
Exercises were commenced around 2000K/5. They were completed three hours later. HMAS Canberra then set course for Melbourne via Westernport, HMAS Australia set course to return to Sydney and HMAS Adelaide set course to return to Jervis Bay. (12)
12 Mar 1940
HMAS Australia (Capt. R.R. Stewart, RN), HMAS Adelaide (Capt. H.A. Showers, RAN) and HMAS Swan (Lt.Cdr. E.J. Prevost, RN) departed Sydney for exercises with HMAS Canberra (Capt. W.R. Patterson, RN, flying the flag of Rear-Admiral J.G. Crace, RN) which was coming north from Melbourne.
On completion of the exercises, all ships entered Sydney harbour in the morning of 13 March 1940. (12)
18 Mar 1940
During 18/19 March 1940, HMAS Canberra (Capt. W.R. Patterson, RN, flying the flag of Rear-Admiral J.G. Crace, RN), HMAS Australia (Capt. R.R. Stewart, RN), HMAS Adelaide (Capt. H.A. Showers, RAN) conducted exercises off Sydney. On completion of the exercises the heavy cruisers returned to Sydney while HMAS Adelaide set course for Westernport. (12)
3 Apr 1940
HMAS Canberra (Capt. W.R. Patterson, RN, flying the flag of Rear-Admiral J.G. Crace, RN), HMAS Australia (Capt. R.R. Stewart, RN), HMAS Adelaide (Capt. H.A. Showers, RAN) conducted exercises off Sydney. On completion of the exercises HMAS Canberra and HMAS Adelaide returned to Sydney while HMAS Australia set course for Melbourne. (13)
24 Apr 1940
Around 0920K/24, HMAS Canberra (Capt. W.R. Patterson, RN, flying the flag of Rear-Admiral J.G. Crace, RN), HMAS Australia (Capt. R.R. Stewart, RN) departed Sydney for exercises.
On completion of the exercises, HMAS Australia returned to harbour around 1345K/24, while HMAS Canberra set course for Wellington. (14)
1 May 1940
Convoy US 3.
The troopship Andes (British, 25689 GRT, built 1939, 1508 troops) departed Lyttelton Harbour, New Zealand (near Christchurch) on 1 May 1940. She was escorted by the heavy cruiser HMAS Canberra (Capt. W.R. Patterson, RN).
Around noon on May, 2nd, in Cook Strait they were joined by the troopships Aquitania (British, 44786 GRT, built 1914, 3627 troops), Empress of Britain (British, 42348 GRT, built 1931, 2047 troops) and Empress of Japan (British, 26032 GRT, built 1930, 1554 troops) and their escorts, the heavy cruiser HMAS Australia (Capt. R.R. Stewart, RN) and light cruiser HMS Leander (from the New Zealand Division) (Capt. H.E. Horan, RN). They came from Wellington.
Early on May, 5th, HMS Leander parted company and proceeded to Sydney. During the forenoon the troopship Queen Mary (British, 81235 GRT, built 1936, 5059 troops) came out escorted by the light cruiser HMAS Perth (Capt. H.B. Farncomb, RAN). Shortly afterwards HMAS Canberra also entered Sydney harbour to pick up correspondence. Around 1600K/5, HMAS Canberra and HMS Leander came out together with the troopship Mauretania (British, 35739 GRT, built 1939, 2616 troops). The convoy then set course for Fremantle.
At 2045K/5, HMAS Perth parted company to return to Sydney where she arrived around 0330K/6.
At 1600K/6, off Melbourne, the troopship Empress of Canada (British, 21517 GRT, built 1922, 1615 troops) joined the convoy.
At 0630H/10, when 70 nautical miles from Rottness Island, HMS Leander parted company with the convoy to proceed ahead of it to Fremantle.
At 0800H/10, the light cruiser HMAS Adelaide (Capt. H.A. Showers, RAN), joined the convoy and guided into Gage Roads. The transports berthed alongside Fremantle Harbour as arranged except for the Aquitania and Queen Mary. The other transports fuelled and took in water. All ships of the escort berther alongside except for HMAS Adelaide which patrolled in Gage Roads.
At 1200H/12, the convoy started to leave the harbour. On forming up course was set for Colombo.
At 2214G/15, the convoy altered course towards the Cape of Good Hope. It had been decided that the convoy was not to pass through the Mediterranean as the situation with Italy was deteriorating. During the night HMS Leander parted company to proceed to Colombo.
At 1529D/20, the heavy cruiser HMS Shropshire (Capt. J.H. Edelsten, RN) joined in position 28°13'S, 60°50'E. HMAS Canberra then parted company to return to Australia.
At dawn on May, 26th, the convoy started to pass down the searched channel and entered Table Bay, Capetown.
At 0743B/26, HMS Shropshire set course to proceed to Simonstown.
The Queen Mary and Aquitania anchored in Table Bay while the other troopships berthed alongside the harbour.
At 1350B/26, the heavy cruiser HMS Cumberland (Capt. G.H.E. Russell, RN) arrived from Simonstown.
At 0300B/28, the Queen Mary and Aquitania departed Table Bay to proceed to False Bay escorted by HMS Cumberland.
At 1000B/31, the ships at Capetown, less the Empress of Japan commenced to leave the Bay led by HMAS Australia. At sea they were joined by the Queen Mary and Aquitania and their escorts HMS Shropshire and HMS Cumberland. They had departed from False Bay around 0815B/31. At the rendezvous HMAS Australia then parted company and proceeded to Simonstown.
Course was set for Freetown where the convoy arrived in the morning of June, 7th.
The convoy departed Freetown in the morning of the June, 8th. Still escorted by HMS Shropshire and HMS Cumberland but now joined by the aircraft carrier HMS Hermes (Capt R.F.J. Onslow, DSC, MVO, RN).
At 0035N/10, HMS Hermes parted company with the convoy and proceeded to Dakar.
Around 0900N/12, the heavy cruiser HMS Dorsetshire (Capt. B.C.S. Martin, RN) joined the convoy.
Around 0800N/14, the aircraft carrier Argus joined the convoy coming from Gibraltar.
Around 1000/14, the battlecruiser HMS Hood (Capt. I.G. Glennie, RN) and the destroyers HMCS Fraser (Cdr. W.B. Creery, RCN), HMCS Restigouche (Lt.Cdr. H.N. Lay, RN), HMCS St. Laurent (Lt.Cdr. H.G. De Wolf, RCN) and HMCS Skeena (Lt.Cdr. J.C. Hibbard, RCN) joined the convoy coming from the U.K. HMS Dorsetshire then parted company.
around 1500N/14, the destroyer HMS Wanderer (Cdr. J.H. Ruck-Keene, RN) joined followed around 1600N/14 by the destroyers HMS Broke (Cdr. B.G. Scurfield, RN) and HMS Westcott (Lt.Cdr. W.F.R. Segrave, RN).
The convoy arrived in the Clyde in the afternoon of the 16th.
16 Jun 1940
Dakar, the French battleship Richelieu and the fall of France Timespan; 16 June to 7 July 1940.
The fall of France, 16 June 1940.
On 16 June 1940, less then six weeks after the invasion of France and the low countries had started on May 10th, all military resitance in France came to an end. The question of control of the French fleet had thus become, almost overnight, one of vital importance, for if it passed into the hands of the enemy the whole balance of sea power would be most seriously disturbed. It was therefore policy of H.M. Government to prevent, at all costs, the French warships based on British and French harbours overseas from falling into the hands of Germany.
The bulk of the French fleet was at this time based in the Mediterranean. There drastic steps were taken to implement this policy. Elsewhere the most important units were the two new battleships completing, the Jean Bart at St. Nazaire and more importantly as she was almost complete, the Richelieu, at Brest.
Events during the Franco-German negotiations 17-25 June 1940 and politics.
It was on the 17th of June 1940, when the newly-formed Pétain Cabinet asked the Germans to consider ‘honourable’ peace terms in order to stop the fighting in France. At 1516 (B.S.T.) hours that day the Admiralty issued orders that British ships were not to proceed to French ports. On receipt of these orders Vice-Admiral George D’Oyly Lyon, Commander-in-Chief South Atlantic, ordered the aircraft carrier HMS Hermes (Capt R.F.J. Onslow, DSC, MVO, RN) then on her way to Dakar after a patrol off the Canary Islands to proceed to Freetown instead at her best speed. At the same time he recalled the British SS Accra which had sailed from Freetown for Dakar at 1730 hours (zone +1) with 850 French troops on board. She returned to Freetown at 0800/18. The British transport City of Paris with 600 French troops on board from Cotonou was ordered to put into Takoradi. On the 18th the Commander-in-Chief was also informed by Commander Jermyn Rushbrooke, RN, the British Naval Liaison Officer at Dakar that the Commander-in-Chief of the French Navy, Admiral Darlan had ordered Admiral Plancon at Dakar to continue fighting and also that the shore batteries and AA personnel there had declared for the British. At 0245/18 Vice-Admiral Lyon passed this information to the Admiralty, cancelled his orders to HMS Hermes to proceed to Freetown and directed her with the armed merchant cruisers HMS Carnarvon Castle (Capt. M.J.C. de Meric, RN) and HMS Mooltan (Capt.(Retd.) G.E. Sutcliff, RN), which were on passage to Freetown from the Western Approaches, to proceed to Dakar at full speed in order to strengthen the French morale. That afternoon the Admiralty ordered HMS Delhi (Capt. A.S. Russell, RN) to leave Gibraltar and proceed to Dakar and join the South Atlantic Station. She left Gibraltar on the 19th with an arrival date of the 23rd. In the morning of the 18th the French troopship Banfora reached Freetown, from Port Bouet, Ivory Coast with 1000 troops on board, and sailed for Dakar without delay. The French armed merchant cruiser Charles Plumier, which had been on patrol south of the Cape Verde Islands reached Dakar at 1015/18.
Meanwhile the British Naval Liaison Officer, Dakar’s signal had been followed by a report from the Naval Control Service Officer at Duala that an overwhelming spirit existed amongst the military and civilian population of the French Cameroons to continue fighting on the British side, but that they required lead, as the Governer was not a forceful character; but that morning the Governor of Nigeria informed the Commander-in-Chief that he considered steps to be taken to prevent a hostile move from Fernando Po (off the entrance to the Cameroon River). Accordingly, at 1845/18, the armed merchant cruiser HMS Bulolo (A/Capt. C.H. Petrie, RN) sailed from Freetown at 14 knots to show herself off San Carlos on the morning of the 23rd, and thence to anchor of Manoka in the Cameroon River the next day (her draught prevented her from reaching Duala). A/Capt. Petrie was then to proceed to Duala and call a conference.
It was difficult to arrive at a clear appreciation of the situation in French West-Africa but on the morning of the 19th June the Commander-in-Chief informed the Admiralty that, as the evidence pointed to an established resolve on the part of the West-African Colonies to join Great Britain whatever happened, he intended to allow French troop movements to continue. This he anticipated would avoid French exasperation and mistrust. During the early afternoon he heard from the Governors of Nigeria and the Gold Coast that French officers and non-commissioned officers were planning to leave the Cameroons and to join the British forces in Nigeria. At 1900/19 the Commander-in-Chief held a conference with the Governor of Sierra Leone at which it was decided that the Governor should cable home urging immediate action to persuade the French colonial troops and authorities to remain in their territories and hold their colonies against all attacks. In the evening the Commander-in-Chief reported to the Admiralty that French Guinea was determined to keep fighting on the British side. Meanwhile the Governor-General of French Equatorial Africa at Brazzaville was wavering and suggested leading his troops to the nearest British Colony. Late that night, still on the 19th, the Commander-in-Chief informed him that it was essential that he should remain at his post and that it was the expressed intention of French West Africa to fight on to victory.
Next morning, on the 20th, the Admiralty informed the Commander-in-Chief that the new French battleship Richelieu (about 95% complete) had departed Brest for Dakar on the 18th. Her sister ship, Jean Bart (about 77% complete) had left St. Nazaire for Casablanca on the 19th. During the afternoon of the 20th the British Liaison Officer at Dakar reported that according to the French Admiral at Dakar the French Government had refused the German armistice terms and would continue the fight in France. This was entirely misleading. For nearly two days the Commander-in-Chief had no definite information till at noon on 22 June when a BB C broadcast announced the signing of a armistice between France and Germany, which was to followed by one between France and Italy. Still there was much uncertainty, and the rest of the day was apparently spent in waiting for news. Early next morning, the 23rd June, the Admiralty informed the Commander-in-Chief that the French Bordeaux Government had signed an armistice with Germany. As the terms were not fully known the attitude of the French Navy remained uncertain. Shortly after 0200/23 the Admiralty gave orders that HMS Hermes was to remain at Dakar, and gave the Commander-in-Chief the text of the British Government’s appeal to the French Empire and to Frenchmen overseas to continue the war on the British side. The final collapse of France naturally exercised an important influence on the dispositions and movements of the South Atlantic forces. Also on the 23rd the cruiser HMS Dorsetshire (Capt. B.C.S. Martin, RN) and the destroyer HMS Watchman (Lt.Cdr. E.C.L. Day, RN) departed Gibraltar for Dakar and Casablanca respectively, and the same morning HMS Bulolo arrived off Fernando Po and showed herself of San Carlos and Santa Isabel. At noon she anchored off Manoka, in the Cameroon River, in the hope of restoring morale at Duala. Meanwhile HMS Mooltan had arrived at Freetown from Dakar and the United Kingdom, and during the afternoon (1500/23) the armed merchant cruiser HMS Maloja (A/Capt. V. Hammersley-Heenan, RN) reached Dakar from the Northern Patrol to join the Freetown escort force. Half an hour later the Richelieu and escorting destroyer Fleuret arrived at Dakar.
For a time the attitude of the French Governor-General at Dakar, the French North African colonies and the French Mediterranean Fleet, and the battleship Richelieu remained in doubt. Then owning to the anticipated difficulty of maintaining French salaries and supplies if the French did not accept the British offer, the situation at Dakar rapidly deteriorated, and by the evening of the 23rd reached a critical state. Early on the 24th, therefore, the Admiralty ordered the Commander-in-Chief to proceed there as soon as possible. The Commander-in-Chief replied that he intended to proceed there in the ex-Australian seaplane carrier HMS Albatross (Cdr. W.G. Brittain, RN), which was the only available ship, and expected to reach Dakar around noon on the 25th. At 1015/24 he left Freetown and reached Dakar around 1600/25. Meanwhile the Richelieu had put to sea. From then on the naval operations centred mainly on the battleship.
The problem of the Richelieu, 25-26 June 1940.
The Richelieu which had been landing cadets at Dakar, had sailed with the Fleuret at 1315/25 for an unknown destination. She was shadowed by an aircraft from HMS Hermes until 1700 hours. She was reported to be steering 320° at 18 knots. At 1700 hours the Admiralty ordered HMS Dorsetshire to shadow her, and at 2200 hours HMS Dorsetshire reported herself as being in position 16°40’N, 18°35’W steering 225° at 25 knots, and that she expected to make contact with the Richelieu at midnight. At 2126 hours, the Admiralty ordered the Vice-Admiral aircraft carriers (Vice-Admiral L.V. Wells, CB, DSO, RN) in HMS Ark Royal (Capt. C.S. Holland, RN) to proceed with dispatch to the Canary Islands with HMS Hood (Capt. I.G. Glennie, RN) and five destroyers (actually only four sailed with them; HMS Faulknor (Capt. A.F. de Salis, RN), HMS Fearless (Cdr. K.L. Harkness, RN), HMS Foxhound (Lt.Cdr. G.H. Peters, RN) and HMS Escapade (Cdr. H.R. Graham, RN)). They departed Gibraltar in the morning of the 26th.
Early on the 26th, the Admiralty informed the Commander-in-Chief, South Atlantic, and the Vice-Admiral, aircraft carriers, that His Majesty’s Government had decided that the Richelieu was to be captured and taken into a British port. They were to take every step to avoid bloodshed and to use no more force then was absolutely necessary. It was understood that the French battleship had H.A. ammunition on board but no main armament ammunition, that forenoon however, the British Liaison Officer Brest reported that she had embarked 15” ammunition before leaving there. HMS Hood was to perform this task if possible but that there were a risk that the Richelieu might get away before her arrival, or if she tried to enter a neutral port such as La Luz in the Canaries, HMS Dorsetshire was to take action. After the capture she was to be taken to Gibraltar. The battleship HMS Resolution (Capt. O. Bevir, RN), which was at Gibraltar, was detailed to intercept the Jean Bart in case she would depart Casablanca and deal with her in the same way.
Vice-Admiral Wells reported that HMS Ark Royal, HMS Hood and their escorting destroyers would pass through position 36°00’N, 06°35’W at 0300/26, steering 225° at 20 knots. HMS Dorsetshire, meanwhile, having seen nothing of the Richelieu by 0015/26, had proceeded to the northwestward, and then at 0230/26 turned to course 030°. At 0530/26 she catapulted her Walrus aircraft to search to the northward, and at 0730 hours it sighted the Richelieu in position 19°27’N, 18°52’W on course 010°, speed 18.5 knots. Eleven minutes later she altered course to 195°. The aircraft proceeded to shadow, but missed HMS Dorsetshire when it tried to return and in the end was forced to land on the sea at 0930 hours about 50 nautical miles to the southward of her. The Dorsetshire which had turned to 190° at 0905 hours was then in position 18°55’N, 17°52’W. She turned to search for her aircraft. Around noon she abandoned the search and steered 245° at 25 knots to intercept the Richelieu, which she correctly assumed to be continuing to the southward. She made contact soon after 1430 hours and at 1456 hours reported that she was shadowing the battleship from astern.
In the meantime the French Admiral at Dakar had informed Vice-Admiral Lyon that the ‘Admiral Afrique’ had ordered the Richelieu and the Fleuret to return to Dakar. At 1512 hours the Commander-in-Chief, South Atlantic asked the Admiralty whether, under these circumstances, HMS Dorsetshire was to attempt to capture the Richelieu. He was confident that any interference would antagonise all the local authorities and the French people in general. He also pointed out that His Majesty’s ships at Dakar would be placed in a most difficult position.
At 1630/26, HMS Dorsetshire, reported that she was in position 17°21’N, 18°22’W with the Richelieu within easy visual distance. Relations between the two ships remained cordial. The French ship had not trained her guns when she sighted the Dorsetshire, and she expressed regret that, having no aircraft embarked, she was unable to co-operate in the search for her missing Walrus aircraft but she signalled to Dakar for a French plane to assist. In view of her declared intention to return to Dakar, Capt. Martin took no steps to capture her and at 1700 hours he was ordered by the Admiralty to only shadow the Richelieu. At the same time HMS Hermes left Dakar to search for HMS Dorsetshire’s Walrus.
Shortly after 1900/26, the Admiralty ordered Ark Royal, HMS Hood and their four escorting destroyers to return to Gibraltar. At 2015 hours, the Admiralty ordered HMS Dorsetshire to cease shadowing the Richelieu and to search for her missing Walrus. On receipt of these orders she parted company with the Richelieu and Fleuret at 2300/26, being then some 70 nautical miles from Dakar. HMS Dorsetshire then proceeded to the north-north-eastward at 23 knots.
At first light on the 27th, HMS Hermes, then some 30 nautical miles to the southward, flew off seven aircraft to assist in the search. It was however HMS Dorsetshire herself which eventually found and recovered her aircraft at 1107/27. Meanwhile the Richelieu had arrived off Dakar at 0900/27 but did not enter the port. Shortly afterwards she made off the the north yet again. HMS Hermes then steered to the northward to be in a position to intercept if needed. Nothing was seen of the Richelieu until she was again located off Dakar at 0500/28. HMS Hermes, by that time about 400 nautical miles north of Dakar, was ordered to proceed southwards and return to Dakar.
The Commander-in-Chief, South Atlantic, at Dakar 26-29 June 1940.
While these movements were going on at sea, the position at Dakar was steadily deteriorating. At about 1830/26, the Commander-in-Chief had reported to the Admiralty that the French Admiral at Dakar had informed him, on Admiral Darlan’s instructions, that the presence of British warships at Dakar was in contrary to the terms of the Franco-German armistice. At 1700/26 (zone -1) however, the Admiralty had signalled to the Commander-in-Chief that, as the French codes were compromised, that French authorities could no longer be sure that orders came from Admiral Darlan but Admiral Plancon refused to question the authenticity of any signal he received. During the night the appointment of the British Liaison Officer at Dakar was terminated.
At 0500/27 the Richelieu was seen approaching Dakar, but 25 minutes later she turned to seaward again and the Commander-in-Chief ordered a Walrus aircraft from HMS Albatros to shadow her. That afternoon he informed the Admiralty that the Richelieu had put to sea to escort five French armed merchant cruisers [according to another source these were the armed merchant cruisers (four in number and not five) El D’Jezair, El Kantara, El Mansour, Ville d’Oran and the large destroyers Milan and Epervier which came from Brest] to Dakar. The Admiralty was clearly anxious that the Richelieu should not escape and at 0021/28, they ordered Vice-Admiral Wells with HMS Ark Royal, HMS Hood escorted by four destroyers (HMS Faulknor, HMS Fearless, HMS Foxhound and HMS Vidette (Cdr.(Retd.) D.R. Brocklebank, RN) to proceed to the Canaries to intercept her if she continued to steam to the northward. These ships (with HMS Escapade instead of HMS Vidette) had only returned to Gibraltar late the previous evening from their first sortie to intercept the Richelieu. Now they left again around 0600/28 but were quickly ordered to return to Gibraltar and were back in port around noon.
Around 0500/28 HMS Dorsetshire, proceeding back towards Dakar after having picked up her lost aircraft encountered the Richelieu about 10 nautical miles north of Dakar. Admiral Wells was then ordered by the Admiralty to return to Gibraltar. The rapid deterioration of the situation in West Africa is clearly shown in a series of signals which passed between the Commander-in-Chief South Atlantic and the Admiralty on 28 June. At 1100 hours, the Commander-in-Chief signalled that the French had refused HMS Dorsetshire permission to enter Dakar and that she was therefore proceeding to Freetown with all dispatch to fuel and return to the Dakar area as soon as possible. HMS Dorsetshire arrived at Freetown at 0545/29. At 1415/28 the Commander-in-Chief informed the Admiralty that the French Admiral at Dakar had issued orders to prevent H.M. ships from communicating with, or receiving stores, from the shore. In reply he had told the French Admiral that HMS Hermes would enter Dakar on the 29th to embark aircraft stores and fuel, and that he himself would sail from there in HMS Albatros after seeing the commanding officer of HMS Hermes. At 1515/28 the Commander-in-Chief informed the Admiralty of the steps he would take in case the Richelieu would proceed to sea again. The Admiralty then issued orders that Dakar was to be watched by an 8” cruiser within sight of the French port by dayand within three miles by night. HMS Hermes was to remain off Dakar until relieved by HMS Dorsetshire after this ship had returned from fueling at Freetown.
HMS Hermes arrived at Dakar at 0900/29. During the day she embarked Fleet Air Arm personnel and stores which had been landed there earlier. She then completed with fuel and sailed at 1800/29. She then patrolled off Dakar until she was relieved by HMS Dorsetshire at 1800/30. The Commander-in-Chief had sailed from Dakar in HMS Albatros at 1030/29. He arrived at Freetown at 1800/30 and transferred his flag to the accommodation ship Edinburgh Castle.
Deterioration of Franco-British relations, 1 – 3 July 1940.
The first few days of July saw a swift deterioration of Franco-British relations everywhere. The paramount importance of keeping the French fleet out of the hands of the enemy forced the British Government to take steps. According to the armistice terms the French fleet had to assemble at ports under German or Italian control and be demilitarized. To the Government it was clear that this would mean that the French ships would be brought into action against us. The Government therefore decided to offer the French naval commanders the following options; - to continue the fight against the Axis, to completely immobilization in certain ports or to demilitarize or sink their ships.
Already a powerful squadron, known as ‘Force H’ had been assembled at Gibraltar, in order to fill the strategic naval vacuum in the Western Mediterranean caused by the defection of the French fleet, and on 30 June Vice-Admiral J.F. Somerville hoisted his flag in HMS Hood. His first task was to present the British alternatives to the Admiral commanding the French ships at Oran, failing the acceptance of one of them, he was to use force.
To return to West-Africa, HMS Hermes reached Freetown with the Fleet Air Arm passengers and stores from Dakar on 2 July. Early that afternoon the Commander-in-Chief asked the Consul General at Dakar to obtain, if possible, assurance from the French Admiral there that if British warships were not allowed to use Dakar, enemy men-of-war should also be forbidden to use it. At 1915/2, the ex-British Liaison Officer, who had not yet left Dakar, reported the arrival of a British merchant ship which had not been diverted. He also reported that the French ships Katiola and Potiers might be sailing for Casablanca, escorted by armed merchant cruisers and destroyers. The Admiralty however ordered HMS Dorsetshire, which was maintaining the watch on Dakar, to take no action. At 2310/2 the Commander-in-Chief asked the Consul-General whether there was any chance of the Polish and Belgian bullion which was in the armed merchant cruiser Victor Schoelcher being transferred to either the Katiola or Potiers. He received no reply, and the continued silence of the British Consul led him to believe that the Consul’s signals were either being held up or mutilated.
Next forenoon, 3 July, the Commander-in-Chief informed the Admiralty that he intended to divert all British shipping in the South Atlantic from all French ports. Early that morning Vice-Admiral Somerville’s Force H had arrived off Oran. For the next ten hours strenuous efforts were made to persuade the French Admiral to accept one of the British alternatives, but without success. At 1554 hours (zone -1) Force H sadly opened fire on the ships of their former ally at Mers-el-Kebir, inflicting heavy damage and grievous loss of life. None could predict the result of these measures on the Franco-British relations, but it was sure they would not be improved.
During the afternoon of July 3rd the Commander-in-Chief, South Atlantic, on Admiralty instructions, directed all British Naval Control Officers and Consular Shipping Advisers to order all Biritsh and Allied ships to leave French ports as soon as possible, if necessary disregarding French instructions. All British warships in French ports were to remain at short notice and to prepared for every eventuality. The only warship in a French port within the limits of the South Atlantic Station at the time was HMS Bulolo, which was at Manoka in the Cameroons. At 2048 hours (B.S.T.) the Admiralty ordered all British warships in French ports to proceed to sea and at 2223 hours the Commander-in-Chief, South Atlantic ordered HMS Bulolo to proceed to Lagos, where she was to remain with HMS Dragon (Capt. R.G. Bowes-Lyon, MVO, RN) until further orders.
HMS Dorsetshire off Dakar, 3-7 July 1940.
Meanwhile HMS Dorsetshire had continued her watch off Dakar. On 3 July 1940 there were sixteen French warships and seven auxiliaries in the harbour. This number included the battleship Richelieu, the large destroyers Fleuret, Milan, Epervier, the armed merchant cruisers El D’Jezair, El Kantara, El Mansour, Ville d’Oran, Ville d’Alger, Victor Schoelcher and Charles Plumier, the colonial sloop Bougainville, the submarines Le Heros and Le Glorieux. At 0917/3 the Admiralty asked the Commander-in-Chief for the Richelieu’s berth at Dakar. HMS Dorsetshire informed him that at 1125/3 she was in position 045°, Cape Manuel lighthouse, 2.6 nautical miles, ships head 230°. Captain Martin seems to have drawn his own conclusions from this question and at 1350 hours he signalled to the the Commander-in-Chief his opinion that the Richelieu’s propellers could be severely damaged by depth charges dropped from a fast motor dinghy, and he asked permission to carry out such an attack about 2300 hours that night. Vice-Admiral Lyon replied that he had no instructions from the Admiralty to take offensive action against the Richelieu. At 1625 hours, however, the Admiralty ordered HMS Dorsetshire to get ready, but to await approval before actually carrying out an attack. This was followed at 1745 hours by a signal that the proposed attack was not approved as it was feared to be ineffective and for the time being the idea was ‘shelved’. [More on this idea later on.]
At 1904/3, the Admiralty ordered HMS Hermes to leave Freetown with all despatch to join HMS Dorsetshire off Dakar at 0500/5. At 2112/3 the Admiralty ordered HMS Dorsetshire to shadow the Richelieu if she sailed and proceeded northwards. If the vessel however made for the French West Indies, the Dorsetshire was to make every effort to destroy her by torpedo attack, and, if that failed, by ramming [ !!! ]. Late that evening the French Government decreed that all British ships and aircraft were forbidden, under penalty of being fired upon without warning, to approach within 20 nautical miles of French territory at home or overseas. Just before midnight the Admiralty gave orders that HMAS Australia (Capt. R.R. Stewart, RN), after refueling at Freetown, was to join HMS Dorsetshire off Dakar. At 0926/4, the Commander-in-Chief, South Atlantic ordered HMS Hermes and HMAS Australia to rendez-vous with HMS Dorsetshire 21 nautical miles from Dakar instead of the 15 nautical miles previously arranged and at 1037 hours he informed all three ships that as the French Air Force and submarines had orders to attack British ships off Casablanca and Dakar. He therefore issued orders that French aircraft and submarines were to be attacked and destroyed on sight. During that afternoon the Prime Minister announced in the House of Commons that, as an alternative to the German demands, French warships might proceed to the West Indies. At 2041 hours the Commander-in-Chief, South Atlantic asked whether, in view of this, the Admiralty intended that the Richelieu should be attacked if she was to proceed to the West Indies. Before this message was received, a signal was sent at 2050 hours cancelling the orders for the Richelieu’s destruction and at about midnight the Admiralty directed that she should be shadowed only.
Early on the 5th the Consul-General at Dakar reported that the merchant vessel Argyll with Commander J. Rushbrooke, RN, the ex-British Naval Liaison Officer, Dakar and his staff onboard, had, in accordance with instructions from the French authorities left Dakar the previous day but that she was recalled on reaching the outer boom, an order which had led the Consul-General to make a protest. Soon after midnight 4/5 July orders were received from the Admiralty that the sloop HMS Milford (Capt. R.J. Shaw, MBE, RN) should be sent to join the patrol off Dakar to provide A/S protection. She left Freetown for Dakar at 1000/5.
At 0723/5, in view of the French order forbidding the approach of British vessels and aircraft within 20 nautical miles from French territory at home and overseas, the Commander-in-Chief ordered his ships off Dakar not to approach within 20 nautical miles of the shore and replied in the affirmative when HMS Dorsetshire asked whether this rule also applied by night. During the afternoon he informed his command that French warships was orders not to attack the British unless they were within these 20 nautical miles. He later added that also submarines had the same orders.
At 1853/5, the Commander-in-Chief ordered HMS Dorsetshire, HMAS Australia, HMS Hermes and HMS Milford not to attack French submarines outside the 20 mile zone unless they were obviously hostile. An Admiralty report then came in the the Richelieu was reported to have put to sea but HMS Dorsetshire quickly contradicted that report.
Dispositions off Dakar at 0300 on 7 July 1940.
At 0300/7, two of the British warships off Dakar which were under the command of Capt. Martin (being the senior officer) were patrolling of Dakar (HMS Dorsetshire and HMS Hermes). The third ship (HMAS Australia) was patrolling about 35 to 40 nautical miles further to the north. The fourth ship HMS Milford was approaching Dakar from the south. At 0307 hours a signal from the Admiralty was received which gave a completely different complexion to their operations.
More on this in the event for 7 July 1940, The attack on the Richelieu.. This event can be found on the pages of the ships involved; HMS Hermes, HMS Dorsetshire, HMAS Australia and HMS Milford. (15)
25 Jun 1940
HMAS Australia (Capt. R.R. Stewart, RN) departed Capetown for Freetown. She is escorting the troopships Orion (British, 23371 GRT, built 1935) and Reina del Pacifico (17702 GRT, built 1931).
(16)
3 Jul 1940
HMAS Australia (Capt. R.R. Stewart, RN) and the troopships Orion (British, 23371 GRT, built 1935) and Reina del Pacifico (17702 GRT, built 1931) arrived at Freetown from Capetown.
(17)
3 Jul 1940
Around 2330N/3, HMS Hermes (Capt R.F.J. Onslow, DSC, MVO, RN) departed Dakar to join HMS Dorsetshire (Capt. B.C.S. Martin, RN) patrolling off Dakar.
Around 0100N/4, HMAS Australia (Capt. R.R. Stewart, RN) also departed Freetown to join the other ships on patrol off Dakar.
Around 0530N/5, HMS Hermes and HMAS Australia joined HMS Dorsetshire and commenced patrolling near Dakar. (18)
7 Jul 1940
The attack on the French battleship Richelieu, 7 / 8 July 1940.
The Admiralty orders operations against the Richelieu.
The Admiralty had originally intended that the Richelieu should be dealt with by Vice-Admiral Somerville’s Force H from Gibraltar but later they decided to employ Force H in the Mediterranean and that the Richelieu was to be put out of action by aircraft from HMS Hermes (Capt. R.F.J. Onslow, RN). Both on account of his up-to-date local knowledge and his air experience Captain Onslow was chosen to take charge of this operation, with the temporary rank of Acting Rear-Admiral. The Admiralty orders to him were contained in a signal sent at 0144/7 (zone -1), which read as follows; ‘H.M. Government have decided question of Richelieu and other French warships at Dakar must be settled without delay. 1) You have been selected to take charge of the operations on account of your recent local and air knowledge, and are hereby promoted to Acting Rear-Admiral until further orders. 2) You are to take HMS Dorsetshire (Capt. B.C.S. Martin, RN), HMAS Australia (Capt. R.R. Stewart, RN) and HMS Milford (Capt. R.J. Shaw, MBE, RN) under your command. 3) You should communicate with the French Naval Authorities at Dakar in manner you think best and transmit text of message which will follow in another signal soon. A decision must be asked within four hours so as to give the Richelieu no time to get underway. 4) Shoud alternative 3 be accepted you take such measures of demilitarization to ensure that ships could not be brought into service for at least a year even at a fully equipped dockyard port. [Seven suggestions to archive this were then given] 5) If all alternatives are refused you should as soon as possible carry out an attack on Richelieu with torpedo aircraft and maintain this attack until it is certain she is sufficiently disabled. Approximately half your torpedoes should have Duplex pistols and half contact pistols and endeavor should be made to obtain a hit in the vicinity of the propellers with a contact pistol. All attacks should be from one side if possible. 6) Bombardment by 8” cruisers should not be carried out in view of the small damage to be expected on the Richelieu and streght of defences. 7) HMS Dorsetshire and HMAS Australia should show themselves at intervals during the operation, but no unnecessary risk of submarine attacks should be accepted by any ship. French naval authorities should be informed your forces are kept at a distance until this decision on account of their submarines. 8) Should it be possible after Richelieu have been dealt with, the two light cruisers should also be attacked. Armed merchant cruisers should not be attacked. 9) Any ship endeavours to put to sea should be brought into action. Whether Richelieu can be attacked under these circumstances by the 8” cruisers should depend on her 15” main battery being operative and effective. 10) H.M. Government desires operation to be carried out as soon as possible subject to your plan as being as proposed. 11) Should Richelieu have left Dakar before receipt of these orders she is to be called upon to stop. If she obeys this order the procedure outlined above is to be carried out. If she refuses to stop she is to be attacked with torpedo aircraft. 12) Inform Admiralty in due course whether operation will take place and of various phases of operations as they occur.
This signal was followed almost immediately by another which gave the terms of communication which Acting Rear-Admiral Onslow was to make to the French authorities at Dakar. Four alternatives were to be offererd; 1) To sail their ships with reduced crews and without ammunition, under British control, to a British port. The crews would be repatriated as soon as possible, and the ships restored to France at the end of the war, or compensation paid if damaged meanwhile 2) To sail with us with reduced crews and without ammunition to some French port in the West Indies, where the ships are to be demilitarized or perhaps entrusted to the United States. Crews to be repatriated. 3) To demilitarize the ships at Dakar to Acting Rear-Admiral Onslow’s satisfaction within 12 hours, to such an extent that they would be incapable of taking part further in the present war. 4) To sink their ships within 6 hours. A reply was required within 4 hours, failing the adoption of one of the alternatives, force will be resorted to.
Acting Rear-Admiral Onslow’s proceedings, 7 July 1940.
After these clear and unequivocal signals had been deciphered Acting Rear-Admiral Onslow’s first concern was the delivery of the British ultimatum to the French authorities. He decided to concentrate HMS Hermes, HMS Dorsetshire, HMAS Australia and meet up with HMS Milford as soon as possible. HMS Milford would then proceed into Dakar with the full text of H.M. Governments terms. By 0800 hours that morning the three ships were steaming south in company, but there was some delay in meeting HMS Milford, as owning to pressure of work in the wireless office of HMS Hermes, Acting Rear-Admiral Onslow had told HMAS Australia to pass a signal to HMS Milford to join his flag, and the Australia used a cypher not held by the Milford. Meanwhile, at 0900 hours the Commander-in-Chief, South Atlantic had asked Acting Rear-Admiral Onslow whether he wished any signal to be made to the Consul-General at Dakar. He replied with a request that the Consul-General to be informed that HMS Milford was being sent into Dakar with an important message for the French Admiral.
It was not until 1155 hours that HMS Milford joined. No time was then lost, and havig embarked Paymaster-Lieutenant R.S. Flynn, RN as interpreter, she left for Dakar at 1214 hours, with a copy of the British ultimatum on board. At 1300 hours, Acting Rear-Admiral Onslow informed the Admiralty that she was on her way and that she should arrive around 1400 hours. On her arrival off Dakar however, the French Admiral declined to accept the British communication and threatened to open fire unless she retired. A request that he should reconsider his decision was met with a blank refusal and at 1448 hours HMS Milford reported that she was returned towards HMS Hermes. Acting Rear-Admiral Onslow then reported this information to the Admiralty without delay, adding that he intended to attack at dusk.
From the first appearance of HMS Milford off Dakar the French kept the British force under aerial observation. Aircraft from HMS Hermes have been keeping Dakar under observation during daylight hours as of 0600/5. At 1700/7 a special reconnaissance was carried out by the Squadron Commander with the senior observer in view of the attack that had to be carried out soon. Shortly afterwards Admiralty approval for the dusk attack was received.
Meanwhile the French authorities seem to have thought better of their abrupt refusal to receive the Milford’s communication, and at about 1615 hours a signal was made to her to the effect that the Governor-General approved of her message being passed by W/T. A further signal seemed to indicate that Admiral Plancon was now prepared to receive it. These signals were interpreted by HMAS Australia and passed on to Acting Rear-Admiral Onslow, who decided to deal with the matter himself, and on receipt of the second message started to pass H.M. Government’s full terms in English by wireless; but in order to allow time to prepare for offensive action during the night he reduced the time limit for a reply from four hours to two. These developments he reported to the Admiralty and the Commander-in-Chief, South Atlantic at 1700 hours. Dakar W/T station acknowledged the receipt of the message at 1805 hours and the ultimatum was thus due to expire at 2005/7. This however was over an hour after sunset and the Commander-in-Chief, South Atlantic therefore suggested that the attack with torpedo planes should therefore be carried out at dawn the next day. The possibility that the Richelieu might put to sea during the night could not be overlooked and Acting Rear-Admiral Onslow deployed his ships in such a manner and closer inshore then 20 miles that the most likely routes were covered.
Disposition of Dakar during the night of 7/8 July 1940.
Air reconnaissance had shown that a definite lane leading from the Richelieu in a north-easterly direction had been purposely made through the large number of merchant ships anchored in the Outer Roads, and it seemed that a passage through the outer boom might have been made between Gorée Island and R’solue Shoal to facilitate her escape in that direction. To guard against this HMS Milford was ordered to patrol further eastward then originally intended.
At 1914/7 the Acting Rear-Admiral detached HMS Dorsetshire and HMAS Australia to take up their patrol lines, while HMS Hermes and HMS Milford in company proceeded towards the west end of the latter’s patrol line. No reply to the ultimatum had been received from the French authorities, and at 2003 hours (two minutes before it’s expiration) Acting Rear-Admiral Onslow made a polite signal asking for an answer. There was no response and at 2020 hours he decided to take offensive action. This was to consist of a depth charge attack by the Hermes’s fast twin-engine motor-boat on the Richelieu during the night, followed by a torpedo attack with aircraft at dawn. At 2050 hours HMS Hermes and HMS Milford stopped, being then 17 nautical miles due south of Cape Manuel, the motor-boat was lowered, and started on the first stage of its adventurous trip.
Depth charge attack on the Richelieu.
The motor-boat, which was manned by a volunteer crew of nine with blackened faces, commanded by Lt.Cdr. R.H. Bristowe, RN, had been painted matt black all over during the afternoon (much to the distress of the Boat Officer) and had been armed with a Vickers machine-gun. It carried four depth charges, a portable wireless set, which would prove to be much useful, and extra petrol, oil and provisions. Lt.Cdr. Bristowe’s orders were to proceed with HMS Milford to the western end of her new patrol line within 10 nautical miles of Dakar harbour and thence to go on alone into the outer harbour, passing over and around booms as he thought best. He was to drop the four depth charges under the Richelieu’s stern if he discovered her at anchor, or across her bows if he found her under way. If he failed to find her he was to report that by wireless at once. After the operation he was to endeavor to get in tow of the Milford on her patrol line by 0300/8 but if he found this impossible he was to make a rendezvous with Acting Rear-Admiral Onslow’s force at 0530/8.
At 2100/7 the crew manned the boat and proceeded with two depth charges from the Hermes to pick up two more from the Milford. A considerable swell was running and when the first depth charge was being hoisted in from the Milford it struck one of the crew of the motor-boat and struck him out. It also wrecked the port engine. Fortunately the new starboard engine which had been fitted during the afternoon, but which had not been tested due to lack of time, was running beautifully.
When HMS Milford got under way at 2145/7, she ordered to motor-boat to follow her at 12 knots if possible. The depth charges slung outboard upset the boat’s stability and it had a perilous trip. Near its point of departure from the Milford a large ship hove into sight which, at first, looked like the Richelieu but it answered the Milford’s challenge correctly and proved to be HMAS Australia.
The motor-boat then parted company and, when out of sight, stopped while the crew lifted the last depth charge into position. When this task was completed, all hands, except the two Royal Marines, which were manning the Vickers machine-gun in the bows carried out a drill with the depth charge throwers. Then they continued their was towards Dakar. Gorée Islands hove into sight after what appeared to have been hours. Actually it was now 0015/8. Shortly afterwards the boat almost collided with a destroyer that was patrolling outside the boom but remained unseen. It then proceeded slowly at only three knots until off the outer boom. The engine was then stopped and it slid over safely. It then went ahead at dead slow speed with engine muffled until it encountered a colonial sloop (must have been the Bougainville), which it at first mistook for the Richelieu and had nearly attacked. Again the motor-boat remained unseen and it now steered for the merchant ships which formed two straight lines running in a north-easterly direction from the Richelieu as she lay about three quarters of a mile due east of the inner harbour entrance. Then passing round the north-eastern end of the inner boom, it steered towards the reported position of the Richelieu, keeping close to the nearest line of merchant ships until the battleship with a merchant vessel laying almost dead astern of her, came into sight. Lt.Cdr. Bristowe steered for the merchant ship which afforded an excellent position from which to attack. As he approached her, however, he sighted a harbour launch under way just astern of the battleship, and decided to attack at once from the quarter instead of from astern. Events followed quickly. The motor-boat was challenged but before the challenge was completed Lt.Cdr. Bristowe had given orders to attack at full speed. As he approached the Richelieu he was challenged again six times, but although he could not reply the French held their fire.
The coxswain’s orders were to go alongside the stern of the battleship, to graze their port side steering towards her bow, and then, as soon as Lt.Cdr. Bristowe gave the order ‘over’ to dash cover amongst the merchant ships. At the last moment a lighter lying right aft along the battleship’s port side, and her port quarter boom with a boat made fast to it, came into sight in the light of the half moon. These the coxswain avoided most skillfully and at 0210 hours put the motor-boat alongside about 30 yards from the battleships stern over what Lt.Cdr. Bristowe hoped was the vital spot for which he was looking. The depth charges then went over. Frenchmen on the quarterdeck of the Richelieu stood looking over the side, apparently at first wondering about what was happening below. When they finally discovered they beat a hurried retreat. Meanwhile the motor-boat dashed for safety amongst the mechant ships. The complete absence of any explosions came as an anti-climax.
Although the Richelieu very quickly sent a general signal which was acknowledged quickly by the shore batteries and the ships in the harbour but no searchlights were switched on. Lt.Cdr. Bristowe decided to get away as soon as possible at full speed to take full advantage of the remaining two hours of darkness. He made a dash for the outer boom. As he approached the boom, however, an auxiliary vessel sighted the motor-boat and gave chase, and, being unable to shake of this pursuer, Lt.Cdr. Bristowe steered at full speed towards the boom with the French vessel only 50 yards behind. The motor-boat passed safely over the nets around 0300 hours but its pursuer got caught in the nets. Another patrol vessel then came into sight and took up the chase, but with steering a zig-zag course the moto-boat managed to escape. Neither French vessel had opened fire. It was already too late to make rendezvous with HMS Milford so Lt.Cdr. Bristowe set course to make rendezvous with the main force. At 0355 hours he informed HMS Hermes by wireless that he had dropped his four depth charges under the stern of the Richelieu at 0210 hours.
At about 0505 hours there were a number of explosions coming from the direction of the French battleship followed by heavy gunfire. A few minutes later a Swordfish aircraft passed overhead, flying to seaward. The Fleet Air Arm attack had taken place. As dawn broke the Richelieu came into sight, shrouded by a pall of yellow smoke, some two to three miles away. There was a heavy barrage of French AA fire and Lt.Cdr. Bristowe turned south to avoid it. A French bomber appeared overhead and for 15 minutes the motor-boat zigzagged to throw it off, but it dropped no bombs.
At 0545 hours, Lt.Cdr. Bristowe decided that he could not reach HMS Hermes so he set course for Bathurst, over 70 nautical miles away. Soon however, a signal was received from the Hermes to stop engines. About noon HMS Hermes picked up the motor-boat 13 nautical miles south of Cape Manuel, after it had been away from the ship for 15 hours.
Acting Rear-Admiral Onslow considered the conduct of Lt.Cdr. Bristowe and the remaining crew of the motor-boat in the highest degree of praiseworthy. It was just said that the depth charges did not explode in the shallow water. The venture clearly deserved better success.
The Fleet Air Arm torpedo attack on the Richelieu at dawn on 8 July 1940.
At 2300/7, Acting Rear-Admiral Onslow had ordered Lt.Cdr. Luard, the leader of 814 Squadron to carry out a torpedo attack with the greatest possible number of aircraft on the Richelieu at dawn the next day. As only three of the available pilots had previously taken off at night Lt.Cdr. Luard decided that the six crews should consist of one pilot and one observer only and that no air gunners were to be part of the crews (to their disappointment). They were to form up in two sub flights in line ahead at a height of 2000 feet, one mile ahead of the Hermes. The pistols carried by the first, second and fourth Swordfish were fitted with Duplex pistols and were set to run under the Richelieu at 38 feet. Those carried by the other three Swordfish were contact pistols set to run at 24 feet. All six were set to run at 40 knots.
The attack was only possible from one side owning to nets, shipping and depth of the water. From this direction, the north-east, the six aircraft were to attack in line ahead, and were then to return to HMS Hermes independently. At 0415/8 they all took off successfully from HMS Hermes which was then in position 14°37’N, 17°46’W about 20 nautical miles west of Cape Manuel, and at 0445 hours took departure about 2000 feet over her. At 0452 hours they sighted the Cape Verde peninsula and at 0500 hours when they were approaching Gorée Island they formed a single line ahead. At 0502 hours, Lt.Cdr. Luard went into a shallow dive from the south to keep a good background as long as possible, turning south-west at 0505 hours. Fortunately the Richelieu was swung heading south-east broadside on. He aimed his torpedo at her port side, two-thirds of the way aft from a range of 800 yards. When he had completed his attack he turned to port and made a rapid get-away to the south before turning west to rejoin HMS Hermes. The other five Swordfish dropped their torpedoes in quick succession. As Lt.Cdr. Luard made his attack a large number of AA guns opened fire and engaged all six Swordfish. The third aircraft to attack saw the two previous torpedo tracks running straight for the Richelieu and the last aircraft reported seeing four tracks proceeding towards her. Two of the aircraft saw a large column of smoke rising from the Richelieu and all the pilots considered that they had made good drops. Owning to the lack of light and the necessity of getting away quickly they found it imposible to observe the effect of their torpedoes but Lt.Cdr. Luard estimated that at least four or five of them had run correctly towards the target. He landed without mishap on board HMS Hermes at 0526/8 and all the other Swordfish did the same afterwards. One had been hit twice and another one once by AA fire but they had received only minor damage.
Conclusion
The exact amount of damage done to the Richelieu was not easy to determine. Lt.Cdr. Luard estimated that four or five of the torpedoes dropped by the six aircraft had run correctly towards their target and that HMS Dorsetshire reported hearing five distinct explosions between 0500 and 0515 hours. A pall of smoke shrouding the Richelieu was reported by one of the pilots and his observer. As the day wore on, further evidence convinced Acting Rear-Admiral Onslow that she had been disabled. Air reconnaissance reported her as being down by the stern, with large quantities of oil all around her. Of this he informed the Admiralty at 0930/8.
On the recovery of the motor-boat at noon Lt.Cdr. Bristowe reported hearing explosions while his motor-boat lay broken down off the end of the inner boom at 0230 hours, which he naturally attributed to his depth charges exploding underneath her stern. Like the Dorsetshire he had heard a number of explosions around 0510 hours and had noticed the pall of smoke reported by the airmen.
Between 0930 and 1235 hours, French aircraft made intermittent attacks on the British force. They failed to press these attacks home but after picking up the motor-boat Acting Rear-Admiral Onslow ordered his ships to the south and south-west to avoid the French aircraft whilst still keeping the Richelieu under observation from the air. Photographs showed her down by the stern and slightly listing to port.
At 1314/8 the Admiralty replied to the report of 0930 hours. ‘Good, but further attacks should be made and report made’. But it was too late. During the afternoon the Richelieu was moved to the inner harbour and berthed alongside the detached mole where she rested on the bottom at low tide. At this position she was immune from further torpedo attack. This information was passed to the Admiralty at 1710 hours, together with the opinion that the Richelieu was definitely disabled. It was suggested that the British force should proceed to Freetown to fuel. HMS Milford was detached after dark. The other ships took up night patrolling positions but just after midnight Admiralty approval to proceed to Freetown was received. HMS Hermes and HMS Dorsetshire indeed did so but HMAS Australia proceeded to the U.K. The passage to Freetown by HMS Hermes and HMS Dorsetshire was not without incident. In a sudden dense tropical storm during the middle watch on 10 July HMS Hermes collided with the armed merchant cruiser HMS Corfu (Capt. W.G. Agnew, RN) which was escorting convoy SL 39 coming from Freetown. HMS Corfu was badly holed, while HMS Hermes suffered severe damage to her bow and the forward end of her flight deck but was able to proceed under her own steam to Freetown where she arrived at 1800/10. On 11 July 1940 Temporary Acting Rear-Admiral Onslow reverted to his rank of Captain.
Damage to the Richelieu.
The Admiralty tried to find out if Richelieu was indeed ‘definitely disabled’ as Acting Rear-Admiral Onslow had claimed. Before the end of the month further reports became available. Commander Rushbrooke, the former British Naval Liaison Officer at Dakar was at Dakar in the merchant vessel Argyll during the attacks which was moored only 3 cables away from the Richelieu on her port beam. Commander Rushbrooke had had a ringside seat. On his arrival at Freetown he reported that at 0230/8 funnel explosions were heard from the direction of the Richelieu which gave the impression that the fuel supply to her furnaces was not normal. These explosions had occurred before and one must take into account that the Richelieu was brand new and not fully completed at that time let alone be fully worked up and possibly suffering from small defects which had not fully be remedied during her trial period. Following these explosions, two officers, which were on the bridge of the Argyll did not see any special activity on board the Richelieu nor in the harbour. These funnel explosions were probably the explosions heard by Lt.Cdr. Bristowe around 0230 hours.
Shortly after 0500/8, Commander Rushbrooke and the same two officers witnessed the air attack and at 0507 hours heard two dull thuds. When full daylight broke they saw a patch of oil round the Richelieu’s stern, which also appeared to be slightly down in the water. Later she lowered her main aerials but soon rehoisted them.
After pursuing all available reports, the Admiralty considered that the attack had been well conceived and executed, but that certain technical aspects required comment. The depth of the water at the time was 42 feet and the Richelieu’s draught was 26 feet 10 inches. In those conditions the setting of the torpedoes intended to run under the ship would have been about 3 feet more then the expected draught, or at most 33 feet (instead of 38 feet) and the setting of the contact torpedoes should have been at least 6 feet less the the draught, 21 feet at most (instead of 24 feet). In view of the shallowness of the water and the fact that the target was at anchor, too, the high speed setting of 40 knots should not have been used, as it was known that these torpedoes were liable to have an excessive initial dive on the 40 knot setting, and a much reduced one on the 29 knot setting.
It was also pointed out in the Admiralty that 18” torpedoes containing about 440 lbs. of T.N.T. hitting the ships side within the length of the citadel would not defeat the main protection. They would cause little flooding but would allow oil to escape into the sea. Torpedoes fitted with Duplex pistols exploding under the ships bottom would not produce damage visible from outside the ship. Broken aerials are a feature of underwater explosions and new aerials may have been hoisted to replace broken ones, but from Commander Rushbrooke’s report it would appear that not more then one torpedo could have exploded under the Richelieu’s main machinery compartments. It was considered, therefore, that she could not be regarded as out of action, but still as seaworthy and able to steam at at least three-quarters speed with all her main armament capable of use.
Actually the damage was more serious then this assessment. According to French sources which later became available, only one torpedo hit. It blew a hole 25 x 20 feet, fractured stern post, distorted the starboard inner shaft and flooded three compartments. She was rendered incapable of steaming more than half power, and repairs to restore seaworthiness took a year. But her main armament was intact which would be shown a few months later. (15)
11 Jul 1940
The troop transports and transports Aska (British, 8323 GRT, built 1939), Karanja (British, 9891 GRT, built 1931) and Kenya (British, 9890 GRT, built 1930), Orion (British, 23371 GRT, built 1935) and Reina del Pacifico (British, 17702 GRT, built 1931) and their escort, the heavy cruiser HMS Cornwall (Capt. C.F. Hammill, RN), were joined by the heavy cruiser HMAS Australia (Capt. R.R. Stewart, RN). (19)
15 Jul 1940
The troop transports and transports Aska (British, 8323 GRT, built 1939), Karanja (British, 9891 GRT, built 1931) and Kenya (British, 9890 GRT, built 1930), Orion (British, 23371 GRT, built 1935) and Reina del Pacifico (British, 17702 GRT, built 1931) and their escorts, the heavy cruisers HMS Cornwall (Capt. C.F. Hammill, RN) and HMAS Australia (Capt. R.R. Stewart, RN) were joined by a local A/S escort made up of the destroyers HMS Havelock (Capt. E.B.K. Stevens, DSC, RN), HMS Harvester (Lt.Cdr. M. Thornton, RN), HMCS St. Laurent (Lt. H.S. Rayner, RCN), HMS Walker (Lt.Cdr. A.A. Tait, RN) and HMS Westcott (Lt.Cdr. W.F.R. Segrave, RN).
The convoy arrived at Liverpool on the 16th minus HMAS Australia which had gone to the Clyde. (19)
25 Jul 1940
The heavy cruisers HMS Devonshire (Capt. J.M. Mansfield, DSC, RN, flying the flag of Vice-Admiral J.H.D. Cunningham, CB, MVO, RN), HMS Sussex (Capt. R.V. Symonds-Tayler, DSC, RN) and HMAS Australia (Capt. R.R. Stewart, RN) conducted exercises at Scapa Flow. (20)
27 Jul 1940
In the early evening the battlecruisers HMS Renown (Capt. C.E.B. Simeon, RN, flying the flag of Vice-Admiral W.J. Whitworth, CB, DSO, RN), HMS Repulse (Capt. W.G. Tennant, CB, MVO, RN), heavy cruisers HMS Devonshire (Capt. J.M. Mansfield, DSC, RN, flying the flag of Vice-Admiral J.H.D. Cunningham, CB, MVO, RN), HMS York (Capt. R.H. Portal, DSC, RN), HMAS Australia (Capt. R.R. Stewart, RN), light cruisers HMS Sheffield (Capt. C.A.A. Larcom, RN) escorted by destroyers HMS Ashanti (Cdr. W.G. Davis, RN), HMS Mashona (Cdr. W.H. Selby, RN), HMS Punjabi (Cdr. J.T. Lean, DSO, RN), HMS Tartar (Capt. C. Caslon, RN), HMS Firedrake (Lt.Cdr. S.H. Norris, DSC, RN), HMS Fortune (Cdr. E.A. Gibbs, DSO, RN), HMS Achates (Cdr. R.J. Gardner, RN), HMS Anthony (Lt.Cdr. N.J.V. Thew, RN) and HMS Arrow (Cdr. H.W. Williams, RN) sailed from Scapa Flow in response to reports that German battlecruiser Gneisenau was proceeding from Trondheim back to Germany but in fact this German battlecruiser was at that time already nearly back in Germany having left undetected earlier and the ships reported were in fact only merchant vessels.
At 0400/28, the destroyers HMS Maori (Cdr. H.T. Armstrong, RN) and HMS Zulu (Cdr. J.S. Crawford, RN) joined the Force.
At 1800/28, HMS Devonshire was detached from the force to give cover to a convoy en-route from the Clyde to Iceland.
The force returned to Scapa Flow around 0630/29.
27 Jul 1940
The heavy cruisers HMS Devonshire (Capt. J.M. Mansfield, DSC, RN, flying the flag of Vice-Admiral J.H.D. Cunningham, CB, MVO, RN), HMS Sussex (Capt. R.V. Symonds-Tayler, DSC, RN) and HMAS Australia (Capt. R.R. Stewart, RN) conducted exercises at Scapa Flow.
On completion of the exercises HMS Sussex set course for Greenock while the other two cruisers returned to Scapa Flow. (21)
3 Aug 1940
HMAS Australia (Capt. R.R. Stewart, RN) conducted gunnery exercises at Scapa Flow. (22)
8 Aug 1940
HMAS Australia (Capt. R.R. Stewart, RN) and HMS Norfolk (Capt. A.J.L. Phillips, RN) conducted exercises off Scapa Flow. (23)
9 Aug 1940
HMAS Australia (Capt. R.R. Stewart, RN) and HMS Norfolk (Capt. A.J.L. Phillips, RN) conducted exercises off Scapa Flow. (23)
11 Aug 1940
At 2250A/11, HMAS Australia (Capt. R.R. Stewart, RN) and HMS Norfolk (Capt. A.J.L. Phillips, RN) departed Scapa Flow to patrol north of the Faeroer Islands to search for enemy shipping. (24)
16 Aug 1940
Around 2115A/16, HMAS Australia (Capt. R.R. Stewart, RN) and HMS Norfolk (Capt. A.J.L. Phillips, RN) returned to Scapa Flow from patrol. They had been ordered to discontinue their patrol at 0800A/16 as they were being relieved by HMS Bonaventure (Capt. H.J. Egerton, RN) and HMS Naiad (Capt. M.H.A. Kelsey, DSC, RN, flying the flag of Rear-Admiral E.L.S. King, CB, MVO, RN). (24)
22 Aug 1940
HMAS Australia (Capt. R.R. Stewart, RN) and HMS Norfolk (Capt. A.J.L. Phillips, RN) conducted gunnery exercises at Scapa Flow. (23)
23 Aug 1940
Operation DR.
Anti shipping sweep / search for enemy trawlers of Bear Island and Northern Norway.
Around 1540A/23, the heavy cruisers HMAS Australia (Capt. R.R. Stewart, RN) and HMS Norfolk (Capt. A.J.L. Phillips, RN) departed Scapa Flow for Operation DR. Course was set to the northwards. Heavy weather was encountered for the next two days.
Around 0600A/26, the cruisers arrived off Bear Island and searched the area but there was no sign of the enemy.
Around 0830A/26, the proceeded to the north coast of Norway.
At 1805A/26, HMS Norfolk catapulted her aircraft for a search ahead. It returned around 1955A/26 having sighted only a very small fishing vessel.
At 2025A/26, HMAS Australia then catapulted her aircraft to search the Tromso area and on completion also to bomb military objectives in that harbour. Visibility was however not good and she returned around 2200A/26 after having jettisoned her bombs.
The cruisers then retired to the West-North-West.
At 0500A/27, course was altered to the South-West.
At 1355A/27, the Finnish ship Ericus (2200 GRT, built 1919) was halted by HMS Norfolk about 350 miles west of Tromso. A boarding party was placed on board the ship and she was ordered to proceed to Kirkwall for inspection.
Around 0700A/29, the cruisers arrived at Scapa Flow. (25)
28 Aug 1940
Operation Menace, the attack on Dakar, 23-24 September 1940.
Part I, initial movements of the Allied naval forces
The actual attack on Dakar took place on 23 and 24 September 1940 but preparations off course started earlier.
28 August 1940.
The battleship HMS Barham (Capt G.C. Cooke, RN) departed Scapa Flow for Gibraltar. She was escorted by HMS Inglefield (Capt. P. Todd, DSO, RN), HMS Eclipse (Lt.Cdr. I.T. Clark, RN) and HMS Escapade (Cdr. H.R. Graham, DSO, RN). They were joined at sea by HMS Echo (Cdr. S.H.K. Spurgeon, DSO, RAN) which sailed later.
29 August 1940.
The transports Anadyr (British, 5321 GRT, built 1930), Casamance (French, 5817 GRT, built 1921), Fort Lamy (British, 5242 GRT, built 1919), Nevada (French, 5693 GRT, built 1918) and the tanker Ocean Coast (British, 1173 GRT, built 1935) split off in position 54’N, 18’W from convoy OB 204 (which had departed from the British east coast on 26/27 August) to proceed to Dakar. When they split off their escort towards Dakar were the Free French sloop Savorgnan de Brazza and the Free French A/S trawler President Houduce.
31 August 1940.
On this day three groups of ships departed from British ports.
From Scapa Flow the following ships sailed; troopships Ettrick (British, 11279 GRT, built 1938), Kenya (British, 9890 GRT, built 1938) and Sobieski (Polish, 11030 GRT, built 1939). These were escorted by the light cruiser HMS Fiji (Capt. W.G. Benn, RN) and the destroyers HMS Ambuscade (Lt.Cdr. R.A. Fell, RN), HMS Antelope (Lt.Cdr. R.T. White, DSO, RN), HMS Volunteer (Lt.Cdr. N. Lanyon, RN) and HMS Wanderer.
From Liverpool the following ships sailed; troopships Karanja (British, 9891 GRT, built 1931), Pennland (Dutch, 16082 GRT, built 1922) and Westernland (Dutch, 16313 GRT, built 1918) and the transport Belgravian (British, 3136 GRT, built 1937). These were escorted by the destroyers HMS Mackay (Cdr. G.H. Stokes, RN), HMS Vanoc (Lt.Cdr. J.G.W. Deneys, RN) and the corvette HMS Erica (Lt.Cdr. W.C. Riley, RNR).
From the Clyde the following warships sailed; HMS Devonshire (Capt. J.M. Mansfield, DSC, RN, flying the flag of Vice-Admiral J.H.D. Cunningham, CB, MVO, RN, the Commander of the upcoming operation), the destroyer HMS Harvester (Lt.Cdr. M. Thornton, RN) and the French sloops (minesweepers) Commandant Dominé and Commandant Duboc.
All these ships were expected to arrive at Freetown on 13 September where they would be joined by ships coming from Gibraltar and ships that were based at Freetown.
1 September 1940.
The outward passage was initially uneventful and Vice-Admiral Cunningham’s group joined up with the group that came from Liverpool at 0600/1 (zone -1). But that evening misfortune occurred when HMS Fiji was torpedoed by the German submarine U-32 when about 40 nautical miles north-northeast of Rockall in position 58°10’N, 12°55’W. She then returned to the Clyde. Her convoy then continued on escorted by the four destroyers until they met Vice-Admiral Cunningham’s force at 0900/2. The convoy was now known as ‘Convoy MP’. The place of HMS Fiji in the operation was subsequently taken over by the Australian heavy cruiser HMAS Australia (Capt. R.R. Stewart, RN).
2 September 1940.
HMS Barham (Capt G.C. Cooke, RN), HMS Inglefield (Capt. P. Todd, DSO, RN), HMS Echo (Cdr. S.H.K. Spurgeon, DSO, RAN), HMS Eclipse (Lt.Cdr. I.T. Clark, RN) and HMS Escapade (Cdr. H.R. Graham, DSO, RN) arrived at Gibraltar from Scapa Flow.
The destroyer escort for the MP convoy parted company at 1400/2 and was ordered to join HMS Revenge (Capt. E.R. Archer, RN) which was escorting Canadian troop convoy TC 7 to the Clyde.
Passage of the MP convoy southwards was relatively uneventful except for some submarine alarms and also some engine defects during which speed had to be reduced a bit.
6 September 1940.
HMS Barham (Capt G.C. Cooke, RN), HMS Inglefield (Capt. P. Todd, DSO, RN), HMS Echo (Cdr. S.H.K. Spurgeon, DSO, RAN), HMS Eclipse (Lt.Cdr. I.T. Clark, RN) and HMS Escapade (Cdr. H.R. Graham, DSO, RN) departed Gibraltar for Freetown in the evening but now accompanied by ships from Force H; the aircraft carrier HMS Ark Royal (Capt. C.S. Holland, RN), battleship HMS Resolution (Capt. O. Bevir, RN) and the destroyers HMS Faulknor (Capt. A.F. de Salis, RN), HMS Forester (Lt.Cdr. E.B. Tancock, RN), HMS Foresight (Lt.Cdr. G.T. Lambert, RN), HMS Fortune (Cdr. E.A. Gibbs, DSO, RN), HMS Fury (Lt.Cdr. T.C. Robinson, RN) and HMS Greyhound (Cdr. W.R. Marshall A'Deane, DSO, DSC, RN).
After passing between Madeira and the Canary Islands on the 8th this force, which constituted the major part of the warships involved in the upcoming operation, turned south at 0900/9. By 0800/11 the force was in position 20°18’N, 19°54’W about 1000 nautical miles south of Casablanca.
Vice-Admiral Cunningham in HMS Devonshire was then in position 16°50’N, 22°00’W, about 240 nautical miles to the south-west ward of the main force. He had just sighted the MS convoy (the five transports), escorted by Savorgnan de Brazza, some 300 nautical miles north-west of Dakar. Vice-Admiral Cunningham ordered the convoy Commodore to take the convoy into Freetown.
A signal was then received that Vichy-French warships had passed the Straits of Gibraltar and had turned south. Three light cruisers and three large destroyers were reported to have made up this force. It was not known where they were bound for but possibly Casablanca. Their appearance seriously affected the whole operation.
The Vichy-French cruiser force.
At 1850 hours on 9 September 1940, H.M. Consul General, Tangier, had informed Admiral Sir Dudley North, Flag Officer commanding North Atlantic, and repeated to the Foreign Office, that a French Squadron in the Mediterranean might try to pass through the Strait of Gibraltar within the next 72 hours. This report received confirmation the next day when the French Admiralty requested the British Naval Attaché, Madrid, to advise the Naval authorities at Gibraltar of the departure from Toulon on the 9th of three light cruisers of the Georges Leygues class and three large destroyers of the Fantasque class. They would pass through the Straits of Gibraltar on the morning of the 11th, no mention was made of their destination. This information reached the Admiralty at 2350/10 and Admiral North at 0008/11.
The Government policy with regards to Vichy warships at that time had been defined in a signal sent to all Commanders-in-Chief and Flag Officers commanding shortly after the attack on the battleship Richelieu at Dakar in July. This message, after stressing the importance of terminating the state of tension then existing between the French navy and ourselves, stated that His Majesty’s Government had decided to take no further action in regard to French ships in French colonial and North African ports, and went on to say ‘ We shall, of course, however, reserve the right to take action in regard to French warships proceeding to enemy controlled ports.’ Recent intelligence had indicated that it was highly improbable that any warships would make for the German occupied Biscay ports, and a Admiral North had not been informed of the Dakar project, he saw no reason to take any steps to interfere with the movements of the French warships.
Early on September 11th, the destroyers HMS Hotspur (Cdr. H.F.H. Layman, DSO, RN), HMS Griffin (Lt.Cdr. J. Lee-Barber, DSO, RN) and HMS Encounter (Lt.Cdr. E.V.St J. Morgan, RN), which were hunting a reported submarine to the eastward of the Strait of Gibraltar. At 0445 they sighted six French warships steaming fast to the westward and reported them. At 0617/11, Admiral North informed the Admiralty that the lights of six ships, probably warships, steering west at high speed, had been reported by HMS Hotspur at 0515 hours in position 36°03'N, 04°14'W (60 miles east of Gibraltar) and that he had ordered the destroyers to take no further action. At 0711 hours he added that he intended to keep in touch with this force by air and that he would report probable destination.
Meanwhile, Vice-Admiral Somerville, commanding Force H, on receiving the signal from HMS Hotspur had brought HMS Renown (Capt C.E.B. Simeon, RN) and the only destroyer available, HMS Vidette (Lt. E.N. Walmsley, RN), to one hour’s notice for full speed. He did not put to sea because he too, believed the Government’s policy was to avoid interference with French warships as stated in the signal of 12 July.
The French squadron passed Gibraltar to the westward shortly after 0830/11 having given it’s composition in reply to the demand as the light cruisers Georges Leygues, Gloire, Montcalm and the destroyers Le Malin, Le Fantasque and L’Audacieux. This information reached the Admiralty at 1043/11 in a signal sent by Admiral North at 0917/11.
No further action was taken during the forenoon and the situation at noon was that the French Squadron was in position 35°00'N, 06°40'W (about 75 nautical miles south-south-west of Gibraltar) steering 213° at 20 knots. They were being observed by reconnaissance aircraft from RAF 200 Sq. based at Gibraltar. The Admiralty and Air Ministery were being kept informed.
Here was a complication that might well effect the Dakar operation should Dakar be the destination of the French Squadron. It does not seem to have been viewed in this light at the Admiralty, until the 1st Sea Lord himself, who was attending a meeting in the Cabinet Offices that forenoon, telephoned orders for HMS Renown and all available destroyers to raise steam for full speed. A signal to this end was then sent to Admiral Somerville at 1239/11. This was over twelve hours after the original message from Madrid had reached the Admiralty.
Movements of Force H, 11 to 14 September 1940.
The noon position and their course indicated Casablanca as the most probable destination of the French Squadron and at 1347/11 the Admiralty ordered Admiral Somerville to sea to intercept them. Further instructions followed at 1429 hours. These was no objection with them going to Casablanca but they could not be allowed to proceed to Dakar. Shortly after 1600 hours aircraft reported that the French Squadron had entered Casablanca.
Admiral Somerville left Gibraltar at 1630 hours in the Renown escorted by the destroyers HMS Griffin, HMS Velox (Cdr.(Retd.) J.C. Colvill, RN) and HMS Vidette. At 2006 hours he was ordered by the Admiralty to establish a patrol to intercept the French Squadron if they sailed southwards from Casablanca. In the early morning hours of the 12th at 0235 hours, HMS Vidette, encountered a four-funneled French destroyer (this was Milan) in position 33°55'N, 08°31'W (west-north-west of Casablanca). She sighted a darkened ship some 6 miles on her port bow. She challenged but got no reply. A searchlight was turned on and revealed a four-funneled French destroyer. Vidette then fired two salvoes and the French destroyer, ignoring a signal to stop, then retired at high speed behind a smoke screen. Shortly afterwards Vidette was recalled from her patrol and ordered to rejoin Renown.
The French squadron was still at Casablanca at 0923/12 according to an aircraft report. At 0934 hours, Admiral Somerville turned north to meet three more destroyers coming from Gibraltar. These were; HMS Hotspur, HMS Encounter and HMS Wishart (Cdr. E.T. Cooper, RN). These were met at 1300 hours, in position 33°05'N, 09°40'W. They then turned to the south-west again. HMS Hotspur was stationed to patrol closer inshore.
At 0405/13, HMS Renown sighted three darkened ships in position 31°25'N, 11°30'W. These were thought to be the three Fantasque class destroyers. They were steaming north at 20 knots and were allowed to proceed. Admiral Somerville continued his patrol but fuel began to become an issue. The weather was to rough for the destroyers to fill up at sea and two of them will have to be detached that evening to refuel. This would much reduce the chance to intercept the French Squadron and Admiral Somerville informed the Admiralty of this. Adding tat he considered a patrol should be established off Dakar. His signal crossed one from the Admiralty stating that according to French sources the Squadron would remain only shortly at Casablanca before proceeding to Dakar.
This forecast proved correct. At 1530/13 aircraft reported that the light cruisers were no longer at Casablanca. Due to his fuel situation Admiral Somerville signalled that he would leave his patrol area for Gibraltar at 2000 hours that evening. But at 1916 hours the Admiralty ordered him to steer for Dakar at 18 knots. This was being done but Vidette and Velox were detached to Gibraltar to fuel.
At 2335/19 the Admiralty cancelled the order so at 0121/14, Renown and the four remaining destroyers set course to return to Gibraltar which they reached at 2000/14.
Patrol of Dakar by Vice-Admiral Cunningham’s forces.
To return to Vice-Admiral Cunningham. He knew that the French Squadron had left the Mediterranean at 1542/11 and that Vice-Admiral Somerville had been ordered to intercept them. Within a couple of hours he learnt that the French Squadron had entered Casablanca. The next forenoon (0947/12) he was informed that Vice-Admiral Somerville had been ordered to establish a patrol and to prevent them from proceeding to the south.
Vice-Admiral Cunningham’s forces were then approaching Freetown. At 1145/12, an aircraft from HMS Ark Royal approached HMS Devonshire to report that the Ark Royal would be in position 13°59'N, 20°08'W at 1300 hours and expected to arrive at Freetown with HMS Barham, HMS Resolution and ten destroyers at 0700/14. The next morning, 13 September, at 0820 hours an aircraft again closed HMS Devonshire. An order was then passed that four destroyers were to be detached to join HMS Devonshire and the convoy before dark. At 1008 hours HMS Devonshire left the convoy to close Ark Royal’s force, sighing it an hour later 20 nautical miles to the north-north-east. Devonshire remained in visual touch until 1700 hours when course was set to return to the convoy taking the destroyers HMS Faulknor, HMS Foresight, HMS Forester and HMS Fury with him.
Shortly after 1800/13, Vice-Admiral Cunningham was informed that the French cruisers had left Casablanca and that Vice-Admiral Somerville in the Renown had been ordered to proceed to the Dakar area.
Shortly after midnight 13th/14th, a signal came in from the Admiralty ordering Vice-Admiral Cunningham to establish a patrol immediately to prevent the French cruisers from reaching Dakar, employing every available ship. The same orders went to the Commander-in-Chief, South Atlantic. HMS Cumberland (Capt. G.H.E. Russell, RN), which had departed Freetown for the U.K. at 2000/13 was placed under Vice-Admiral Cunninham’s orders and HMS Cornwall (Capt. C.F. Hammill, RN), on her way from Simonstown to Freetown, was ordered to increase speed.
The original operation was now swallowed up in the task of intercepting the French ships. Time had become a factor of the utmost importance and without waiting for daylight, Vice-Admiral Cunningham and General Irwin, went over to see General de Gaulle on board the Westernland at 0120/14, who immediately roused Capitaine Thierry d’Argenlieu and armed him with a letter forbidding any French warship to proceed to Dakar. Within twenty minutes they were on their way back to the Dorsetshire with Capt. D’Argenlieu and the following measures were taken;
HMAS Australia which was coming from the Clyde to take the place of HMS Fiji was ordered to close HMS Devonshire, which would be steering for Dakar, then 400 nautical miles distant.
The Ark Royal was ordered to sent her six remaining destroyers; HMS Inglefield, HMS Greyhoud, HMS Fortune, HMS Echo, HMS Eclipse and HMS Escapade to Freetown to fuel and herself proceed with despatch to position 16’N, 17°40’W.
HMS Barham and HMS Resolution and the other four destroyers; HMS Faulknor, HMS Foresight, HMS Forester and HMS Fury, were to fuel at Freetown and leave for the Dakar area as soon as fuelling had been completed.
Convoy’s MP and MS were to proceed to Freetown with their French escorts.
HMS Devonshire meanwhile had altered course to the northward for Dakar at 0230/14, speed 18 knots. It was not possible to transfer General Irwin and his staff and the General thus found himself speeding northward with the orders for the landing while his troops went on to Freetown. HMAS Australia joined HMS Devonshire at 0300 hours and half an hour later the cruisers had worked up to 27 knots. HMS Cumberland and HMS Ark Royal were approaching from the south.
At 1000/14, HMS Devonshire and HMAS Australia were 200 nautical miles south of Dakar in position 11°23’N, 17°42’W, with HMS Cumberland and HMS Ark Royal respectively 45 and 100 miles astern of them. Aircraft from Ark Royal carried out reconnaissance ahead of Devonshire and Australia from this time onwards. Also flights over Dakar were carried out. That afternoon a large amount of shipping was reported in the harbour and also a submarine was sighted on the surface at 1533 in position 260°, Cape Manuel, 10 nautical miles, steering 260°. It could not be seen if the French cruisers had arrived at Dakar.
At 1900/14 the Devonshire and Australia, reduced to 17 knots on reaching the latitude of Dakar and then turned back to join Cumberland. She was met at 1940 hours and then the cruisers turned northward once more. They established a patrol line at 2320 hours, 4 miles apart, courses 270°-090°, between the meridians 17°30’W and 18°00W in latitude 16°00’N.
But they were too late. Just before midnight 14/15 September a message was received from the Admiralty that a Vichy report had announced that the cruisers had arrived safely at Dakar. The Vichy cruisers actually had arrived at Dakar at 1600/14.
Dawn air reconnaissance on the 15th failed to spot the cruisers at Dakar and by this time the three heavy cruisers were running low on fuel and at 1001 hours Vice-Admiral Cunningham sent a signal to the Admiralty to ask if he should withdraw to Freetown to refuel and prepare for operation ‘Menace’, leaving HMS Cumberland to patrol off Dakar, or to report the patrol about 0001/17 and accept indefinite delay of operation ‘Menace’. He recommended the first alternative.
At 1027 hours, however, the Ark Royal signalled that the cruisers had been located at Dakar. All ships then set course for Freetown to refuel except HMS Cumberland which was left to patrol off Dakar. The next day, the 16th, she met the Vichy French merchant vessel Poitiers (4185 GRT, built 1921) 100 miles south of Dakar and fired a salvo across her bows. Her crew then set her on fire and abandoned her. She was then sunk by gunfire from the cruiser.
Cancellation of Operation ‘Menace’.
By the evening of 15 September, Vice-Admiral Cunningham’s forces were all making once again for Freetown. A destroyer had been sent on ahead with the operation orders and two staff officers. The escape of the French cruisers, however, called for a drastic re-consideration of the original plan.
In London the War Cabinet met at 1000/16 to consider the new situation. The Prime Minister pointed out that in his view the operation had to be cancelled and at 1346/16, Vice-Admiral Cunningham received a signal that the landing of troops at Dakar in ‘Operation Menace’ was impracticable. It was proposed that General de Gaulle’s force should land at Duala with the object of consolidating his influence in the Cameroons, Equatorial Africa and the Chads. The British portion of the force was to remain at Freetown. Unless de Gaulle had any strong objection, this plan had to be put into operation forthwith.
Vice-Admiral Cunningham and General Irwin were reluctant to take this view. They replied at 1642 hours suggesting that if HMS Cornwall and HMS Cumberland would be added to their force they should be enough to deal with the French cruisers. The answer came at 2245 hours; they were left a liberty to consider the whole situation and discuss it with de Gaulle, whom they informed of the new proposal.
HMS Devonshire arrived at Freetown at 0630/17. The Vice-Admiral and the General proceeded to consult with General de Gaulle. The latter was much perturbed at the possible cancellation of the original plan and that very morning he sent a telegram to the Prime Minister desiring ‘to insist’ that the plan should be carried out and emphasising the vital importance to the Allies of gaining control of the basis in French Africa. He now urged on the Force Commanders that if the unopposed landing failed the Free French troops should attempt a landing at Rufisque. They decided to support this proposal and shortly after midnight they forwarded their recommendations to the Admiralty for consideration. The reply from H.M. Government came at 1159/18; ‘ We cannot judge relative advantages of alternative schemes from here. We give you full authority to go ahead and do what you think is best, in order to give effect to the original purpose of the expedition. Keep us informed.’
With a free hand such as is seldom enjoyed in these days of rapid communication by the leaders of an overseas expedition in unbroken touch with their Government, the Joint Commanders decided to proceed with ‘Menace’ on 22 September.
The French cruisers again, 19 to 26 September 1940.
The naval and military staffs were working hard at preparations for the landing when the next day, 19 September, French cruiser appeared again on the scene. HMAS Australia, which had left Freetown the day before to relieve HMS Cumberland on patrol, at 1019/19 in position 10°23’N, 16°54’W, north-west of Freetown, sighted the three La Galissonniere class cruisers 14 nautical miles off steering south-east. Once more the naval forces had to raise steam with all despatch. HMAS Australia and HMS Cumberland were already had on the trial. General de Gaulle again arranged for Captain Thierry d’Angenlieu to carry a message requisting the French cruisers to return to Casablanca.
General Irwin and his staff, with Admiral Cunningham’s Chief Staff Officer, Capt. P.N. Walter, were transferred to the troopship Karanja, and at 1400 hours HMS Devonshire left Freetown at 27 knots with the destroyers HMS Inglefield, HMS Greyhound and HMS Escapade. It was hoped to sight the French cruisers before dark. HMS Barham with HMS Fortune and HMS Fury made for a position to the south-east of the French. HMS Ark Royal, which had engine trouble to repair first, was to follow at 0500/20. A message came from the Admiralty that the French cruisers were not to return to Dakar.
The French cruisers turned back to the north-west and increased speed to 29 knots. Torrential rain was falling, hiding everything from view, but HMAS Australia and HMS Cumberland were able to keep in touch and at 1830/19 HMAS Australia managed to pass directions not to return to Dakar. She was then in position 09°02’N, 15°14’W, just keeping in touch while doing 31 knots. Then the French cruiser Gloire broke down and separated from the other two cruisers. The British then lost touch with these two cruisers. HMS Devonshire meanwhile was steaming to a position to cut off the way to Conakri in French Guinea. HMS Cumberland then regained touch with the two French cruisers (Georges Leygues (flag) and Montcalm) who were speeding north while HMAS Australia picked up the Gloire which was steering eastwards at reduced speed. Night had fallen when HMS Devonshire with HMS Inglefield still in company showed up. HMS Inglefield took Captain d’Argenlieu on board of the Gloire. The French captain refused to accede to his representations, but when Vice-Admiral Cunningham intervened he agreed to proceed to Casablanca. HMAS Australia escorted her until 21 September, leaving her then, on Admiralty instructions, to proceed unescorted.
HMS Cumberland meanwhile managed to keep in touch with the other two cruisers. Her attempts at parley failed, but the French signalled that ‘under no circumstances shall my cruisers pass under German control’. HMS Cumberland followed them all the way to Dakar but was unable to prevent them from entering, which they did at 0550/20.
Meanwhile, on 18 September, far away to the southward, a fourth French cruiser had been sighted escorting a naval tanker. This was the Primaguet escorting the Tarn. HMS Cornwall had departed Freetown on 16 September to meet HMS Delhi (Capt. A.S. Russell, RN) and HMS Dragon (Capt. R.J. Shaw, MBE, RN) off Cape Formosa (south Nigeria). They swept towards Fernando Po [now called Bioko] to intercept any French forces bound for the Cameroons with instructions to direct them back to Casablanca. On 17 September at 2000 hours information came that a French warship and an oiler had been in position 07°25’N, 14°40’W at 1500/15. The Cornwall proceeded to search and on the 18th her aircraft picked up the cruiser Primaguet and oiler Tarn 35 nautical miles ahead. The Commander-in-Chief, South Atlantic ordered her to be shadowed.
Her lights were sighted at 2142/18 but disappeared at 0425/19. When dawn broke the horizon was clear. She was picked up again at 1009/19. A boarding party from HMS Delhi went on board. The Captain, after making a formal protest, asked to be allowed to remain stopped until 1700/19 after which she proceeded, first westward, then northward, being shadowed by HMS Cornwall and HMS Delhi until 1830/21 when HMS Delhi had to proceed to Freetown to refuel. HMS Cornwall shadowed her alone untul the 23rd when she was rejoined by HMS Delhi. For two days they followed her close, still steaming north. On the 25th Primaguet fuelled from the Tarn. They were then off the Cape Verde Island. The next day the Admiralty approved the cruisers to return to Freetown. The Primaguet gave a promise that she would proceed to Casablanca with the Tarn where they indeed arrived in due course. The British cruisers then turned south. They had kept the Primaguet and Tarn in sight for five days. Thus two out of the four cruisers in the area had been diverted to Casablanca without the use of force. (15)
31 Aug 1940
Convoy MP.
Convoy MP was part of the upcoming Dakar operation. The convoy departed Scapa Flow on 31 August 1940 for Freetown.
The convoy was made up of the troopships Ettrick (11279 GRT, built 1938), Kenya (9890 GRT, built 1930) and Sobieski (11030 GRT, built 1939). Escort was provided by the light cruiser HMS Fiji (Capt. W.G. Benn, RN) and the destroyers HMS Ambuscade (Lt.Cdr. R.A. Fell, RN), HMS Antelope (Lt.Cdr. R.T. White, DSO, RN), HMS Volunteer (Lt.Cdr. N. Lanyon, RN) and HMS Wanderer (Cdr. J.H. Ruck-Keene, DSC, RN). The next day the convoy was joined to the north of Ireland by the heavy cruiser HMS Devonshire (Capt. J.M. Mansfield, DSC, RN), the destroyer HMS Harvester (Lt.Cdr. M. Thornton, RN) and the Free French sloops (minesweepers) Commandant Dominé and Commandant Duboc which came from the Clyde.
At 1709/1 (zone -1), HMS Fiji was hit by a torpedo fired by the German submarine U-32 when about 40 nautical miles north-northeast of Rockall in position 58°10’N, 12°55’W. She then left the convoy 10 minutes later and set course for the Clyde. She was joined by the destroyer HMS Antelope soon afterwards. The forward boiler room and five adjacent were flooded and five ratings had been killed.
Around 2030 hours HMS Fiji and HMS Antelope were joined by the destroyers HMS Ashanti (Cdr. W.G. Davis, RN), HMS Bedouin (Cdr. J.A. McCoy, DSO, RN) and HMS Volunteer. Fiji and her escort arrived at the Clyde around 1700/3. After inspection it was estimated repairs would take three to four months.
At 1930 hours on 1 September 1940 the destroyers HMS Tartar (Capt. C. Caslon, RN), HMS Punjabi (Cdr. J.T. Lean, DSO, RN), HMS Jaguar (Lt.Cdr. J.F.W. Hine, RN) and HMS Javelin (Cdr. A.F. Pugsley, RN) departed Scapa Flow to join HMS Fiji. Later they joined convoy's.
All destroyers that had been with the convoy parted company with the convoy on September 1st except for HMS Harvester which parted company with the convoy on the 3rd.
The place of HMS Fiji in the upcoming Dakar operation was taken by HMAS Australia (Capt. R.R. Stewart, RN) which departed the Clyde for Freetown on 6 September.
The convoy, escorted by the two Free French sloops (minesweepers), arrived at Freetown on 14 September 1940.
23 Sep 1940
Operations Menace, the attack on Dakar, 23-24 September 1940.
Part II, the actual attack.
General intentions.
By 20 September the attack force was assembled at Freetown. It was made up of the following warships; battleships HMS Barham (Capt G.C. Cooke, RN, flying the flag of Vice-Admiral J.H.D. Cunningham, CB, MVO, RN), HMS Resolution (Capt. O. Bevir, RN), aircraft carrier HMS Ark Royal (Capt. C.S. Holland, RN), heavy cruisers HMS Cumberland (Capt. G.H.E. Russell, RN), HMS Cornwall (Capt. C.F. Hammill, RN) (detached), HMAS Australia (Capt. R.R. Stewart, RN), HMS Devonshire (Capt. J.M. Mansfield, DSC, RN), light cruisers HMS Delhi (Capt. A.S. Russell, RN) (detached) and HMS Dragon (Capt. R.J. Shaw, MBE, RN), destroyers HMS Echo (Cdr. S.H.K. Spurgeon, DSO, RAN), HMS Eclipse (Lt.Cdr. I.T. Clark, RN) and HMS Escapade (Cdr. H.R. Graham, DSO, RN), HMS Faulknor (Capt. A.F. de Salis, RN), HMS Forester (Lt.Cdr. E.B. Tancock, RN), HMS Foresight (Lt.Cdr. G.T. Lambert, RN), HMS Fortune (Cdr. E.A. Gibbs, DSO, RN), HMS Fury (Lt.Cdr. T.C. Robinson, RN) and HMS Greyhound (Cdr. W.R. Marshall A'Deane, DSO, DSC, RN) and HMS Inglefield (Capt. P. Todd, DSO, RN), sloops HMS Bridgewater (A/Cdr.(Retd.) H.F.G. Leftwich, RN), HMS Milford, Savorgnan de Brazza (Free French, Lt.Cdr. A. Roux), Commandant Dominé (Free French, Lt. J.P.Y. de la Porte des Vaux) and Commandant Duboc (Free French, Lt.Cdr. M.A.F. Bourgine) , auxiliary patrol vessel Président Houduce (Free French, Lt. L. Deschatres) and the net tender HMS Quannet (T/Lt. C.E. Richardson, RNR).
Vice-Admiral Cunningham then transferred his flag from HMS Devonshire to HMS Barham accompanied by General Irwin and his staff. All was ready for the passage to Dakar but at General de Gaulle request the opening day was deferred to 23 September.
The task force would arrive off Dakar at dawn on 23 September. It would patrol in groups while French airmen would take off in aircraft from HMS Ark Royal and land at Ouakam airfield to endeavour to win over the French air force. British aircraft meanwhile would drop proclamations and announcements of the arrival of de Gaulle on the town of Dakar and the forts.
An hour later, Captain d’Argenlieu would land in a motor boat with a communication from General de Gaulle to the Governor requiring a reply within two hours. The Free French sloops carrying de Gaulle’s troops would approach and, if necessary, force the anti-submarine boom. Meanwhile Vice-Admiral Cunningham’s Force with fighter and anti-submarine patrols would lie off the harbour as follows.
Group A) The two French troopships, Pennland and Westernland, ten miles to the south of Cape Manuel.
Group B) HMS Barham, HMS Resolution and the cruisers, two miles to the seaward of group A.
Group C) The four British troopships, two miles to the seaward of Group B.
Group D) The other transports, six miles to the seaward of Group C.
Group E) HMS Ark Royal further to the seaward.
If there appeared to be a good chance of a favourable reception the Free French sloops would land their troops at one of the wharves while the French troopships made for the harbour.
It was hoped that the forts would be reluctant to fire on French ships and as soon as de Gaulle was firmly established the British Force would withdraw. If the forts offered serious resistance General de Gaulle would call on Vice-Admiral Cunningham to quell it with a minimum of force. If it was clear that an organised and continuous resistance would be offered and local authorities refused to parley, the Free French ships would withdraw out of range while the British force broke down resistance and landed troops to capture the town and its defences.
The possible contingencies would be referred to as situation ‘Happy’, ‘Sticky’ or ‘Nasty’ according to events. ‘Happy’ would mean a favourable reception and unopposed landing. ‘Sticky’ would mean resistance of a formal or sporadic nature. ‘Nasty’ would mean serious resistance. HM ships then would move in to engage the forts, and British troops would prepare to land.
Commencement of operations.
The forces left Freetown in three groups;
Group I consisted of the five transports escorted by HMS Bridgewater, HMS Quannet and President Houduce. It had already left Freetown on the 19th of September.
Group II consisted of the French troopships Pennland and Westernland, the food ship Belgravian and the three Free French sloops and also of the British troopships Ettrick, Karanja, Kenya and Sobieski escorted by HMS Devonshire, HMS Faulknor, HMS Forester, HMS Fury and HMS Milford (Capt.(Retd.) S.K. Smyth, RN). This group departed Freetown at 0600/21.
Group III consisted of HMS Barham, HMS Resolution, HMS Ark Royal, HMS Inglefield, HMS Greyhound, HMS Foresight, HMS Fortune, HMS Echo and HMS Escapade. This group departed Freetown at 0900/21. Early the next day this group was joined by HMS Cumberland, HMAS Australia and HMS Dragon.
The weather was fine and the sea was calm. Passage north to Dakar was uneventful. Aircraft from the Ark Royal conducted photographic reconnaissance on the 22nd.
At Dakar there were the following French warships; the uncompleted battleship Richelieu, the light cruisers Georges Leygues and Montcalm, the destroyers Le Fantasque, Le Malin, L’Audacieux and Le Hardi, three submarines Ajax, Perseé and Bévéziers (this last one was in dock) and some smaller vessels.
Zero hour for the commencement of the attack was set at 0550/23 and all ships managed to get into their assigned positions at that time. Visibility was however very poor due to mist, and was no more then 3 to 5 nautical miles. The fog was expected to clear during the day but in fact the opposite happened and visibility decreased steadily during the day. The shore was rarely sighted.
During the forenoon, the warships and transports patrolled up and down. Punctually at daybreak (0505 hours), HMS Ark Royal, then some 25 nautical miles from Dakar, flew off five aircraft most of which were manned by Free French flying officers. Two of these aircraft landed safely at Ouakam airfield at 0554 hours. Within 10 minutes a signal was displayed indicating ‘success’. This however proved to be premature. At 0608 hours a third aircraft landed on the airfield. Disembarked her three passengers and then took off without much interference. Two minutes later the ‘success’ signal was removed and a fourth aircraft broke off her attempt to land. Nothing more was heard from the Free French officers that had been landed. Two fighters were then seen to take off and they chased away the three remaining aircraft together with AA fire from the Richelieu and from the battery on Gorée Island. The attempt to win over the airfield had failed.
HMS Barham had sighted the Westernland at 0600 hours and Vice-Admiral Cunningham had sent a message of goodwill to General de Gaulle. The Free French sloop Savorgnan de Brazza was of the boom at 0555 hours and her two motor boats, with Captain d’Argenlieu and the Generals other emissaries were on their way to the boom gate at 0605 hours. The gate was open and at 0640 hours they were entering the harbour.
Visibility was poor, and the Savorgnan de Brazza took station of the boom to keep the boats in sight. The emissaries landed and encountered a hot reception. They were fired on and wounded in resisting an attempt to arrest them, but managed to re-embark and withdraw under fire. A blank round was fired at the Savorgnan de Brazza at 0745 hours followed by three salvoes, which fell astern. Just then the motor boats were sighted and at 0750 hours Captain d’Argenlieu sent a signal that he had met serious resistance. This reached Vice-Admiral Cunningham at 0807 hours. The other French sloops were to be at the boom at 0905 hours to pass it (or force it if needed) and land their troops. If the reception had been favourable the French troopships were then to enter the harbour to disembark the main body of troops. The Commandant Dominé and Commandant Duboc were actually at the boom at 0805 hours, one hour early. They encountered no opposition until they approached the mole. They were taken under fire with heavy machine guns and were ordered to stop. The Richelieu fired a blank round and then opened fire with small guns. Both sloops then turned for the gate under the cover of a smoke screen. Also the guns from the Gorée Island battery were joining in. At 0820 hours the Commandant Dominé and Commandant Duboc were sighted by the Savorgnan de Brazza which was intended to lead them in at 0905 hours. The sloops had not expected such a hostile reception and retired on the British Fleet which was sighted a 0900 hours.
Meanwhile HMS Barham at 0706 hours had turned north-north-west towards the land, and at 0740 hours Cape Manuel was in sight some 5 nautical miles away. At 0827 hours, with the land still just visible from HMS Barham Vice-Admiral Cunningham asked General de Gaulle whether he wished the British ships to close the shore and show themselves at the risk of being fired on. Five minutes later came the signal ‘proposals rejected’. At 0840 hours General de Gaulle signalled that the Richelieu and Gorée Island guns had been firing and that he had ordered his own ships to make a determined effort; if they failed he suggested that the Vice-Admiral should show himself of Dakar. Just then, one minute later, came the signal from the Savorgnan de Brazza confirming the emissary’s proposals had been rejected.
Situation deteriorates.
It was clear by this time an unfavourable situation was rapidly developing. General de Gaulle’s proposals to the Governor had been rejected and two of his emissaries had been seriously wounded, his sloops had been fired upon and the Vichy French ships in the harbour were raising steam. In spite of these manifest tokens of hostility the General apparently still hoped for a peaceful solution. At 0905 hours, however, Vice-Admiral Cunningham warned his force that the situation was developing towards ‘Sticky’.
Valuable and comprehensive reports were coming in from the British aircraft reconnoitring Dakar. Although these aircraft were fired on by all the French ships in the harbour and by machine guns on the jetty, Vice-Admiral Cunningham gave orders that a French flying boat over the fleet should not be attaked, for there still seemed to be hopeful signs that the French air force might join de Gaulle. At 0948 hours a signal arrived from HMS Ark Royal to say that one of the Gloire class cruisers had slipped. The Vice-Admiral at once instructed HMS Foresight, the northern destroyer of the anti-submarine screen, to order any French cruiser sighted to return to harbour. At 1005 hours, however, the shore batteries opened fire on HMS Foresight and the Vice-Admiral ordered her to withdraw following this with a signal to HMS Ark Royal to stand by with six aircraft to bomb Gorée Island. He also warned the French Admiral that if the fire were continued he would regretfully be compelled to return it. The French Admiral replied that if Vice-Admiral Cunningham did not wish him to fire he should remove himself more then 20 nautical miles from Dakar. Meanwhile the force had turned westwards at 1016 hours. Two minutes later Vice-Admiral Cunningham detached HMAS Australia to examine a ship reported to the north. At 1025 hours, HMAS Australia, identified two Le Fantasque class destroyers steering westwards and ordered them to return to harbour, backing up this order with a warning shot. They at once turned back and the Australia then resumed her place in line after having been fired upon by shore guns.
At 1030 hours, two La Galissonnière class cruisers were reported leaving Dakar and Vice-Admiral Cunningham at once informed the French that if their ships left the harbour he would use force to compel their return. Two French submarines were also reported to be underway and at 1050 hours Vice-Admiral Cunningham warned the French Admiral that if they left Dakar harbour he would attack them. One minute later a report came in that the submarines were passing the entrance and when a torpedo missed HMS Foresight Vice-Admiral Cunningham cancelled the order for HMS Ark Royal to bomb Gorée Island but to bomb the submarines instead. At the same time he detached HMS Inglefield and HMS Foresight to attack them and he also turned the remained of the force to close Gorée Island to support them. Almost immediately HMS Foresight came under fire and at 1051 hours she was hit forward by a shell. Thus the actual first hit was made by the French.
By 1100 hours the whole force was under fire from the guns at Cape Manuel. HMS Inglefield reported also being missed by a torpedo. Two minutes later HMS Inglefield and HMS Foresight were were engaging one of the submarines (the Perseé) on the surface to the north-westward. Events followed rapidly. HMS Inglefield was hit by a shore battery. By 1104 hours the submarine was sighted on the Barham’s port bow. She was engaged by the 6” guns from HMS Barham, HMS Resolution and HMS Dragon. She was badly hit and soon abandoned by her crew, finally sinking at 1137 hours in position 065°, Cape Manuel lighthouse, 2740 yards. Simultaneously HMS Barham fired five 15” gun salvoes at the Cape Manuel battery but accordingly to a subsequent French broadcast they caused heavy civilian casualties ashore.
When the force turned back to the south-westwards at 1107 hours, HMS Inglefield was again hit aft by a shore battery. With HMS Foresight she engaged the second submarine (the Ajax) which at once made for the harbour entrance, and Vice-Admiral Cunningham, still hoping for a peaceful solution, and in accordance with the agreement to use no more force then necessary to overcome sporadic resistance, ordered the force to cease fire.
At 1119 hours however, HMS Dragon, ordered to attack the second submarine, came under fire from the guns at Cape Manuel. The whole force at once turned west but though the land was barely visible through the mist, HMS Foresight and HMS Cumberland, which were close to HMS Barham were hit almost immediately by the shore guns. The damage to HMS Cumberland was serious. She was struck by what was thought to be an 11.2” shell (actually it was a 9.4” shell) just above the armour belt on the port side. The engine rooms became temporary untendable and she was forced to withdraw to Bathurst, taking no further part in the operation. Nothing further was to be gained by remaining close inshore and at 1135 hours the force turned to the southward.
At 1154 hours a signal from the High Commissioner, French West Africa was received stating ‘We confirm that we will oppose all landings, you have taken the initiative in causing French blood to flow’. The situation at noon was thus far from hopeful but it was decided a final attempt to land the Free French troops at Rufisque would be undertaken (operation ‘Charles’).
Situation ‘Sticky’.
Operation ‘Charles’ was to be a final attempt for a peaceful landing of the Free French troops at Rufisque Bay before beginning a systematic reduction of the Dakar defences as a preliminary to a British landing.
It was considered essential in this plan to maintain the French character of the landing as far as possible; the Free French transports were to be accompanied as far as possible by their own warships, and by two British destroyers only, HMS Inglefield and HMS Forester, which would lead them in and, if necessary, provide flanking fire.
At 1158 hours, Vice-Admiral Cunningham signalled to de Gaulle, ‘what about operation ‘Charles’ now ?’. The General replied at 1212 hours that he desired to to ahead with operation ‘Charles’ but that he required the latest reports. He was then given the latest aircraft reports, which showed no surface ships outside the boom. A zero hour for ‘Charles’ was then set at 1530 hours if the Generals ships could reach Rufisque Bay in time. A signal was sent to the entire force that the situation was now ‘Sticky’.
General de Gaulle then asked Vice-Admiral Cunningham what opposition might be expected from shore batteries and the Vice-Admiral replied that the bad visibility would help the forces taking part in ‘Operation Charles’. At 1335 hours HMS Barham proceeded westwards to endeavour to locate the General’s flagship the Westernland but she could not be found. HMS Barham then spent three hours searching for her in the mist.
A baffling phase of uncertainty followed. In the thick weather which precluded visual signalling between Barham and Westernland radio telephony and wireless communication between Vice-Admiral Cunningham and General de Gaulle, though at first satisfactory, deteriorated progressively during the afternoon. This was due to jamming of radio telephony by a heavy traffic of military signals between the Westernland herself and the Free French sloops. At the root of the trouble was the fact that General de Gaulle was in a separate ship. Everything possible had been done to improvise additional lines of communication, but these proved inadequate to meet the situation. For some three hours that afternoon all contact was lost with General de Gaulle and the French transports.
At 1358 hours Vice-Admiral Cunningham informed the Admiralty that de Gaulle was attempting a landing but at 1445 hours a signal was received from de Gaulle to say that he was awaiting instructions to which the Vice-Admiral replied at 1504 hours ‘carry out Charles, report zero hour’.
But to carry out ‘Charles’, however, HMS Inglefield and HMS Forester had to get in touch with the French transports, and despite repeated calls for their positions no one knew where they were.
An ultimatum was made ready to be sent to the authorities and people of Dakar informing them that failing to accept General de Gaulle proposals, the British fleet would open fire on the fortifications of Dakar. This was misunderstood by General de Gaulle and he thought that the ultimatum had already been delivered so he suspended ‘Operation Charles’. Troops would not be landed by the transports but only a smaller number would be landed by the French sloops. Vice-Admiral Cunningham was only informed about this after two hours.
Meanwhile further complications had arisen. Aircraft reported a French destroyer off Gorée Island (this was the L’Audacieux), threatening the approach to Rufisque Bay. HMAS Australia, HMS Fury and HMS Greyhound were detached at 1608 hours to ward her off. The French destroyer was engaged and set on fire after she had fired two torpedoes at HMAS Australia.
Around 1630 hours HMS Devonshire finally sighted the French transports some 20 nautical miles from Rufisque Bay. This meant that ‘Charles’ could not be completed before dark. These was at least one enemy submarine (possibly two) in the area. In these weather conditions it was not though possible to give sufficient protection to the transports in Rufisque Bay. On these grounds Vice-Admiral Cunningham cancelled ‘Operation Charles’ at 1642 hours.
Two minutes later an air report reached him reporting two La Galissonniere class cruisers three nautical miles north-north-east of Gorée Island which were steering towards Rufisque Bay at 17 knots. Vice-Admiral Cunningham at once turned the battleships towards Rufisque to cover the Westernland and Pennland in case they were still making for it. He held this course until 1710 hours and then altered to the southward to regain contact with the British transports. A signal timed 1635 hours from General de Gaulle that he expected to arrive at 1650 hours, which would be zero hour, reached Vice-Admiral Cunningham at 1720 hours. Actually at that moment the Free French sloops, having parted from the French transports at 1648 hours reached Rufisque Bay. It is not clear how they were missed by the Vichy cruisers, which and air report placed, together with a large destroyer, two nautical miles were of Rufisque at 1740 hours. This was the last air report, for at 1745 hours weather conditions obliged HMS Ark Royal to withdraw all reconnaissance aircraft. It did not reach Vice-Admiral Cunningham until 1835 hours.
Meanwhile at 1805 hours, General de Gaulle’s signal timed 1620 hours had at last arrived and the Vice-Admiral knew that the Free French sloops would probably be attempting a landing. He immediately sent off HMS Inglefield and HMS Forester, which found the Westernland in position 155°, Rufisque Bay, 10 nautical miles at 1835 hours.
Free French sloops at Rufisque, 23 September 1940.
As mentioned previously the Free French sloops parted company with the Westernland and Pennland at 1648 hours some 7.5 nautical miles from Rufisque to carry out ‘their mission’. There seemed to be considerable doubt as to what this mission was. It certainly was not ‘Operation Charles’ as had been intended. The landing party in each sloop consisted of about 60 ‘fusilier marines’, making it about 180 in total. They arrived off Rusfisque at 1720 hours. The Savornan de Brazza, whose draught was greater then the other two, anchored about 500 yards from the shore. The Commandant Dominé and Commandant Duboc pushed in right towards the jetty, and all three lowered their boats. Fire was almost immediately opened on the Commandant Duboc by a 4” gun in a blockhouse at Cap de Biches. She was hit and one officer was killed and three men seriously wounded. Fire was opened by the sloops and the battery was knocked out. The Commandant Duboc then retired behind a smoke screen. Two of the Savorgnan de Brazza’s motor boats towing whalers were making for the beach to the right of the jetty. When within 300 yards from the shore they met with heavy machine gun fire and stopped, while the Commandant Dominé, covering them, opened fire on the shore emplacements, but could not locate them in the failing light and mist. But then at 1758 hours a signal was received from the Westernland cancelling ‘Operation Charles’. The landing parties were then re-embarked and at 1838 hours the three Free French sloops left for their patrol line.
Situation ‘Nasty’.
The day was drawing to a close. All hopes of a friendly reception had been scattered. The ships were lying in a fog off a hostile coast with submarines in the vicinity. Vice-Admiral Cunningham and General Irwin considered landing British forces at Rufisque, but decided against it.
At 1910/23, while the Free French sloops were closing the Westernland and Pennland, Vice-Admiral Cunningham with the ‘battlefleet’; HMS Barham, HMS Resolution and HMS Devonshire, turned west to cover the transports (which were still to the southward) for the night.
Ten minutes before, at 1900 hours, the Vichy French Governor General, M. Pierre Boisson, had in a broadcast stated emphatically that Dakar would not submit. There could be no further hope of a peaceful settlement and at 2052 hours General de Gaulle was asked whether he agreed that the situation was now ‘Nasty’ and to the issue of the ultimatum. The Admiralty had been kept fully informed of the situation and at 2105 hours a personal message from the Prime Minister arrived ‘Having begun we must go on to the end, stop at nothing’.
General de Gaulle reply arrived at 22235 hours, he agreed that the situation was now ‘Nasty’ and that the ultimatum should go out. It was broadcast at 2345 hours in French and English to the Admiral, Governor General and people of Dakar. They had prevented General de Gaulle from landing. Dakar might be seized by the Germans / Italians and the Allies were bound to prevent this. Their forces were approaching. The conditions offered must be accepted by 0600/24 or the guns of the Allies would open fire.
The Governor General’s answer reached Vice-Admiral Cunningham at 0400/24. It was an unqualified refusal; ‘I shall defend Dakar to the end’. There was nothing more to be said. At dawn the battlefleet was approaching the coast to take up their bombardment stations.
The attack on Dakar, the attack opens, 24 September 1940.
HMS Ark Royal had orders to carry out a reconnaissance as early as possible backed up by bombing attacks on the Richelieu, Forts Manual and Gorée, and the two light cruisers lying off Dakar.
Visibility had greatly improved since the previous day and was six nautical miles at 0625 hours when the first striking force of six Skua’s of No. 800 Squadron, loaded with 500 lb. S.A.P. bombs, took off from HMS Ark Royal to attack the cruisers and other suitable targets.
At 0703 hours aircraft reported a destroyer damaged off Rufisque, two cruisers in the roads and three destroyers coming slowly out. It was seven minutes later when the Skuas carried out a high level bombing attack on the Richelieu and one of the destroyers. By this time the battlefleet was on its bombardment course and the Barham’s spotting aircraft was in the air. They were followed by six Swordfish of No. 820 Squadron loaded with G.P. bombs for an attack on the town of Dakar, which was to synchronise with the ships bombardment.
It had been calculated that at 0725 hours the battlefleet would be within 16000 yards of the forts and fire could be opened, but unfortunately when the moment arrived nothing could be seen of them in the prevailing mist. A long range bombardment was clearly impractical, and the fleet turned away temporarily in order to re-dispose the cruisers and destroyers for a short range attack. At the same time HMS Fortune was detached to obtain a shore fix, but she came under accurate fire from the forts and her fix proved unreliable.
The Ark Royal’s first Swordfish striking force was diverted to bomb Cape Manuel. At 0800 hours she despatched another striking force of six Swordfish of No. 810 Squadron loaded with S.A.P. bombs to attack the Richelieu. It was hoped that by the time it attacked the Richelieu the opening of the naval bombardment would provide a diversion, but this did not occur; one Swordfish was shot down and two others failed to return.
A diversion was also provided on the enemy’s side. At 0805 hours HMS Fortune, which had rejoined the battlefleet, reported a submarine contact inside the screen and dropped three depth charges. At 0831 hours the Vichy French submarine Ajax surfaced. She was unable to dive or move and surrendered. Her whole crew was rescued before she sank. The Fortune’s boarding party found six ‘tube ready’ light burning, and it was evidently only the destroyers depth charges that saved the fleet from attack.
The incident still further delayed the bombardment and it was not till 0920 hours, forty minutes after the first Swordfish striking force had attacked the Richelieu with S.A.P. bombs, that Gorée Island was sighted. At 0935 hours the shore batteries opened fire and one minute later the Barham and Resolution replied with their 15” guns, firing on the Richelieu at ranges of 13600 to 15000 yards respectively, while the cruisers HMAS Australia and HMS Devonshire engaged a destroyer of the Le Fantasque class.
The first bombardment.
As soon as the British ships opened fire a French destroyer of the Le Fantasque class steamed south laying a smoke screen to the eastward of the anchorage and Gorée Island. The French cruisers inside the boom to the northward, sheltering amongst the many merchant vessels, also made a smoke screen, which drifted slowly south and, combining with the mist and heavy smoke from the vicinity of the Richelieu, eventually obscured all targets.
Shooting became extreme difficult, for range taking was nearly impossible. There were other serious handicaps. HMS Barham, which was newly commissioned after repairs, had never carried out any bombardment practice. Neither battleship had done any concentration firing, and neither had its customary observer in the air.
After engaging the Richelieu for nine minutes the Resolution’s director training gear failed and she shifted fire to the Cape Manuel battery, on which she probably obtained a hit. The Barham’s aircraft reported several straddles across the Richelieu, which was thought to have been hit. The smoke-laying cruiser was still active, and at 0942 hours the Barham’s 6” guns engaged her without success.
Meanwhile the Devonshire and Australia had engaged and damaged a large destroyer of Rufisque which was subsequently engaged by the Inglefield, Foresight and Forester, and left burning.
The fire encountered by the fleet consisted of occasional one- and two-gun salvoes (yellow splash) from the Richelieu’s 15” guns, salvoes of 9.4” from Cape Manuel (white splash), Gorée Island, and an unseen battery, and a number of smaller rounds from the Richelieu and various shore batteries. The French fire was slow but accurate. By 1010 hours the targets were wholly obscured by smoke, and shortly afterward the fleet withdrew to the southward, leaving the Ark Royal to report the result of the bombardment.
As the fleet made to the south, Vichy Glenn-Martin bombers made high level attacks on it without success, though three bombs fell close to HMAS Australia.
At 1141 hours the Ark Royal reported the results of the bombardment; several near misses with bombs on the Richelieu; one near miss with a bomb on a destroyers; one 15” hit on the Cape Manual battery, which had ceased fire; one 15” hit and repeated straddles on the Richelieu; straddles across the cruisers in Hahn Bay, one of which was set on fire aft. No hits had been obtained on the Gorée Island battery.
The second bombardment.
At 1146 hours relief spotting aircraft for the battleships were ordered and targets for a further bombardment at 1315 hours were allocated as follows; the Barham on Richelieu; the Resolution on Goréé Island; the Devonshire on Cape Manuel; the Australia on the cruisers inside the boom. The spotting aircraft took off from HMS Ark Royal at 1220 hours and as a report reached her about this time that Vichy cruisers and destroyers were proceeding towards Rufisque, a torpedo striking force was got ready to attack them immediately after the second bombardment.
French aircraft were still busy. At 1217 hours a French bomber dropped six bombs close to HMS Barham. It was driven off by Skuas. Shortly afterwards a shadowing cruiser was sighted while the fleet was approaching Gorée Island. She was engaged from 14500 yards by the main armament from HMS Barham and HMS Resolution. She then turned away under a smoke screen. Fire was then checked. At 1248 hours, Vice-Admiral Cunningham ordered the Devonshire and Australia to engage her, but cancelled this order five minutes later when his destroyers, which were coming under an accurate fire from shore batteries, were told to take station on his disengaged side. By an unfortunate mischance the first order – to engage the cruiser – never reached the Devonshire and she interpreted Vice-Admiral Cunningham’s second signal ‘cruisers negative engage’, which referred only to the hostile cruiser, as an order to take no further part in the bombardment. Accordingly at 1300 hours she turned away to the east with HMAS Australia and neither ship took part in the subsequent bombardment.
The bombardment was reopened in the afternoon, at 1300 hours HMS Barham obtained a shore fix and turned north-west on her bombardment course. Five minutes later she engaged the Richelieu bearing 330°, range 17000 yards. HMS Resolution opened fire on Gorée Island from 16000 yards. The batteries at Cape Manuel, which had been reported hit, Gorée Island and Dakar Point at once replied. The Richelieu also opened fire with her 15” guns firing two gun salvoes with fair accuracy. She continued firing until her fire was blanked by the mole.
The French gunfire concentrated on the Barham and was heaviest between 1312 and 1320 hours. At 1315 hours an 9.4” projectile hit the Barham. At 1320 hours she was hit again and two minutes later she was hit twice.
The smoke screen tactics of the forenoon were repeated as soon as the British ships were sighted, and by 1311 hours the targets again became obscured. Although spotting aircraft reported that the Barham was straddling the Richelieu, the salvos appeared to be out for line, and apparently the Vichy French battleship was not being hit. The Resolution did not succeed in silencing the main Gorée Island battery and it is doubtful whether she was being spotted on the correct target. She was straddled by several salvoes of 5.4” and 6” shells from the shore batteries. At 1323 hours the Richelieu ceased fire. A minute later HMS Barham and HMS Resolution broke off the attack and at at 1326 hours the shore batteries also ceased firing.
The results of the bombardment were not encouraging. Despite the expenditure of nearly 400 rounds of 15” ammunition, none of the larger shore batteries had been silenced. The Richelieu was still in action, and the position of several 5.4” batteries, whose fire had proven effective against the destroyers, and would be still more so against the transports, had not even been located.
In spite of the poor visibility the fire of the shore batteries had been remarkably accurate and indicated that their fire was directed by listening devices rather then from forward observation posts, from which the battlefleet would generally had been out of sight. French air action had increased considerably since the previous day and the French will to resist appeared unimpaired. A report from HMS Ark Royal stated that the hostile attitude of the French fighters had made it hazardous for her aircraft to operate in the Dakar harbour area.
The question of a landing in force still remained. In these circumstances Vice-Admiral Cunningham decided to consult General de Gaulle and at 1400 hours the Barham withdrew to the southward to meet the Westernland before dark.
Swordfish aircraft attack the French cruisers.
Then minutes later, at 1410 hours, HMS Ark Royal’s striking force of nine Swordfish aircraft of No. 820 and 810 Squadrons took off while a fighter escort of three Skuas to attack the Vichy-French cruisers proceeding towards Rufisque. At 1440 hours the leader was forced down with engine trouble, his crew being picked up by the destroyer HMS Escapade. At 1500 hours the eight remaining Swordfish Swordfish attacked the two La Galissonnière class cruisers and a destroyer in the bay. In the prevailing haze the attack, which was made from an east-south-easterly direction, took the French by surprise. When the first sub-flight came down just outside the anti-submarine nets the three vessels were barely moving, but they immediately put their helms hard over and turned to port at full speed. The Swordfish claimed hits on one of the cruisers and the destroyer but this seemed to be doubtful. One Swordfish was forced down by AA fire on her way back to the Ark Royal. The crew was rescued by the destroyer HMS Echo.
Conference with General de Gaulle.
HMS Barham stopped at 1615 hours. General de Gaulle then came on board to confer with Vice-Admiral Cunningham and General Irwin. General de Gaulle, though deeply distressed and surprised about the nature of the defences, was still confident that the situation in French West Africa would improve as the power of his movement grew stronger. He explained that in view of the determined opposition encountered, and the probable destructive effects of the bombardment, it was imperative, from the point of view from the French opinion, that he should not be closely connected with the destruction and loss of French life, which had presumably taken place, lest his further utility to the common cause should be hopelessly compromised.
Though he would prefer not to use his troops he was prepared, if really needed, to support a British landing regardless of consequences. He considered, however, that a British landing was no longer feasible, and emphasised that a reverse would be a most serious check to the Allied cause.
He blamed himself for undue optimism in underestimating the possibility of a resolute defence, and suggested that the bombardment should be suspended at his direct request and Dakar so informed; that his forces should go to Bathurst for exercises, with a view of a possible advance upon Dakar over land; that British naval action should be taken to cover his passage and prevent the reinforcement and revictualling of Dakar.
General de Gaulle returned to the Westernland at 1800 hours. The situation was considered by Vice-Admiral Cunningham and General Irwin in the light of these proposals. A Swordfish, which had crashed near the Barham at 1830 hours, reported that one cruiser was beached and burning east of Rufisque, one buring in Gorée Bay, and two detroyers were beached in Hann Bay (this information was subsequently found to be incorrect). It was essential to immobilise the Vichy French cruisers and neutralise the main armament of the French forts before attempting a landing. It was decided that the attack on the defences must be renewed the next day if weather conditions were favourable. General de Gaulle and the Admiralty were informed accordingly and dispositions were made for a landing of British troops at Rufisque, to follow up any success obtained by the bombardment.
Final bombardment. HMS Resolution torpedoed.
The next day, 25 September 1940, broke fine and clear with extreme visibility. The Ark Royal at 1531/24 had proposed bombing Ouakam and Gorée at dawn and at 2348/24 was ordered to do so, but owning to wireless congestion, this was not received until 0200/25 when Captain Holland considered it too late. The targets allocated to the battleships and cruisers were the same as for the second bombardment; spotting aircraft, with fighter protection, were to be in position at 0900/25. At 0530 hours three reconnaissance aircraft took off from the Ark Royal, but by 0700 hours, two had been driven back by French fighter patrols. At 0754 hours, HMS Devonshire sighted a submarine submerging some eight nautical miles to the east of the battlefleet, which was then some 25 nautical miles to the south of Dakar. HMS Forester was at once detached to hunt it, leaving only two destroyers to screen the battlefleet.
At 0803 hours they were ordered to withdraw to the disengaged flank as soon as the shore batteries opened fire. The battleships were then steaming towards Gorée Island ready to open fire, with the cruisers three miles away to the east. HMS Resolution had orders to take independent avoiding action if necessary during the bombardment. At 0857 hours a circular buoy was sighted which HMS Barham fired on, suspecting it to be a sound locating device. One minute later the Richelieu opened fire on HMS Barham from a range of 23000 yards.
At 0901 hours the signal to turn to the bombarding course (050°) was hauled down in HMS Barham. It was not only the British which acted on this signal. Captain Lancelot of the Vichy submarine Bévézièrs was watching the approaching battleships though the periscope. Experience with the Royal Navy before the fall of France had taught him our manoeuvring signals. On seeing ‘Blue 7’ hoised, he waited for it to be hauled down; then fired his torpedoes at the turning point. Thus it came about that as the Resolution was turning, five torpedoes were seen approaching her port beam. Already committed to the turn she could only apply full helm in the hope of turning short and combing the tracks. In this she almost succeeded, for three torpedoes passed ahead and another narrowly missed her astern. The fifth, however, struck her on the port side amidships causing serious flooding, but fortunately no loss of life. HMS Barham avoided the three torpedoes that had missed the Resolution ahead and they passed astern, exploding harmlessly on the bottom.
HMS Resolution, which had developed a list of 12° to port, was still able to steam. At 0905 hours HMS Barham opened fire on the Richelieu from 21000 yards and also the cruisers engaged their targets, HMS Devonshire firing on Cape Manuel and HMAS Australia on the French cruisers inside the boom. Fire from the Richelieu and shore batteries was deliberate and accurate; it was concentrated on HMS Barham and frequently straddled her. The British cruisers were also under heavy fire. HMS Barham was hit once and HMAS Australia twice. HMS Resolution was badly damaged and it was necessary for her to withdraw and at 0912 hours HMS Barham turned to cover her. About this time HMS Foresight reported that she had sunk the French submarine with depth charges (but this was not the case). She and HMS Inglefield were then ordered to cover HMS Resolution with a smoke screen. The two cruisers were recalled. About 0918 hours Vichy French fighters shot down the Australia’s Walrus aircraft. HMS Forester was ordered to try to rescue the crew but she came under heavy fire from shore batteries and had to retire.
At 0921 hours, HMS Barham ceased fire and took station close astern of HMS Resolution with HMS Devonshire and HMAS Australia on each quarter. The Ark Royal was ordered to provide maximum fighter protection, and the battlefleet withdrew to the southward.
HMS Resolution was steaming at 10 knots and between 0940 and 0950 hours two high level bombing attacks were made on her, both of them were unsuccessful. The whole force now steered south-west at the best possible speed and by 1134 hours the flagship, HMS Barham had the whole force in sight.
The Vice-Admiral now had to decide whether to continue the attack on Dakar or to withdraw his force. The chance of capturing Dakar was clearly remote and in the end it was decided to discontinue the attack and to withdraw his force to Freetown without further delay. A signal to this effect was made at 1152 hours.
Withdrawal to Freetown.
Before a signal could be passed to the Admiralty a signal was received from the Prime Minister who was aware of the damage to HMS Resolution. Vice-Admiral Cunningham was ordered to abandon the enterprise against Dakar.
By 2000/25, HMS Barham was about 100 nautical miles south of Dakar steering south at 7 knots. The next day the sea was smooth as the weather was fine. HMS Resolution was taken in tow by HMS Barham. On the 27th the tow parted but was quickly secured again and the battleships were able to continue southwards at 6 knots.
HMS Cumberland rejoined the force having effected temporary repairs at Bathurst. HMS Cornwall and HMS Delhi had also joined after having chased the French cruiser Primaguet and the tanker Tarn.
At 0550/29, HMS Barham passed the boom at Freetown followed by the rest of the force. So ended a difficult operation. No British warship had been sunk but several had been damaged. HMS Cumberland was out of action for 13 days and HMS Fiji for six months. HMS Resolution was temporarily patched up at Freetown but was not fully operational. She returned to England six months later but was then sent on to the U.S.A. for full repairs. It was a full year later before she was again ready for active service. Five more ships HMS Barham, HMAS Australia, HMS Dragon, HMS Inglefield and HMS Foresight were also damaged but their fighting efficiency was not seriously impaired. (15)
30 Sep 1940
Around 0630N/30, the aircraft carrier HMS Ark Royal (Capt. C.S. Holland, RN), heavy cruiser HMAS Australia (Capt. R.R. Stewart, RN) and the destroyers HMS Greyhound (Cdr. W.R. Marshall A'Deane, DSO, DSC, RN), HMS Forester (Lt.Cdr. E.B. Tancock, RN) and HMS Fortune (Cdr. E.A. Gibbs, DSO, RN) departed Freetown for the Clyde.
Around 1900Z/3, the destroyers parted company to return to Freetown.
At 1525A/4, HMS Ark Royal flew off seven Swordfish aircraft for an air search on the line Azores - Cape Finisterre as reports had been received about a possible German invasion of the Azores. The aircraft returned about two hours later having seen nothing.
Around 2200A/4, HMAS Australia parted company to patrol off the Azores. HMS Ark Royal now proceeded on unescorted.
Around 0830A/6, HMS Ark Royal made rendezvous with the aircraft carrier HMS Argus (Capt. E.G.N. Rushbrooke, DSC, RN) and the destroyers HMS Havelock (Lt.Cdr. E.H. Thomas, RN and HMS Highlander (Cdr. W.A. Dallmeyer, RN). Shortly afterwards the destroyers HMS Hurricane (Lt.Cdr. H.C. Simms, RN) and a little later HMS Harvester (Lt.Cdr. C.M. Thornton, RN) also joined company.
Around 2200Z/6, HMS Harvester was detached to go to the aid of the torpedoed British tanker British General. She did however not sight the tanker and the ship was lost with the entire crew.
Around 0500A/8, HMS Argus parted company and proceeded up the Clyde to Greenock taking HMS Hurricane with her.
HMS Ark Royal arrived at Liverpool in the afternoon where she was then immediately docked in the Gladstone Dry Dock for a refit. She had flown off all her aircraft during the day.
HMS Havelock and HMS Highlander then went on to Plymouth where they arrived later on the 8th as did HMS Harvester. (26)
11 Oct 1940
At 0204/11, Vice-Admiral Somerville received Admiralty message 0108/11 stating that the Vichy French light cruiser Primauget had departed Casablanca escorting a merchant ship loaded with munitions and bound for Dakar.
At 1737/11, Vice-Admiral Somerville received Admiralty message 1710/11 ordering HMS Barham (Capt G.C. Cooke, RN), HMS Escapade (Cdr. H.R. Graham, DSO, RN), HMS Echo (Cdr. S.H.K. Spurgeon, DSO, RAN) and HMS Fortune (Cdr. E.A. Gibbs, DSO, RN) to steer course 090°. Seven minutes later Admiralty mesage 1718/11 was received ordering HMS Renown (Capt. C.E.B. Simeon, RN, flying the flag of Vice-Admiral J.F. Somerville, KCB, DSO, RN) to come to four hour's notice.
At 1821/11, Admiralty message 1732/11 was received in which HMS Barham and her three escorting destroyers were ordered to intercept the Primauget and the merchant vessel she was escorting. At the same time Admiralty message 1727/11, ordering HMS Renown and HMAS Australia (Capt. R.R. Stewart, RN) to proceed to the westward, being clear of the harbour as soon after 0700/12 as possible, was received.
Destroyers on patrol were then rcalled and those making good minor defects were ordered to complete repairs with all despatch. HMS Australia was warned to be ready to proceed at midnight.
At 2145/11, Admiralty message 2112/11 was received which ordered HMS Australia to sail as soon as possible for Las Palmas at 25 knots. HMS Renown was ordered to sail to the westward at 0500/12. HMS Australia sailed accordingly at 2330/11.
At 0450/12, HMS Wishart (Cdr. E.T. Cooper, RN), HMS Vidette (Lt. E.N. Walmsley, RN), HMS Gallant (Lt.Cdr. C.P.F. Brown, RN) and HMS Griffin (Lt.Cdr. J. Lee-Barber, DSO, RN) departed Gibraltar to carry out an A/S sweep in Gibraltar Bay. HMS Renown slipped shortly afterwards. Course was shaped to the westward at 18 knots with the destroyers screening.
A Vichy-French Glenn Martin aircraft was sighted at 1440/12 shadowing HMS Renown from astern. Course was altered to 300° to mislead this machine. This Glen Martin finally made off to the eastward at 1635/12.
At 1600/12, Vice-Admiral Somerville received a signal stating that the Yugoslav merchant vessel Orao (5135 GRT, built 1919), on passage to Gibraltar under armed guard from HMS Hotspur (Cdr. H.F.H. Layman, DSO, RN), was being fired at by a submarine (this was the Italian Enrico Tazzoli) and that the crew had taken to the boats in position 35°43'N, 10°20'W. As there appeared to be a reasonable chance of attacking this submarine, Vice-Admiral Somerville decided to sent the whole of Renown's screen to hunt this submarine. HMS Gallant and HMS Griffin were therefore ordered to proceed to the vicinity at full speed, HMS Wishart and HMS Vidette following at 25 knots. Meanwhile HMS Renown increased to 24 knots and carried out a broad zig-zag, subsequently altering course at 1700/12 to 180°.
Before parting company the destroyers were ordered to rendezvous with HMS Renown at 0800/13 in position 33°22'N, 11°58'W, this position being selected in order to make contact with the transports Ettrick (British, 11279 GRT, built 1938) and Karanja (British, 9891 GRT, built 1931) that were proceeding to Gibraltar escorted by HMS Greyhound (Cdr. W.R. Marshall A'Deane, DSO, DSC, RN).
Shortly afterwards HMS Firedrake (Lt.Cdr. S.H. Norris, DSC, RN), previously escorting convoy HG 45, reported that she was proceeding to the position of the Orao at 32 knots. As four destroyers had already been directed to hunt the submarine, the Admiral Commanding North Atlantic Station, instructed HMS Firedake to join HMS Greyhound to provide additional escort for the two transports.
The four destroyers arrived in the position of the arrived in the position of te Orao about 1930/12 and found the ship in a sinking condition. The crew and armed boarding party of HMS Hotspur were picked up by HMS Gallant and HMS Griffin, who carried out an A/S sweep to the westward and the northward. HMS Wishart and HMS Vidette swept to the eastward and southward.
No contact had been obtained by midnight, at which time the destroyers left the area to rendezvous with HMS Renown as previously arranged. The submarine that attacked the Arao was a large one with two guns. Before leaving HMS Wishart sank the Arao, who was still afloat, with one torpedo.
HMS Renown sighted HMS Firedrake at 0724/13 proceeding to join HMS Greyhound. At 0745/13, HMS Gallant, HMS Griffin, HMS Wishart and HMS Vidette were all in sight and all were in their position in the screen by 0820/13. Course was then altered to close the estimated position of the convoy that was being escorted by HMS Greyhound.
At 1045/13, a merchant ship was sighted bearing 060° and HMS Gallant was detached to investigate. This ship turned out to be Portugese and was bound from the Cape Verde Islands to Lisbon. She was boarded and after investigation was allowed to proceed.
HMS Firedrake was again encountered at 1100/13 still searching for the convoy. Vice-Admiral Somerville ordered her stationed 10 miles on his port beam.
The convoy was sighted at 1300/13 and HMS Vidette was ordered to join HMS Greyhound and the convoy. HMS Firedrake was now ordered to take the place of HMS Vidette in Renown's screen as she had more fuel remaining than Vidette.
At 1430/13, Vice-Admiral Somerville received Admiralty's 1308/13 directing HMS Renown, HMS Barham and HMAS Australia and their accompanying destroyers to return to Gibraltar if the Primauget had not been sighted by 1800/13.
In view of the recent submarine reports in the vicinity of the Straits Vice-Admiral Somerville decided that HMS Wishart should join the convoy. HMS Renown now screened by HMS Firedrake, HMS Gallant and HMS Griffin proceeded towards Gibraltar at 24 knots with the object of entering the harbour as early as possible, so as to free the screening destroyers for local patrol and convoy escort duty.
On passing through the Straits HMS Renown overhauled the Vichy-French destroyer Fleuret escorting two merchant vessels proceeding eastwards.
HMS Renown and her escorting destroyers entered harbour at 1030/14. (27)
5 Nov 1940
Hunt for the German pocket battleship Admiral Scheer after the attack on convoy HX 84.
Timespan: 5 to 23 November 1940.
In response to the attack on convoy HX 84 by the German pocket battleship Admiral Scheer the Admiralty acted quickly.
The battlecruisers HMS Hood (Capt. I.G. Glennie, RN, flying the flag of Vice-Admiral W.J. Whitworth, CB, DSO, RN), HMS Repulse (Capt. W.G. Tennant, CB, MVO, RN), light cruisers HMS Naiad (Capt. M.H.A. Kelsey, DSC, RN, flying the flag of Rear-Admiral E.L.S. King, CB, MVO, RN), HMS Phoebe (Capt. G. Grantham, RN), HMS Bonaventure (Capt. H.J. Egerton, RN) and the destroyers HMS Somali (Capt. C. Caslon, RN), HMS Eskimo (Cdr. St. J.A. Micklethwait, DSO and Bar, RN), HMS Mashona (Cdr. W.H. Selby, RN), HMS Matabele (Cdr. R.St.V. Sherbrooke, DSO, RN), HMS Punjabi (Cdr. J.T. Lean, DSO, RN) and HMS Electra (Lt.Cdr. S.A. Buss, MVO, RN) departed Scapa Flow at 2330A/5 to proceed to the last reported position of the German pocket battleship 52°50'N, 32°15'W at 2003A/5.
At 1050A/6 the force split up; HMS Hood, HMS Naiad, HMS Phoebe, HMS Somali, HMS Eskimo and HMS Punjabi proceeded to patrol off the Bay of Biscay to cover the approaches to Brest and Lorient.
HMS Repulse, HMS Bonaventure, HMS Mashona, HMS Matabele and HMS Electra towards the Admiral Scheer's last known position.
At 0700A/6 the battleships HMS Nelson (Capt. G.J.A. Miles, RN, flying the flag of Admiral of the Fleet C.M. Forbes, GCB, DSO, RN) and HMS Rodney (Capt. F.H.G. Dalrymple-Hamilton, RN), light cruiser HMS Southampton (Capt. B.C.B. Brooke, RN) and the destroyers HMS Cossack (Capt. P.L. Vian, DSO, RN), HMS Maori (Cdr. H.T. Armstrong, RN), HMS Brilliant (Lt.Cdr. F.C. Brodrick, RN), HMS Douglas (Cdr.(Retd.) J.G. Crossley, RN), HMS Keppel (Lt. R.J. Hanson, RN) and HMS Vimy (Lt.Cdr. D.J.B. Jewitt, RN) departed Scapa Flow to cover the patrols in the Iceland-Faroes Channel.
Shortly before midnight during the night of 6/7 November HMS Rodney was detached to escort to escort convoy HX 83 and once this convoy was safe, HX 85 from Halifax.
Three armed merchant cruisers, which were on patrol were recalled to port on the 8th. These were HMS Chitral (Capt.(Retd.) G. Hamilton, RN), which was to the northwest of Iceland and HMS California (Capt. C.J. Pope, RAN) and HMS Worcestershire (A/Capt. J. Creswell, RN), which were to the south of Iceland. The light cruiser HMS Southampton was ordered to take over the place of HMS Chitral. She split off from HMS Nelson at 1600A/8. HMS Worcestershire joined HMS Nelson and her escorting destroyers around 1500A/9.
There were also the destroyers HMS Churchill (Cdr.(Retd.) G.R. Cousins, RN), HMS Lewes (Lt.Cdr. J.N.K. Knight, RN), HMS Lincoln (Cdr. A.M. Sheffield, RN) and HMS Ludlow (Cdr. G.B. Sayer, RN). They were en-route to the U.K. and had departed Halifax on 31 October and refuelled at St. Johns on 3 November. After receiving distress signals from ships in convoy HX 84 they rushed to the reported location. The only thing they found was an empty lifeboat. They then continued their Atlantic crossing and arrived at Londonderry on 9 November.
The destroyer HMS Stanley (A/Lt.Cdr. R.B. Stannard, VC, RNR) had departed Halifax on 1 November and St. Johns on 5 November. Now she and the Canadian destroyer HMCS St.Francis (Lt.Cdr. H.F. Pullen, RCN) escorted convoy HX 85, which had been recalled, back to Nova Scotia.
On 8 November, after machinery defects had been repaired, the heavy cruiser HMAS Australia (Capt. R.R. Stewart, RN) departed the Clyde to protect convoys.
The battlecruiser HMS Renown (Capt C.E.B. Simeon, RN) and the destroyers HMS Encounter (Lt.Cdr. E.V.St J. Morgan, RN), HMS Forester (Lt.Cdr. E.B. Tancock, RN) and HMS Gallant (Lt.Cdr. C.P.F. Brown, RN) departed Gibraltar at 0500A/6 to provide cover for convoys HG 46 and SL 53.
At 1225A/6, off Cape St Vincent, the submarine HMS Utmost (Lt. J.H. Eaden, DSC, RN) was identified as enemy by HMS Encounter which then rammed the submarine which was en-route to Gibraltar. HMS Encounter was escorted to Gibraltar by HMS Forester. They arrived at 0800A/7.
On 11 November, HMAS Australia relieved Renown from covering convoy HG 46 and Renown arrived back at Gibraltar around 1515A/12. Renown had been joined at 0807A/12 by the destroyers HMS Duncan (Cdr. A.D.B. James, RN) and HMS Forester.
Aircraft carrier HMS Argus (Capt. E.G.N. Rushbrooke, DSC, RN), light cruiser HMS Despatch (Commodore 2nd cl. C.E. Douglas-Pennant, DSC, RN) and the destroyers HMS Verity (Cdr. R.H. Mills, RN), HMS Vesper (Lt.Cdr. W.F.E. Hussey, DSC, RN) and HMS Windsor (Lt.Cdr. G.P. Huddart, RN) departed the Clyde on 7 November for Gibraltar and were also ordered to keep a look out for the German pocket battleship. The destroyers were later detached; HMS Windsor around 0100A/9 and HMS Verity and HMS Vesper around 0600A/9. HMS Despatch was detached at 1000A/13 and proceeded to Gibraltar where she arrived around noon the next day. Shortly before HMS Despatch was detached the destroyers HMS Wishart (Cdr. E.T. Cooper, RN) and HMS Wrestler (Lt. E.L. Jones, DSC, RN) had joined followed later in the day by HMS Vidette (Lt. E.N. Walmsley, RN). HMS Argus, HMS Vidette, HMS Wishart and HMS Wrestler arrived at Gibraltar very late on the 14th.
Battlecruiser HMS Repulse escorted by the destroyers HMS Matabele and HMS Electra arrived at Scapa Flow for refuelling around 1100A/11.
Light cruiser HMS Bonaventure and destroyer HMS Mashona arrived at Scapa Flow around 1130A/11 for refuelling.
Battlecruiser HMS Hood, light cruisers HMS Naiad, HMS Phoebe and the destroyers HMS Somali, HMS Eskimo and HMS Punjabi returned to Scapa Flow around 1400A/11 for refuelling. HMS Eskimo had suffered weather damage to her asdic dome and had some forecastle deck plates buckled. She was docked for repairs in the floating drydock at Scapa Flow from 13 to 16 November. HMS Phoebe had also sustained weather damage for which she was later taken in hand for repairs at Glasgow.
After fuelling HMS Bonaventure departed Scapa Flow at 2300A/11 to continue to search for survivors from convoy HX 84. Armed merchant cruiser HMS Chitral was also back at sea to search for survivors. She had departed from Reykjavik, Iceland around 2330A/10.
HMS Bonaventure returned to Scapa Flow on the 19th with weather damage.
The armed merchant cruiser HMS Letitia (A/Capt. E.H. Longsdon, RN) departed the Clyde around 1300A/11 for the Northern Patrol.
HMS Repulse, HMS Naiad departed Scapa Flow around 1330A/12 for patrol and also to provide cover for ships of the Northern Patrol. They were escorted by the destoyers HMS Sikh (Cdr. G.H. Stokes, RN), HMS Mashona, HMS Matabele and HMS Punjabi.
HMS Naiad parted company on the 13th to proceed to Jan Mayen Island where a German weather / wireless station in Jameson Bay was to be raided.
HMS Repulse returned to Scapa Flow at 0015A/19 being escorted by the destroyers HMS Ashanti (Cdr. W.G. Davis, RN), HMS Mashona and HMS Matabele. They had provided cover for HMS Naiad during her raid on Jan Mayen Island.
The battleship HMS Nelson arrived at Scapa Flow around 1630A/13 escorted by the destroyers Maori, HMS Beagle (Lt.Cdr. R.H. Wright, RN), HMS Bulldog (Lt.Cdr. F.J.G. Hewitt, RN) and Keppel.
Battleship HMS Rodney only arrived at Scapa Flow around 1500A/23. She had been joined at dawn the previous day by the destroyers HMS Beagle, HMS Brilliant, HMS Bulldog and HMS Electra. (28)
7 Jan 1941
Convoy WS 5B
This convoy departed U.K. ports on 7 January 1941 for variuos ports in the Far East and Mediterranean (see below).
The convoy was made up of the following troop transports; Arundel Castle (British, 19118 GRT, built 1921), Athlone Castle (25564 GRT, built 1936), Britannic (British, 26943 GRT, built 1930), Capetown Castle (British, 27002 GRT, built 1938), Duchess of Bedford (British, 20123 GRT, built 1928), Duchess of Richmond (British, 20022 GRT, built 1928), Duchess of York (British, 20021 GRT, built 1929), Durban Castle (British, 17388 GRT, built 1938), Empress of Australia (British, 21833 GRT, built 1914), Empress of Japan (British, 26032 GRT, built 1930), Franconia (British, 20175 GRT, built 1923), Highland Chieftain (British, 14131 GRT, built 1929), Highland Princess (British, 14133 GRT, built 1930), Monarch of Bermuda (British, 22424 GRT, built 1931), Nea Hellas (British, 16991 GRT, built 1922), Orbita (British, 15495 GRT, built 1915), Ormonde (British, 14982 GRT, built 1917), Pennland (Dutch, 16082 GRT, built 1922), Samaria (British, 19597 GRT, built 1921), Winchester Castle (British, 20012 GRT, built 1930) and Windsor Castle (British, 19141 GRT, built 1922).
Four of these ships departed Avonmouth on 7 January and six sailed from Liverpool. These ships anchored in Moelfre Bay for several days as the eleven ships that were to be sailed from the Clyde could not do so due to thick fog.
The Avonmouth (Bristol Channel) section of the convoy had been escorted to Moelfre Bay by the destroyer HMS Vansittart (Lt.Cdr. R.L.S. Gaisford, RN).
The Liverpool section was escorted to Moelfre Bay by the heavy cruiser HMAS Australia (Capt. R.R. Stewart, RN) and the destroyers HMS Harvester (Lt.Cdr. M. Thornton, DSC, RN), HMS Highlander (Cdr. W.A. Dallmeyer, DSO, RN) and HMS Witherington (Lt.Cdr. J.B. Palmer, RN).
The ships and their escorts anchored in Moelfre Bay from 8 to 11 January. The escorts remained there for A/S patrol and AA protection and were joined by the destroyer HMS Foresight (Lt.Cdr. G.T. Lambert, RN) which had departed Liverpool on the 8th and the light cruiser HMS Naiad (Capt. M.H.A. Kelsey, DSC, RN, flying the flag of Rear-Admiral E.L.S. King, CB, MVO, RN) which came from the Clyde.
When it became clear that the ships from the Clyde were finally able to sail the ships in Moelfre Bay sailed for Lough Foyle (near Londonderry, Northern Ireland) to take on board additional water.
The ships from Lough Foyle and the Clyde made rendez-vous at sea on 12 January and course was then set to Freetown.
The convoy was now escorted by the battleship HMS Ramillies (Capt. A.D. Read, RN), heavy cruiser HMAS Australia, light cruisers HMS Phoebe (Capt. G. Grantham, RN), HMS Naiad, destroyers HMS Jackal (Cdr. C.L. Firth, MVO, RN), HMS Harvester, HMS Highlander, HMS Fearless (Cdr. A.F. Pugsley, RN), HMS Brilliant (Lt.Cdr. F.C. Brodrick, RN), HMS Beagle (Lt.Cdr. R.H. Wright, DSC, RN), HMS Witherington, HMS Watchman (Lt.Cdr. E.C.L. Day, RN), HMS Vansittart, HMS Lincoln (Cdr. A.M. Sheffield, RN), HMS Leamington (Cdr. W.E. Banks, DSC, RN) and Léopard (Lt.Cdr. J. Evenou).
On 14 January the destroyers HMS Witherington and FFS Leopard parted company.
The light cruiser HMS Emerald (Capt. F.C. Flynn, RN) departed Plymouth on 12 January. She joined the convoy around noon on the 15th. Shortly afterwards HMS Naiad then parted company with the convoy and proceeded to Scapa Flow where she arrrived around 1430/17.
HMS Phoebe and HMS Fearless also parted company with the convoy escorting the Capetown Castle and Monarch of Bermuda to Gibraltar where they arrived in the afternoon of the 18th. On the 17th they were joined by the destroyer HMS Forester (Lt.Cdr. E.B. Tancock, RN) and on the 18th by two more destroyers; HMS Duncan (A/Capt. A.D.B. James, RN) and HMS Fury (Lt.Cdr. T.C. Robinson, RN).
At Gibraltar the two troopships took on board troops from the damaged troopship Empire Trooper. They departed Gibraltar for Freetown on 19 January being escorted by the destroyers HMS Fury, HMS Fearless and HMS Duncan until 21 January when they parted company. Both troopships arrived at Freetown on 26 January escorted by HMS Faulknor (Capt. A.F. de Salis, RN) and HMS Forester.
Meanwhile convoy WS 5B had coninued its passage southwards.
On the 16 January all remaining destroyers parted company.
Around 0330Z/17, HMS Ramillies parted company with the convoy. She took the troopship / liner Duchess of York with her.
When approaching Freetown local A/S vessels started to join the convoy. On 21 January the corvettes HMS Asphodel (Lt.Cdr.(Retd.) K.W. Stewart, RN) and HMS Calendula (Lt.Cdr. A.D. Bruford, RNVR) joined and the next day the destroyer HMS Velox (Lt.Cdr. E.G. Roper, DSC, RN) also joined the convoy. Finally on 24 January the destroyer HMS Vidette (Lt. E.N. Walmsley, RN) also joined the convoy.
On 25 January 1941 the convoy arrived at Freetown escorted by HMAS Australia, HMS Emerald, HMS Velox, HMS Vidette, HMS Asphodel and HMS Calendula.
The convoy departed Freetown on 29 January with the addition of troop transport Cameronia (British, 16297 GRT, built 1920) still escorted by HMAS Australia and HMS Emerald. A local A/S force remained with the convoy until 1 February and was made up of the destroyers HMS Faulknor, HMS Forester, sloop HMS Milford (Capt.(Retd.) S.K. Smyth, RN) and the corvettes HMS Clematis (Cdr. Y.M. Cleeves, DSC, RD, RNR) and HMS Cyclamen (Lt. H.N. Lawson, RNR).
HMS Emerald arrived at Capetown on 8 February escorting Arundel Castle, Athlone Castle, Capetown Castle, Duchess of Bedford, Durban Castle, Empress of Australia, Empress of Japan, Monarch of Bermuda and Winchester Castle. The light cruiser then went to Simonstown.
HMAS Australia arrived at Durban on 11 February with Britannic, Cameronia, Duchess of Richmond, Franconia, Highland Chieftain, Highland Princess, Nea Hellas, Ormonde, Pennland, Samaria and Windsor Castle.
The Capetown section departed that place on 12 February and the Durban section on 15 February after which a rendez-vous of Durban was effected.
On 21 February the troopships Empress of Australia, Empress of Japan, Ormonde and Windsor Castle were detached to Kilindini / Mombasa escorted by HMS Emerald. They arrived at Kilindini / Mombasa on 22 February. In the approaches to Kilindini / Mombasa the convoy was joined by the destroyer HMS Kandahar (Cdr. W.G.A. Robson, RN).
The remainder of the convoy continued on Suez escorted by HMS Australia (until 2040D/22) and HMS Hawkins (Capt. H.P.K. Oram, RN) which joined the convoy shortly before HMS Emerald and the four troopships for Kilindini / Mombasa were detached.
Around 1200D/26, the light cruiser HMS Caledon (Capt. C.P. Clarke, RN) joined. HMS Hawkins then parted company and proceeded to Aden with the Duchess of Richmond.
On 27 August the sloops HMS Auckland (Cdr. J.G. Hewitt, DSO, RN) and HMAS Parramatta (Lt.Cdr. J.H. Walker, MVO, RAN) joined the convoy. HMS Hawkins and the Duchess of Richmond also rejoined after which HMS Caledon parted company to return to Aden.
Also on 27 August, the destroyer HMS Kingston (Lt.Cdr. P. Somerville, DSO, DSC, RN) departed Aden with the following (troop) transports; President Doumer (British, 11898 GRT, built 1935), Takliwa (British, 7936 GRT, built 1924), Varsova (British, 4701 GRT, built 1914) and Waimarama (British, 12843 GRT, built 1938).
Around daylight on 1 March, HMS Auckland was detached to proceed to Port Sudan taking the President Doumer with her.
Around 1600C/1, HMAS Parramatta was detached to return to Aden.
In the morning of 2 March, HMS Hawkins was detached to proceed to Aden.
The convoy arrived at Suez on 3 March 1941, still escorted by HMS Kingston.
The 'Kilindini / Mombasa section' meanwhile departed there on 24 February as convoy WS 5X now escorted by light cruiser HMS Enterprise (Capt. J.C. Annesley, DSO, RN). On 27 February light cruiser HMS Capetown (Capt. P.H.G. James, RN) joined this convoy as additional escort. The convoy arrived at Bombay on 3 March 1941.
Convoy WS 5BX, now made up of the troopship Aquitania (British, 44786 GRT, built 1914) and Empress of Japan, departed Bombay for Singapore on 5 March escorted by HMS Enterprise. The convoy was joined on 8 March by the light cruiser HMS Durban (Capt. J.A.S. Eccles, RN). HMS Enterprise left the convoy on 9 March. The convoy arrived at Singapore on 11 March. HMS Durban had parted company with the convoy the day before.
22 Feb 1941
At 0515Z/22, the Dutch merchant vessel Rantaupandjang (2542 GRT, built 1922) sent out a raider signal from position 08°24'S, 51°35'E.
Then at 0818Z/22, a Walrus aircraft from the light cruiser HMS Glasgow (Capt. H. Hickling, RN) reported a German pocket battleship in position 08°30'S, 51°35'E. This was the Admiral Scheer. Later that afternoon after the aircraft had been launched again it failed to make contact with the enemy.
In response the aircraft carrier HMS Hermes (Capt. R.F.J. Onslow, DSC, MVO, RN) and light cruiser HMS Emerald (Capt. F.C. Flynn, RN) were sailed from Kilindini / Mombasa for the area the raider was spotted. The light cruiser HMS Capetown (Capt. P.H.G. James, RN) was sent to the Seychelles.
The heavy cruiser HMS Shropshire (Capt. J.H. Edelsten, RN) was operating off Somaliland. She was ordered to joined HMS Hermes and HMS Emerald.
The heavy cruiser HMAS Australia (Capt. R.R. Stewart, RN) was sent to the area the raider was spotted from escort duty with convoy WS 5B. HMS Hawkins (Capt. H.P.K. Oram, RN) remained with this convoy.
Heavy cruiser HMAS Canberra (Capt. H.B. Farncomb, RAN), which was en-route to the Maledive Islands from Colombo was ordered to proceed towards position 06°00'S, 60°00'E.
Heavy cruiser HMS Dorsetshire (Capt. B.C.S. Martin, RN) was with ' Z Force ' near Durban. She was ordered to join the East Indies command to search for the enemy. She was ordered to return to Durban the following day to continue escorting ' Z Force '.
Light cruiser HMS Leander (from the New Zealand Division) (Capt. R.H. Bevan, RN) was ordered to proceed southwards from Bombay. (29)
2 Mar 1941
Around 0700E/2, the aircraft carrier HMS Hermes (Capt. R.F.J. Onslow, DSC, MVO, RN) and light cruiser HMS Emerald (Capt. F.C. Flynn, RN) were joined by the heavy cruiser HMAS Australia (Capt. R.R. Stewart, RN) in approximate position 00°01'S, 68°45'E. (30)
4 Mar 1941
The aircraft carrier HMS Hermes (Capt. R.F.J. Onslow, DSC, MVO, RN), heavy cruiser HMAS Australia (Capt. R.R. Stewart, RN) and light cruiser HMS Emerald (Capt. F.C. Flynn, RN) arrived at Colombo. (31)
6 Mar 1941
Convoy CF 1.
This convoy departed Colombo on 6 March 1941.
It was made up of the troopships; Mauretania (British, 35739 GRT, built 1939) and Nieuw Amsterdam (Dutch, 36287 GRT, built 1938).
On departure from Colombo the convoy was escorted by the heavy cruiser HMAS Australia (Capt. R.R. Stewart, RN).
Around 1730FG/11, HMAS Australia was reinforced by the light cruisers HMAS Hobart (Capt. H.L. Howden, CBE, RAN, flying the flag of Rear-Admiral J.G. Crace, RN) and HMAS Sydney (Capt. J.A. Collins, CB, RAN) coming from Fremantle.
The convoy arrived at Fremantle in the early afternoon of March 15th, (32)
15 Mar 1941
HMAS Australia (Capt. R.R. Stewart, RN), HMAS Hobart (Capt. H.L. Howden, CBE, RAN, flying the flag of Rear-Admiral J.G. Crace, RN) and HMAS Sydney (Capt. J.A. Collins, CB, RAN) arrived at Fremantle with convoy CF 1. (33)
17 Mar 1941
Around 0830H/17, HMAS Australia (Capt. R.R. Stewart, RN), HMAS Hobart (Capt. H.L. Howden, CBE, RAN, flying the flag of Rear-Admiral J.G. Crace, RN) and HMAS Sydney (Capt. J.A. Collins, CB, RAN) departed Fremantle. They were escorting the troopships Mauretania (British, 35739 GRT, built 1939) and Nieuw Amsterdam (Dutch, 36287 GRT, built 1938) until 0700H/18 when the cruisers left the troopships in position 36°11'S, 116°25'E.
The troopships then proceeded independently, HMAS Australia set course for Albany while HMAS Hobart and HMAS Sydney set course for Melbourne. (33)
23 Mar 1941
Around 0915K/23, HMAS Hobart (Capt. H.L. Howden, CBE, RAN, flying the flag of Rear-Admiral J.G. Crace, RN) and HMAS Sydney (Capt. J.A. Collins, CB, RAN) departed Melbourne and Williamstown respectively.
They then met HMAS Australia (Capt. R.R. Stewart, RN) in position 38°41'S, 144°29'E around 1500K/23.
The three cruisers then set course for Sydney. (33)
24 Mar 1941
Around 1540K/24, HMAS Australia (Capt. R.R. Stewart, RN), HMAS Hobart (Capt. H.L. Howden, CBE, RAN, flying the flag of Rear-Admiral J.G. Crace, RN) and HMAS Sydney (Capt. J.A. Collins, CB, RAN) arrived at Sydney.
HMAS Hobart then went to the Cockatoo Island Dockyard where she was docked in the Sutherland Dock. (33)
4 Apr 1941
Around 0930K/4, HMAS Hobart (Capt. H.L. Howden, CBE, RAN, flying the flag of Rear-Admiral J.G. Crace, RN) and HMAS Australia (Capt. R.R. Stewart, RN) departed Sydney for Wellington. (34)
6 Apr 1941
Around 1800M/6, HMAS Hobart (Capt. H.L. Howden, CBE, RAN, flying the flag of Rear-Admiral J.G. Crace, RN) and HMAS Australia (Capt. R.R. Stewart, RN) arrived at Wellington from Sydney.
At 1336K/6, while in Cook Strait, the Walrus aircraft of HMAS Australia crashed on being launched. The pilot was killed, the other crewmembers were picked up. (34)
7 Apr 1941
Convoy US 10.
This convoy departed Wellington, New Zealand on 7 April 1941. It arrived at Colombo / Trincomalee on 26 April 1941.
On departure from Wellington, around 1620M/7, the convoy was made up of the troopships; Mauretania (British, 35739 GRT, built 1939) and Nieuw Amsterdam (Dutch, 36287 GRT, built 1938).
They were escorted by the heavy cruiser HMAS Australia (Capt. R.R. Stewart, RN) and the light cruiser HMAS Hobart (Capt. H.L. Howden, CBE, RAN) and HMS Achilles (from the New Zealand Division) (Capt. H.M. Barnes, RN).
Around 0430K/10, HMS Achilles parted company in position 35°15'S, 152°45'E and proceeded to Jervis Bay where the troopship Queen Mary (British, 81235 GRT, built 1936) is anchored under the protection of the light cruiser HMAS Sydney (Capt. J.A. Collins, CB, RAN). When HMS Achilles arrived HMAS Sydney departed Jervis Bay for Sydney.
The remainder of the convoy meanwhile went to Sydney where they arrived around 1000K/10.
Around 0830K/11, the convoy departed Sydney with two more troopships in it, these were the Ile de France (British, 43450 GRT, built 1926) and Queen Elizabeth (British, 83673 GRT, built 1939). Escort was HMAS Australia.
In the afternoon of the 11th they were joined in position 35°24'S, 152°05'E by the Queen Mary and HMS Achilles. HMS Achilles then parted company to proceed to Sydney.
The convoy arrived at Fremantle on 16 April and departed from there in the same composition on 19 April.
In the afternoon of 22 April the convoy made rendezvous in position 08°30'S, 104°45'E with the light cruiser HMS Durban (Capt. J.A.S. Eccles, RN) which then took the Nieuw Amsterdam with her to Singapore. They arrived at Singapore on 24 April.
In the afteroon of the 25 April the convoy made rendezvous in position 03°00'N, 84°45'E with the heavy cruiser HMAS Canberra (Capt. H.B. Farncomb, RAN) which then took the Queen Elizabeth and Queen Mary with her to Trincomalee where they arrived on 26 April.
HMS Australia with the Ile de France and Mauretania proceeded to Colombo where they arrived on 26 April. (29)
30 May 1941
HMAS Australia (Capt. R.R. Stewart, RN) and HMAS Adelaide (Capt. H.A. Showers, RAN) conducted exercises off Sydney.
On completion of the exercises both entered harbour. (35)
12 Jun 1941
HMAS Australia (Capt. R.R. Stewart, RN) and HMAS Adelaide (Capt. H.A. Showers, RAN) conducted exercises off Sydney.
On completion of the exercises both entered harbour. (36)
20 Jun 1941
HMAS Australia (Capt. R.R. Stewart, RN) and HMAS Adelaide (Capt. H.A. Showers, RAN) conducted exercises off Sydney.
On completion of the exercises both entered harbour. (36)
24 Jun 1941
Convoy US 11A.
On 24 June 1941, the troop transport Aquitania (British, 44786 GRT, built 1914) departed Wellington escorted by the light cruiser HMS Achilles (from the New Zealand Division) (Capt. H.M. Barnes, RN). They set course for Bass Strait.
On 28 June 1941, the troopship Queen Elizabeth (British, 83673 GRT, built 1939) proceeded from Sydney to Jervis Bay escorted by the light cruiser HMAS Adelaide (Capt. H.A. Showers, RAN).
On 29 June 1941, the troopship Queen Mary (British, 81235 GRT, built 1936) departed Sydney escorted by the heavy cruiser HMAS Australia (Capt. R.R. Stewart, RN).
Around 1700K/29, the Queen Mary and HMAS Australia were joined in position 35°00'S, 151°55'E by the Queen Elizabeth and HMAS Adelaide. HMAS Adelaide then parted company to proceed to Auckland.
Around 1200K/30, the Aquitania and HMS Achilles joined the convoy. HMS Achilles then parted company to return to Wellington.
On 4 July 1941, the convoy anchored in Gage Roads off Fremantle.
On 5 July 1941, HMAS Australia entered Fremantle harbour.
On 9 July 1941, the convoy departed Fremantle for Trincomalee still escorted by HMAS Australia.
On 16 July 1941, the convoy arrived at Trincomalee.
On 17 July 1941, the convoy departed Trincomalee for Suez. The convoy was still escorted by HMAS Australia.
Around 1700C/22, near Aden, the light cruiser HMS Caledon (A/Capt. H.J. Haynes, DSO, DSC, RN) took over the escort of the convoy from HMAS Australia
The convoy was later dispersed in the Red Sea. (37)
6 Aug 1941
Convoy SW 8.
This convoy departed Aden on 6 August 1941.
It was made up of the following troop transports; Duchess of Bedford (British, 20123 GRT, built 1928) and Orduna (British, 15507 GRT, built 1914).
On departure from Aden the convoy was escorted by the heavy cruiser HMAS Australia (Capt. R.R. Stewart, RN).
The convoy arrived at Kilindini / Mombasa on 13 August 1941.
The convoy departed Kilindini / Mombasa on 14 August 1941 now escorted by the heavy cruiser HMS Hawkins (Capt. H.P.K. Oram, RN).
The convoy arrived at Durban on 18 August 1941. (38)
18 Aug 1941
Operation Kedgeree
The purpose of this operation was to intercept a Vichy French convoy en-route from Tamatave, Madagascar to France.
A Vichy French convoy, made up of the transports Dalny (6672 GRT, built 1914), Lipari (9954 GRT, built 1922), Linois (7473 GRT, built 1907), Sagittaire (7706 GRT, built 1929) and Ville d'Oran (10172 GRT, built 1936) had departed Tamatave on the 12th to proceed into the Atlantic. It had been decided to try to intercept this convoy when it was rounding South Africa.
The following warships were sent out to intercept the convoy; heavy cruisers HMAS Australia (Capt. G.D. Moore, RAN) and HMS Hawkins (Capt. H.P.K. Oram, RN) and the auxiliary whalers HMSAS Blaauwberg, HMSAS Cederberg, HMSAS Odberg, HMSAS Southern Barrier and HMSAS Sydoslandet.
Around 1800B/18, HMSAS Odberg and HMSAS Southern Barrier departed Durban for the operation.
Around 1900B/18, HMSAS Blaauwberg, HMSAS Cederberg and HMSAS Sydoslandet departed Capetown for the operation.
During the night of 18 / 19 August 1941, HMAS Australia departed Durban for the operation.
And finally around 1015B/19, HMS Hawkins departed Durban for the operation.
Also South African aircraft were deployed to search for the convoy.
Around 1730B/22, HMSAS Blaauwberg, sighted two eastbound French transports and an escorting sloop. Contact was however lost in the poor visibility.
The French convoy was however not sighted and at sunset 25 August 1941 the operation was called off and all ships involved set course to return to harbour. (39)
24 Dec 1941
Around 088K/24, HMAS Canberra (Capt. H.B. Farncomb, RAN, flying the flag of Rear-Admiral J.G. Crace, CB, RN), HMAS Perth (Capt. H.M.L. Waller, DSO, RAN) and HMNZS Achilles (Capt. H.M. Barnes, RN) arrived at Sydney.
Rear-Admiral Crace then struck his flag in HMAS Canberra and hoisted it in HMAS Australia. Also the Commanding Officers of HMAS Australia and HMAS Canberra were swapped. (40)
28 Dec 1941
Convoy ZK 5.
This convoy departed Sydney on 28 December 1941.
It was made up of the (troop) transports; Aquitania (British, 44786 GRT, built 1914), Herstein (Norwegian, 5100 GRT, built 1939) and Sarpedon (British, 11321 GRT, built 1923). They were escorted by the heavy cruisers HMAS Australia (Capt. H.B. Farncomb, RAN, flying the flag of Rear-Admiral J.G. Crace, CB, RN), HMAS Canberra (Capt. G.D. Moore, RAN) and light cruisers HMAS Perth (Capt. H.M.L. Waller, DSO, RAN) and HMNZS Achilles (Capt. H.M. Barnes, RN).
Around 1500K/2, the sloops HMAS Swan (Lt.Cdr. A.J. Travis, RAN) and HMAS Warrego (Cdr. R.V. Wheatley, RAN) joined the escort.
The convoy arrived at Port Moresby on 3 January 1942. (41)
4 Jan 1942
The heavy cruiser HMAS Australia (Capt. H.B. Farncomb, RAN, flying the flag of Rear-Admiral J.G. Crace, CB, RN) and the light cruisers HMAS Perth (Capt. H.M.L. Waller, DSO, RAN) and HMNZS Achilles (Capt. H.M. Barnes, RN) departed Port Moresby for Noumea. (42)
7 Jan 1942
The heavy cruiser HMAS Australia (Capt. H.B. Farncomb, RAN, flying the flag of Rear-Admiral J.G. Crace, CB, RN) and the light cruisers HMAS Perth (Capt. H.M.L. Waller, DSO, RAN) and HMNZS Achilles (Capt. H.M. Barnes, RN) arrived at Noumea from Port Moresby. (42)
9 Jan 1942
Around 0800L/9, the Australian Squadron which was made up of the heavy cruiser HMAS Australia (Capt. H.B. Farncomb, RAN, flying the flag of Rear-Admiral J.G. Crace, CB, RN) and the light cruisers HMAS Perth (Capt. H.M.L. Waller, DSO, RAN) and HMNZS Achilles (Capt. H.M. Barnes, RN) departed Suva to proceed to the south-east and the join convoy ZS 6.
[For more info on this convoy see the event ' Convoy ZS 6 ' for 10 January 1942.] (42)
10 Jan 1942
Convoy ZS 6.
This convoy departed Auckland on 10 January 1942.
It was made up of the (troop) transports; Port Montreal (British, 5882 GRT, built 1937), Rangitira (New Zealand, 6152 GRT, built ) and Wahine (New Zealand, 4436 GRT, built 1913).
On departure from Auckland the convoy was escorted by the light cruiser HMNZS Leander (Capt. R.H. Bevan, RN).
Around 1330M/11, the convoy was sighted by the Australian Squadron which was made up of the heavy cruiser HMAS Australia (Capt. H.B. Farncomb, RAN, flying the flag of Rear-Admiral J.G. Crace, CB, RN) and the light cruisers HMAS Perth (Capt. H.M.L. Waller, DSO, RAN) and HMNZS Achilles (Capt. H.M. Barnes, RN). The Australia Squadron then patrolled ahead of the convoy.
Around 1800M/13, HMAS Perth and HMNZS Achilles parted company with HMAS Australia and proceeded one hour later with the Rangitira to Lautoka, Fiji where they arrived around 0800M/14. The cruisers then set course for Suva where they arrived around 1300M/14.
Meanwhile the remainder of the convoy had proceeded to Suva escorted by HMAS Australia and HMNZS Leander. They had arrived in the morning of the 14th. (42)
15 Jan 1942
Around 0600M/15, the heavy cruiser HMAS Australia (Capt. H.B. Farncomb, RAN, flying the flag of Rear-Admiral J.G. Crace, CB, RN), light cruisers HMAS Perth (Capt. H.M.L. Waller, DSO, RAN), HMNZS Achilles (Capt. H.M. Barnes, RN), HMNZS Leander (Capt. R.H. Bevan, RN) and the destroyer FSS Le Triomphant (Cdr. P.M.J.R. Auboyneau) departed Suva for Sydney.
Around 1100M/15, FFS Le Triomphant was detached to return to Suva to escort the chartered tanker Falkefjell (Norwegian, 7927 GRT, built 1931) to Brisbane.
Around 1130L/17, HMNZS Achilles was detached to proceed to Auckland for docking.
Around 1400K/19, HMAS Australia, HMAS Perth and HMNZS Leander arrived at Sydney. (42)
23 Jan 1942
HMAS Australia (Capt. H.B. Farncomb, RAN, flying the flag of Rear-Admiral J.G. Crace, CB, RN), HMAS Perth (Capt. H.M.L. Waller, DSO, RAN) and HMNZS Leander (Capt. R.H. Bevan, RN) conducted exercises off Sydney. (42)
27 Jan 1942
HMAS Australia (Capt. H.B. Farncomb, RAN, flying the flag of Rear-Admiral J.G. Crace, CB, RN), HMAS Perth (Capt. H.M.L. Waller, DSO, RAN), HMAS Adelaide (Capt. H.A. Showers, RAN) and HMNZS Leander (Capt. R.H. Bevan, RN) departed Sydney to proceed eastwards to provide cover for a US troop convoy proceeding to Melbourne. HMAS Adelaide was to join the close escort of the convoy.
HMAS Australia, HMAS Perth and HMNZS Leander returned to Sydney on 31 January 1942.
The convoy continued on and arrived at Melboune on 1 February 1942 escorted by USS Phoenix and HMAS Adelaide.
Rendezvous with the US Convoy was made around 1130L/29. The US convoy was made up of the light cruiser USS Phoenix (Capt. H.E. Fischer, USN) and the (troop) transports Mariposa (18017 GRT, built 1931) and President Coolidge (American, 21936 GRT, built 1931). HMAS Adelaide then join the close escort while HMAS Australia, HMAS Perth and HMNZS Leander patrolled ahead of the convoy.
(42)
31 Jan 1942
Around 1730K/31, HMAS Australia (Capt. H.B. Farncomb, RAN, flying the flag of Rear-Admiral J.G. Crace, CB, RN), HMAS Perth (Capt. H.M.L. Waller, DSO, RAN) and HMNZS Leander (Capt. R.H. Bevan, RN) departed Sydney to proceed to the eastward to make rendezous with HMNZS Achilles (Capt. H.M. Barnes, RN) coming from Auckland and to provide cover for an American transport enroute to Australia.
Plans were however changed and around 2330K/1, HMAS Perth was detached having been ordered to proceed to Melbourne.
HMNZS Leander was ordered to escort / provide cover for the transport while HMAS Australia was ordered to proceed to Wellington. (42)
1 May 1942
A.M. on 1 May 1942 HMAS Australia (Capt. H.B. Farncomb, RAN, flying the flag of Rear-Admiral J.G. Crace, CB, RN) and HMAS Hobart (Capt. H.L. Howden, CBE, RAN) departed Sydney for passage to Hervey Bay at high speed. (1)
2 May 1942
Around 1545K/2, HMAS Australia (Capt. H.B. Farncomb, RAN, flying the flag of Rear-Admiral J.G. Crace, CB, RN) and HMAS Hobart (Capt. H.L. Howden, CBE, RAN) arrived at Hervey Bay and immediately commenced fuelling.
Around 2100K/2, HMAS Australia, HMAS Hobart and USS Whipple (Lt.Cdr. E.S. Karpe, USN) departed Hervey Bay to make rendezvous with Task Force 11 which was effected around 0805KL/4. USS Whipple did not join Task Force 11 but was released and proceeded to Port Vila, New Hebrides. (43)
4 May 1942
Battle of the Coral Sea
Allies Forces in the area on 4 May 1942.
The Allied forces in the area were made up of the following units; Task Force 11; aircraft carrier USS Lexington (Capt. F.C. Sherman, USN, flying the flag of R.Adm. A.W. Fitch, USN), heavy cruisers USS New Orleans (Capt. H.H. Good, USN), USS Minneapolis (Capt. F.J. Lowry, USN, flying the flag of R.Adm. T.C. Kinkaid) and the destroyers USS Phelps (Lt.Cdr. E.L. Beck, USN, with Capt. A.R. Early, USN, commanding DesRon 1 on board), USS Farragut (Cdr. G.P. Hunter, USN), USS Dewey (Lt.Cdr. C.F. Chillingsworth, Jr., USN), USS Worden (Lt.Cdr. W.G. Pogue, USN), USS Monaghan (Lt.Cdr. W.P. Burford, USN), Aylwin (T/Cdr. R.H. Rodgers, USN) and the tanker USS Tippecanoe (Cdr. A. MacOndray, Jr., USN).
Task Force 17; aircraft carrier USS Yorktown (Capt. E. Buckmaster, USN, flying the flag of R.Adm. F.J. Fletcher, USN), heavy cruisers USS Chester (Capt. T.M. Shock, USN), USS Portland (Capt. B. Perleman, USN), Astoria (Capt. F.W. Scanland, USN), and the destroyers USS Morris (T/Cdr. H.B. Jarrett, USN, with T/Capt. G.C. Hoover, USN, commanding DesRon 2 on board), USS Sims (Lt.Cdr. W.M. Hyman, USN), USS Anderson (Lt.Cdr. J.K.B. Ginder, USN), USS Hammann (Cdr. A.E. True, USN), USS Russell (Lt.Cdr. G.R. Hartwig, USN), USS Walke ( Lt.Cdr. T.E. Fraser, USN) and the tanker USS Neosho (T/Capt. J.S. Phillips, USN). The heavy cruiser USS Chicago (Capt. H.D. Bode, USN) and the destroyer USS Perkins (Lt.Cdr. W.C. Ford, USN) were also temporary attached to Task Force 17, these two ships were units of Task Force 44.
Early on the 4th (0805KL/4), Two more units of Task Force 44, the Australian heavy cruiser HMAS Australia (Capt. H.B. Farncomb, RAN, flying the flag of Rear-Admiral J.G. Crace, CB, RN) and Australian light cruiser HMAS Hobart (Capt. H.L. Howden, CBE, RAN) had made rendezvous with Task Force 11.
Prelude up to 4 May 1942.
Task Force 11 and Task Force 17 had met earlier, around 0615LM(-11.5) on 1 May 1942 in position 16°16'S, 162°20'E. Task Force 17 had just spent seven days of upkeep and provisioning at Tonga.
Task Force 11 was then ordered to join the heavy cruiser USS Chicago, destroyer USS Perkins and tanker USS Tippecanoe in position 16°00'S, 161°45'E and with those ships rejoin Task Force 17 the next morning which they did.
It was desirable to take as much fuel out of USS Tippecanoe as possible before she was to return to Port Vila, Efate in accordance with orders from the Commander-in-Chief, US Pacific Fleet and to hold as much fuel as possible in USS Neosho as a reserve.
Intelligence reports meanwhile indicated that the long awaited Japanese attack on Port Moresby, New Guinea, might start very soon. Task Force 17 completed fuelling on May 2, but Task Force 11 did not expected to complete fuelling until noon on the 4th. Rear-Admiral Fletcher therefore ordered Rear-Admiral Fitch to fuel his destroyers, if practicable, on northwesterly course at night and rejoin Task Force 17 at daylight May 4 in position 15°00'S, 157°00'E. This was the same rendezvous as had been arranged with Rear-Admiral Crace, RN, which was to join with the heavy cruiser HMAS Australia and light cruiser HMAS Hobart.
At 1545LM/2, an air scout from USS Yorktown sighted an enemy submarine on the surface in position 16°04'S, 162°18'E, just 32 miles north of the Task Forces at that moment. The submarine dived but surfaced shortly afterwards as it was again sighted and depth charges by three planes sent out to locate it. Two destroyers were then ordered to search the area but no contact was made. It was thought possible that the Task Forces might have been reported by the enemy. [The enemy submarine in question was the Japanese I-21 (offsite link) en-route from Rabaul to Noumea. She reported the attack but did NOT report that the attacking aircraft were CARRIER BASED aircraft, so the Japanese were still unaware of the American carriers that were operating in the Coral Sea.]
Task Force 17 with USS Neosho continued to the northwestward during the night and topped off destroyers from Neosho on the third. It was intended to top off other ships requiring it after effecting rendezvous with Rear-Admirals Fitch and Crace the next morning. The former had been directed to sent USS Tippecanoe to Efate with a destroyer escort, this he did after his entire force had topped off with fuel. The destroyer USS Worden was ordered to escort the tanker to Efate.
Task Force 17 consistently kept in readiness for action on short notice by topping off destroyers from the tanker, cruiser and the carrier whenever they could receive as mich as 500 barrels of fuel. This condition of readiness paid dividends on the night of May 3 and 6.
At 1900LM/3, Rear-Admiral Fletcher received intelligence reports from the Commander Southwest Pacific Forces stating that five or six enemy vessels had been sighted at 1700 hours on 2 May, off the southern end of Santa Isabel Island possibly heading to Tulagi and that two transports were unloading into barges at Tulagi at an unspecified time. This was just the kind of report he was waiting for. It was regrettable that Task Force 11 was not available yet but it was fortunate that Task Force 17, fully fuelled, was able to stike at daylight on the 4th. USS Neosho, escorted by USS Russell was ordered to proceed to position 15°00'S, 157°00'E to meet Rear-Admirals Fitch and Crace at 0800 hours on 4 May and the combined force was then to proceed eastwards and join Task Force 17 in position 15°00'S, 160°00'E at daylight on 5 May.
Japanese landings at Tulagi on 3 May 1942 and the American response on 4 May 1942.
Tulagi had been evacuated by the Australians based there on 2 May 1942 and the Japanese landed there the following day. The Japanese force that had arrived there and had landed troops and supplies was made up of the minelayer Okinoshima, auxiliary minelayer Koei Maru, destroyers Kikuzuki, Yuzuki, auxiliary submarine chasers Toshi Maru No.3 and Tama Maru No.8, auxiliary minesweepers Wa-1, Wa-2, Hagoromo Maru, Noshiro Maru No.2 and Tama Maru. The transport Azumasan Maru (7623 GRT, built 1933) is also part of the force. (All links are offsite links).
At 2030LM/3, Task Force 17, currently made up of the aircraft carrier USS Yorktown, heavy cruisers USS Chicago, USS Chester, USS Portland, USS Astoria and the destroyers USS Perkins, USS Sims, USS Anderson, USS Hammann, USS Walke and USS Morris changed course to the north and increased speed to 24 knots and two hours later to 27 knots. At 0701LM/4, USS Yorktown launched a six plane combat air patrol and the first attack group. Combat air patrol was maintained throughout the day and cruisers maintained inner air patrol. The surface force maneuvered south of Guadacanal Island. Three air attacks were made on the Japanese at Tulagi. No enemy ships or aircraft were sighted from the ships of Task Force 17. The last attack group landed back on USS Yorktown at 1702LM/4.
One torpedo plane and two fighters failed to return due to being lost and running out of gasoline. The fighter pilots were recovered from Guadalcanal Island by USS Hammann that same evening. Six scout bombers and two torpedo planes were slightly damaged. USS Perkins was also detached to search for the missing torpedo plane but found no trace of it.
Enemy losses were reported by returning aircraft as two destroyers, one cargo ship and four gunboats sunk. One light cruiser beached and sunk, one destroyer, one heavy cruiser or aircraft tender severely damaged. One cargo ship damaged. Various small craft destroyed. Five single float planes shot down. [Actual damage inflicted on the enemy was as follows; During the first strike the destroyer Kikuzuki was sunk. During the second strike the auxiliary minesweepers Wa-1, Wa-2 were sunk. The Okinoshima , escorted by the Yuzuki were attacked but managed to dodge all torpedoes by radical maneuvering. She sustained some minor damage though, from near misses and strafing. Also the Yuzuki, Azumasan Maru, Koei Maru were damaged as was the Tama Maru which sank two days later as a result of the damage. Also five float planes were destroyed.]
Events between the action of Tulagi and the action of Misima.
During the night of May 4 - 5, Task Force 17, less USS Perkins and USS Hammann, proceeded southeast and south at 23 knots to rendezvous as previously arranged. The two detached destroyers rejoined Task Force 17 in the morning.
At 0825LM/5, USS Yorktown launched four fighters to investigate a radar contact bearing 252°, distance 30 miles. Interception was completed 15 minutes later and an enemy patrol plance was shot down. At this time the patrol plane was fifteen miles from USS Lexington and twenty-seven miles from USS Yorktown, so it might have been trailing Task Force 11 and not Task Force 17. Shortly before rejoining USS Hammann sighted the patrol plane. At 0845LM/5 Task Force 17 made rendezvous with Task Force 11 and HMAS Australia and HMAS Hobart.
Task Force 17 fuelled from USS Neosho on 5 and 6 May 1942. Task Force 11 and Task Force 44 now joined Task Force 17.
The heavy cruisers USS Minneapolis, USS Astoria, USS Portland, USS New Orleans, USS Chester and five of the destroyers were assigned as ' Attack Group ' in case enemy surface ships were to be attacked during a surface action.
HMAS Australia, USS Chicago, HMAS Hobart and two destroyers were assigned as ' Support Group '.
The carriers were assigned four destroyers as close escort.
The remaining two destroyers were assigned to escort the tankers, though one destroyer and one tanker were at Efate.
Intelligence reports were received on a large amount of various types of enemy vessels in the Salomon Sea between New Guinea, New Britain and the Solomon Islands. It was also reported that three enemy carriers were in the area.
It was decided to be in attack position at daylight on 7 May. Tanker USS Neosho was detached to the southwards escorted by USS Sims.
Action of Misima Island, 7 May 1942.
The morning air search was planned to locate the most suitable objective for attack and to obtain positive or negative information regarding enemy carriers of whose movements no information had been received since the previous afternoon. It was quite possible that three enemy carriers might be within striking distane. Unfortunately the search to the east-north-eastward was not completed due to bad weather. A scout searching to the north-westward reported two carriers and two cruisers north of Masima Island. After launching the attack groups, the scouts were recovered and it was learned that an error had been made in using the contact pad and that the pilot had not sighted any carriers. About the time this error was discovered, Army aircraft reported an enemy carrier group close to Misimi and the attack groups were diverted and made contact. The carrier and a light cruiser were claimed sunk in position 10°29'S, 152°53'E. The large number of torpedo and bomb gits and the rapidity of her sinking (within five minutes) must have resulted in the loss of practically all personnel and aircraft aboard the carrier. The light cruiser was reported to sink so quickly that there must have been great loss of life in her also. The attack groups returned to USS Yorktown and USS Lexington around 1338LM/7.
The Japanese carrier sunk was the Shoho, which had been part of the cover force for the Port Moresby landing group. The cover force had been made up of the already mentioned Shoho, the heavy cruisers Aoba, Furutaka, Kako, Kinugasa and the destroyer Sazanami.
The main assault force for the Port Moresby landings was made up of the light cruiser Yubari, minelayer Tsugaru, destroyers Oite, Asanagi, Mutsuki, Mochitsuki, Yayoi, minesweeper W-20, auxiliary minesweepers Hagoromo Maru, Noshiro Maru No.2 and Fumi Maru No.2, the fleet tanker Hoyo Maru (8692 GRT, built 1936) and ten transports with troops and supplies, these were the naval transport Shoka Maru (4467 GRT, built 1935), Mogamigawa Maru (7509 GRT, built 1934), Goyo Maru (8469 GRT, built 1939), Akibasan Maru (4670 GRT, built 1924), Chowa Maru (2719 GRT, built 1940) and the army transports Matsue Maru (7061 GRT, built 1921), Taifuku Maru (3520 GRT, built 1939), Mito Maru (7061 GRT, built 1921), China Maru (5870 GRT, built 1920) and Hibi Maru (5873 GRT, built 1921).
Thoughts were given to launching another strike or search but it was unlikely that another suitable objective was to be found near the location of the attack of this morning. The location of the Japanese 5th Carrier Division was still unknown but it was thought possible that these were within striking distance. Radar contacts and radio interceptions showed that our position was known to the enemy. One four engined enemy patrol bomber had been shot down by fighters from USS Yorktown.
It was decided to head westwards during the night to be in position if the enemy would pass through the Jomard Passage by morning heading for Port Moresby.
At 1659LM/7 an enemy seaplane was sighed but fighters failed to intercept.
At 1747L/7 (clocks had been set to zone -11 at 1700 hours), radar showed a group of planes to the south-eastward on a westerly course. Fighters were sent to intercept and between fifteen and twenty enemy planes were claimed to have been shot down. American losses were three fighters. When American aircraft were landing after dark, three enemy aircraft circled showing light and they made no sign of hostility probably having mistaken our forces for their own. It was realized that the enemy carriers must be in the area for such a mistake to happen. One of these enemy aircraft was shot down by AA gunfire.
Loss of USS Neosho and USS Sims.
While all of the above was going on, at 1051LM/7, a signal, repeated several times, was reveived from USS Neosho that she was being bombed by three enemy aircraft in position 16°50'S, 159°08'E. Later at 1600LM/7, USS Neosho reported that she was sinking in position 16°38'S, 158°28'E.
A subsequent signal from the Commander-in-Chief, US Pacific Fleet indicated that USS Sims had also been sunk. Unfortunately, nothing was received as to the type of aircraft which attacked them. It would have been extremely valuable information if it had been reported that they were carrier planes. The destroyer USS Monaghan was detached during the night of May 7-8 to search the next morning for survivors. While well clear of the Fleet, she was also to sent radio signals to the Commander-in-Chief, US Pacific Fleet and others. This left seven destroyers and five cruisers with the two carriers.
According to survivors of the USS Sims around 0910LM/7, a lone Japanese twin engined bomber had dropped a single bomb which hit the water rather close to port abreast the forward guns. On man at No.2 gun mount was injured by a fragment but no furher damage was done. The plane then kept shadowing USS Sims and USS Neosho. Weather was clear and the sea smooth.
USS Sims had numerous radar contacts and about 0930LM/7, sixteen high level bombers came in to attack USS Sims and USS Neosho. They dropped bombs but missed the Sims wide, Neosho reported being near missed, but neither ship was damaged.
Survivors from the USS Sims reported that the ships 5" DP gunfire apparently disturbed them with the above result. During these fist two actions 328 rounds of 5" ammunition was expended.
The horizontal bombers disappeared from sight but USS Sims continued to pick up planes on her SC radar. None were sighted, however, until twenty-four dive bombers, appeared around 1130LM/7 [USS Neosho gives the time as 1201/7, but it might be she kept another time zone]. As soon as these aircraft appeared, USS Sims went to flank speed and turned left to take position on the port quarter of the tanker. Fire was opened with the 5" guns in director control when the planes came within range. The attacks were directed promarily at the tanker and came in from various bearings astern in three waves. The planes approached at about 15000 feet and dove close to the ship in shallow dives of about 30°. Bombs were released quite close aboard. Survivors stated that some dive-bombers were destroyed by the blast of their own bombs. USS Sims obtained one direct hit on one of the dive bombers and the plane exploded in the air. The 20mm AA guns fired continuously at the dive bombers as they passed overhead and tracers were seen to pass through the planes, but the projectiles failed to burst and destroy the aircraft. One of the forward 20mm guns jammed early in the action and was not cleared during the remainder of the engagement.
Four aircraft broke off from one wave of Neosho attackers and directed their attack at USS Sims, diving on their succession from astern. All of these planes were single motored, had fixed landing gear, and had a silhoutte similar to that of Japanese dive bombers. The first released a bomb wihch landed in the water about amidships to port. The second released a bomb which landed on no.2 torpedo mount and exploded in the forward engine room. The third released a bomb which apparently hit the after upper deck house and went down through diagonally forward, exploding in the after engine room. The fourth plane is believed to have made a direct hit on No.4 gun but this can not be definitely established.
Numbers three and four gun mounts and the after 20mm guns were put out of commission by the bomb hits, but the forward mounts in local control and one 20mm gun forward continued firing at the planes untill all of them were out of range. The total of rounds fired by the Sims cannot be ascertained, but one survivor states that over 200 rounds were fired from number two mount alone. During this last attack, the paint on the barrel of number one mount blistered and caught fire. The crew, however, continued to fire with the complete length of the barrel in flames. Several planes were brought down by gun fire during this attack. It is believed that the bombs dropped were of about 500 pounds size. USS Sims broke in two and sank around noon.
Though there are only thirteen survivors of the Sims, these men are from widely separated battle stations and it was possible to reconstruct a fairly accurate account of her last moments. The survivors of the USS Sims then made for the USS Neosho was had been abandoned but was still afloat.
USS Neosho meanwhile had also been dive bombed. The majority of the dive bombers had been forced to released their bombs early due to effective AA gunfire which claimed to have shot down three of the attackers. One of these planes made a suicidal run into the ship hitting no.4 gun enclosure. Non the less the ship was hit by about five bombs, three near the bridge and two aft. It is also believed that at least two of the ships boilers exploded.
The Commanding Officer gave order to ' prepare to abandon ship ' but some must have misunderstood the order or only heard ' abandon ship ' some personnel in some part of the ship began to do so. Neosho's motor whale boat and the motor whale boat from the Sims were then dispatched to round these up. They picked up men and put them on raft so they could continue their search for more men in the water. After the boats were then full they returned to the ship. It was however to close near sunset to sent the boats out again to collect the rafts as it was also feared that the Neosho could sink at any moment due to her listing badly. The liferafts then drifted away with their occupants.
A muster roll was held and with the known casualties it was established that 4 officers and 154 men were missing. Accounted for were 16 officers and 94 men. The survivors on Neosho had been joined by only 15 survivors from the Sims. To righten the ship from it's 30° list, three valves in starboard wing tanks were opened, three other valves could not be opened due to them being damaged. Power could however not be restored.
During the night of 7/8 May, two surivivors (wounded), one from the Neosho and one from the Sims died. They were buried at sea in the morning of the 8th.
On the 9th, three more men (all from the Neosho), were buried at sea.
Shortly after noon on the 10th, an Australian Hudson aircraft was sighted and information was passed. Also on this day, three more men (all from the Neosho), were buried at sea.
Shortly before noon on the 11th, a Calatina aircraft was sighted and 1.5 hours later, the destroyer USS Henley (Lt.Cdr. R.H. Smith, USN) arrived on the scene. Just as well as by now the Neosho would not have held out much longer. The survivors were then taken on board the destroyer, a total of 123 officers and men. At 1522L/11, USS Neosho slid underneath the waves with her colors flying after having been scuttled by a torpedo and gunfire from the Henley. Position was 15°35'S, 155°36'E.
USS Henley then set course for Brisbane arriving there on the 14th. On the 12th an ex Sims survivor had died from his wounds as did an ex Neosho survivor on the 13th. Both were buried at sea on the 13th.
On 16 May 1942, the destroyer USS Helm (Lt.Cdr. C.E. Carroll, USN), which had also been searching in the area picked up four survivors from a life raft. One of these however died shortly afterwards. These survivors were also taken to Brisbane where the Helm arrived on 18 May 1942.
As a result of the confusion on board USS Neosho the Commanding Officer suggested to change the order ' prepare to abandon ship ' Navy wide to ' fall in at boats and raft stations ' and to only use the words ' abandon ship ' if this was actually to be done.
Carrier battle, 8 May 1942.
As shore based aircraft had not detected the two Japanese carriers and our intelligence was not sure of their position either with reporting that they could be either east or west of Task Force 17, a 360° degree search was launched at dawn. At 0828L/8, a scout from USS Lexington reported two carriers, four heavy cruiser and three destroyers. This was amplified seven minutes later as two carriers, four heavy cruisers and many destroyers bearing 028°, 175 miles from our own force (enemy approximate position would then be 11°51'S, 156°04'E). An intercepted radio transmission showed that Task Force 17 had been sighted by the enemy at 0822L/8.
The Japanese carrier force was made up of the aircraft carriers Zuikaku, Shokaku, heavy cruisers Myoko, Haguro and the destroyers Ushio, Akebono, Airake, Yugure, Shiratsuyu and Shigure.
Around 0900LM/8, attack groups were launched. Cruisers and destroyers were around the carriers in a circular screen. During the morning two radar contact resulted in no interception. One visual contact resulted in the destruction of a four engine enemy bomber / scout. At 1055L/8, radar indicated a large group of enemy aircraft bearing 020°, range 68 miles. Fighters were sent to intercept them.
American aircraft commenced to attack the enemy carriers out twenty minutes earlier then the Japanese aicraft commenced their attack on Task Force 17. The attack group from Yorktown arrived ahead of the attack group from Lexington although the almost attacked around the same time. The Yorktown bombers and torpedo planes made a coordinated attack on the northernmost enemy carrier. They reported six 1000 pound bomb hits and three, possibly four torpedo hits. When leaving they reported the enemy carrier ablaze forward and obviously severely damaged. The Lexington group reported three bomb and five torpedo hits on an enemy carrier of the Shokaku-class. When last seen she was on fire, settling and turning in a circle. It was thought that both enemy carriers had been severely damaged. In fact both air groups had attacked the same carrier.
The Japanese attack on Task Force 17 started around 1115L/8. USS Yorktown was hit by one bomb and suffered many near misses. USS Lexington suffered at least two torpedo and two bomb hits besides many near misses by both torpedoes and bombs. Both ships remained operational immediately following these attacks and damage they had sustained. There were troubles with the elevators in USS Lexington though.
Following the Japanese air attacks and the return of our aircraft an informal estimate of the situation was made. Consideration was given to making another attack or sending in the Attack Group for a surface attack. A returning Lexington pilot had reported that one enemy carrier was undamaged.
At 1422L/8, a report was received that an additional enemy carrier may have joined the enemy force. Three boilers in USS Yorktown which had been out of commission, were placed in use again and the ship was capable of 30 knots. Damage had reduced the speed of USS Lexington to 24 knots.
Radio interceptions showed that some aircraft of the Shokaku had landed on Zuikaku, this must mean that the Shokaku was damaged and that the aircraft were unable to land on her. The idea of making another attack was abandoned when it became apparent that USS Yorktown had only eight fighters, twelve bombers and eight torpedo planes serviceable. The idea of making a surface attack was also abandoned due to the fact that they then would not be with the carriers to provide protection against enemy air attack. Course was therefore set to the southward. It was intended to transfer operational aircraft from the Lexington to the Yorktown and then sent the Lexington to Pearl Harbor to effect repairs, however it was not to be.
At 1445L/8, USS Lexington reported that she had suffered a serious explosion and seven minutes later it was reported that the fires could not be controlled. The explosion was caused by leaking gasoline and the forming of fumes which eventually ignited. At 1610L/8, USS Lexington reported that they were abandoning lower deck spaces and at 1657L/8 they reported that all power had been lost. At 1710L/8, they started abandoning ship. Around 1737L/8, a big explosion ripped through the ship, possibly caused by ammunition exploding.
Rear-Admiral Kinkaid was then tasked to take charge of the rescue operations with USS Minneapolis, USS New Orleans, USS Phelps, USS Anderson, USS Hammann and USS Morris. They rescued over 2700 officers and men. USS Lexington was beyond salvage and was eventually scuttled by torpedoes from USS Phelps in position 15°05'S, 155°16'E. Five torpedoes were fired of which at least three hit.
Operations by Task Force 17.3 / Task Force 44.
At daylight on the 7th (0645LM/7), Rear-Admiral Crace, Royal Navy, had been detached with the ' Support Force ' made up of HMAS Australia, USS Chicago, HMAS Hobart, USS Perkins and USS Walke and reinforced with the destroyer USS Farragut. They were to proceed to the Jomard passage to destroyer enemy transports and light cruisers heading towards there. The group was known as Task Force 17.3.
Around 1130LM/7, an enemy shadowing aircraft was sighted by this group.
At 1506LM/7, Task Force 17.3 was attacked by eleven enemy torpedo bombers. No hits were obtained and five of the attackers were shot down. One torpedo passed close down the Port side of HMAS Hobart.
At 1513LM/7, they were attacked by nineteen high level bombers. Bombs fell close to HMAS Australia but no hits were obtained.
At 1519LM/7, three high level bombers attacked but they did no damage. It was later found out that this had been Allied aircraft which had attacked in error.
At 1055LM/8, a single shadowing aircraft was sighted.
In the afternoon of the 18th, HMAS Hobart fuelled USS Perkins.
At 2013LM/8, HMAS Hobart and USS Walke were detached to proceed to the Grafton Passage and then onwards to Australia.
At 1235LM/9, HMAS Hobart and USS Walke entered the Grafton Passage.
At 0045KL/10, HMAS Hobart and USS Walke parted company with each other. HMAS Hobart set course for Brisbane while USS Walke proceeded to Townsville.
Meanwhile USS Farragut fuelled from HMAS Australia in the morning of the 8th.
At 1947LM/9, a signal was received that Task Force 17.3 was released from operations with Task Force 17 and reverted to being Task Force 44 under operational command of ComSoWesPacFor.
Around 0735LM/10, Task Force 44 set course for the Grafton Passage which they entered around 1745LM/10.
Task Force 44 arrived in Cid Harbour around 1145KL/11 where they fuelled. The cruisers from the Australian Royal Fleet Auxiliary tanker Kurumba (3798 GRT, built 1916), and the destroyers from the cruisers. Around 1900KL/11, USS Chicago and USS Perkins departed for Sydney where they arrived in the morning of the 14th. HMAS Australia and USS Farragut proceeded to Brisbane where they arrived in the afternoon of the 13th.
2 Jun 1942
HMAS Australia (Capt. H.B. Farncomb, RAN, flying the flag of Rear-Admiral J.G. Crace, CB, RN), Salt Lake City (Capt. E.G. Small, USN) and HMAS Hobart (Capt. H.L. Howden, CBE, RAN) conducted close range AA exercises in Moreton Bay. (44)
3 Jun 1942
Task Force 44, made up of the heavy cruisers HMAS Australia (Capt. H.B. Farncomb, RAN, flying the flag of Rear-Admiral J.G. Crace, CB, RN), HMAS Canberra (Capt. G.D. Moore, RAN), Salt Lake City (Capt. E.G. Small, USN), USS Chicago (Capt. H.D. Bode, USN), light cruiser HMAS Hobart (Capt. H.L. Howden, CBE, RAN) and the destroyers USS Henley (Lt.Cdr. R.H. Smith, USN, with Cdr. L.B. Austin, USN, commanding Destroyer Division 7 on board), USS Helm (Lt.Cdr. C.E. Carroll, USN), USS Mugford (T/Cdr. E.W. Young, USN) and USS Perkins (Lt.Cdr. W.C. Ford, USN) conducted exercises off Brisbane. (45)
4 Jun 1942
Rear-Admiral J.G. Crace, CB, RN, transferred his flag from HMAS Australia (Capt. H.B. Farncomb, RAN) to HMAS Canberra (Capt. G.D. Moore, RAN). (44)
4 Jun 1942
During 4/5 June 1942, Task Force 44, made up of the heavy cruisers HMAS Canberra (Capt. G.D. Moore, RAN, flying the flag of Rear-Admiral J.G. Crace, CB, RN), HMAS Australia (Capt. H.B. Farncomb, RAN), Salt Lake City (Capt. E.G. Small, USN), USS Chicago (Capt. H.D. Bode, USN), light cruiser HMAS Hobart (Capt. H.L. Howden, CBE, RAN) and the destroyers USS Henley (Lt.Cdr. R.H. Smith, USN, with Cdr. L.B. Austin, USN, commanding Destroyer Division 7 on board), USS Bagley (Lt.Cdr. G.A. Sinclair, USN), USS Helm (Lt.Cdr. C.E. Carroll, USN), USS Mugford (T/Cdr. E.W. Young, USN) and USS Perkins (Lt.Cdr. W.C. Ford, USN) conducted exercises off Brisbane.
All ships returned to Brisbane / Moreton Bay on completion of the exercises on the 5th, except for HMAS Australia and USS Helm which had been detached P.M. on the 4th to proceed to Sydney. (45)
22 Jun 1942
Rear-Admiral V.A.C. Crutchley, VC, DSC, RN, transferred his flag from HMAS Canberra (Capt. F.E. Getting, RAN) to HMAS Australia (Capt. H.B. Farncomb, RAN). (46)
23 Jun 1942
Task Force 44, made up of the heavy cruisers HMAS Australia (Capt. H.B. Farncomb, RAN, flying the flag of Rear-Admiral V.A.C. Crutchley, VC, DSC, RN), HMAS Canberra (Capt. F.E. Getting, RAN), Salt Lake City (Capt. E.G. Small, USN), USS Chicago (Capt. H.D. Bode, USN), light cruiser HMAS Hobart (Capt. H.A. Showers, RAN) and the destroyers USS Henley (Lt.Cdr. R.H. Smith, USN, with Cdr. L.B. Austin, USN, commanding Destroyer Division 7 on board), USS Bagley (Lt.Cdr. G.A. Sinclair, USN), USS Patterson (Cdr. F.R. Walker, USN) and USS Jarvis (Lt.Cdr. W.W. Graham, Jr., USN) departed Brisbane for an offensive sweep in the Coral Sea. (47)
28 Jun 1942
Task Force 44, made up of the heavy cruisers HMAS Australia (Capt. H.B. Farncomb, RAN, flying the flag of Rear-Admiral V.A.C. Crutchley, VC, DSC, RN), HMAS Canberra (Capt. F.E. Getting, RAN), Salt Lake City (Capt. E.G. Small, USN), USS Chicago (Capt. H.D. Bode, USN), light cruiser HMAS Hobart (Capt. H.A. Showers, RAN) and the destroyers USS Henley (Lt.Cdr. R.H. Smith, USN, with Cdr. L.B. Austin, USN, commanding Destroyer Division 7 on board), USS Bagley (Lt.Cdr. G.A. Sinclair, USN), USS Patterson (Cdr. F.R. Walker, USN) and USS Jarvis (Lt.Cdr. W.W. Graham, Jr., USN) arrived at Noumea from operations. No contact with the Japanese had been made though. (47)
29 Jun 1942
Task Force 44, made up of the heavy cruisers HMAS Australia (Capt. H.B. Farncomb, RAN, flying the flag of Rear-Admiral V.A.C. Crutchley, VC, DSC, RN), HMAS Canberra (Capt. F.E. Getting, RAN), Salt Lake City (Capt. E.G. Small, USN), USS Chicago (Capt. H.D. Bode, USN), light cruiser HMAS Hobart (Capt. H.A. Showers, RAN) and the destroyers USS Henley (Lt.Cdr. R.H. Smith, USN, with Cdr. L.B. Austin, USN, commanding Destroyer Division 7 on board), USS Bagley (Lt.Cdr. G.A. Sinclair, USN), USS Patterson (Cdr. F.R. Walker, USN) and USS Jarvis (Lt.Cdr. W.W. Graham, Jr., USN) departed Noumea to return to Brisbane. (47)
1 Jul 1942
Task Force 44, made up of the heavy cruisers HMAS Australia (Capt. H.B. Farncomb, RAN, flying the flag of Rear-Admiral V.A.C. Crutchley, VC, DSC, RN), HMAS Canberra (Capt. F.E. Getting, RAN), Salt Lake City (Capt. E.G. Small, USN), USS Chicago (Capt. H.D. Bode, USN), light cruiser HMAS Hobart ( Capt. H.A. Showers, RAN) and the destroyers USS Henley (Lt.Cdr. R.H. Smith, USN, with Cdr. L.B. Austin, USN, commanding Destroyer Division 7 on board), USS Bagley (Lt.Cdr. G.A. Sinclair, USN), USS Patterson (Cdr. F.R. Walker, USN) and USS Jarvis (Lt.Cdr. W.W. Graham, Jr., USN) arrived at Brisbane / Moreton Bay from Noumea. (44)
8 Jul 1942
Task Force 44, made up of the heavy cruisers HMAS Australia (Capt. H.B. Farncomb, RAN, flying the flag of Rear-Admiral V.A.C. Crutchley, VC, DSC, RN), HMAS Canberra (Capt. F.E. Getting, RAN), Salt Lake City (Capt. E.G. Small, USN), USS Chicago (Capt. H.D. Bode, USN), light cruiser HMAS Hobart ( Capt. H.A. Showers, RAN) and the destroyers USS Henley (Lt.Cdr. R.H. Smith, USN, with Cdr. L.B. Austin, USN, commanding Destroyer Division 7 on board), USS Bagley (Lt.Cdr. G.A. Sinclair, USN), USS Patterson (Cdr. F.R. Walker, USN) and USS Jarvis (Lt.Cdr. W.W. Graham, Jr., USN) conducted exercises off Brisbane. (48)
14 Jul 1942
Task Force 44, made up of the heavy cruisers HMAS Australia (Capt. H.B. Farncomb, RAN, flying the flag of Rear-Admiral V.A.C. Crutchley, VC, DSC, RN), HMAS Canberra (Capt. F.E. Getting, RAN), Salt Lake City (Capt. E.G. Small, USN), USS Chicago (Capt. H.D. Bode, USN), light cruiser HMAS Hobart ( Capt. H.A. Showers, RAN) and the destroyers USS Ralph Talbot (Lt.Cdr. J.W. Callahan, USN), USS Patterson (Cdr. F.R. Walker, USN) and USS Jarvis (Lt.Cdr. W.W. Graham, Jr., USN) departed Brisbane for Wellington, New Zealand. (44)
19 Jul 1942
Task Force 44, made up of the heavy cruisers HMAS Australia (Capt. H.B. Farncomb, RAN, flying the flag of Rear-Admiral V.A.C. Crutchley, VC, DSC, RN), HMAS Canberra (Capt. F.E. Getting, RAN), Salt Lake City (Capt. E.G. Small, USN), USS Chicago (Capt. H.D. Bode, USN), light cruiser HMAS Hobart ( Capt. H.A. Showers, RAN) and the destroyers USS Ralph Talbot (Lt.Cdr. J.W. Callahan, USN), USS Patterson (Cdr. F.R. Walker, USN) and USS Jarvis (Lt.Cdr. W.W. Graham, Jr., USN) arrived at Wellington from Brisbane. (49)
22 Jul 1942
A convoy for the upcoming landings at Guadacanal departed Wellington, New Zealand for Fiji.
The convoy, designated Task Force 62, was made up of two units; Task Group 62.1 was the actual convoy made up of the Naval Transports; USS McCawley (AP 10) (8156 GRT, built 1928) (Capt. C.P. McFeathers, USN), USS Barnett (AP 11) (8153 GRT, built 1928) (Capt. H.E. Thornhill, USN), USS Heywood (AP 12) (8424 GRT, built 1919) (Capt. H.B. Knowles, USN), USS George F. Elliott (AP 13) (8424 GRT, built 1918) (Capt. W.O. Bailey, USN), USS Fuller (AP 14) (8424 GRT, built 1919) (Capt. P.S. Theiss, USN), USS Neville (AP 16) (8424 GRT, built 1918) (Capt. C.A. Bailey, USN), USS Hunter Liggett (AP 27) (13712 GRT, built 1922) (Cdr. L.W. Perkins, USCG) and USS American Legion (AP 35) (13737 GRT, built 1921) (Cdr. T.D. Warner, USN) and the Naval Cargo Ships; USS Bellatrix (AK 20) (8280 GRT, built 1942) (Cdr. W.F. Dietrich, USN), USS Fomalhaut (AK 22) (5028 GRT, built 1942) (Cdr. J.D. Alvis, USN), USS Alchiba (AK 23) (6198 GRT, built 1939) (Cdr. J.S. Freeman, USN) and USS Libra (AK 53) (6155 GRT, built 1941) (Cdr. W.B. Fletcher, Jr., USN).
The convoy was escorted by Task Group 62.2, which was made up the heavy cruisers HMAS Australia (Capt. H.B. Farncomb, RAN, flying the flag of Rear-Admiral V.A.C. Crutchley, VC, DSC, RN), HMAS Canberra (Capt. F.E. Getting, RAN), Salt Lake City (Capt. E.G. Small, USN), USS Chicago (Capt. H.D. Bode, USN), light cruiser HMAS Hobart ( Capt. H.A. Showers, RAN) and the destroyers USS Selfridge (Lt.Cdr. C.D. Reynolds, USN, with Capt. C.W. Flynn, USN, commanding Destroyer Squadron 4 on board), USS Blue (Cdr. H.N. Williams, USN), USS Mugford (Lt.Cdr. E.W. Young, USN), USS Ralph Talbot (Lt.Cdr. J.W. Callahan, USN), USS Henley (Cdr. R.H. Smith, USN), USS Patterson (Cdr. F.R. Walker, USN) and USS Jarvis (Lt.Cdr. W.W. Graham, Jr., USN).
Around 1400M/23, the destroyers USS Bagley (Lt.Cdr. G.A. Sinclair, USN) and USS Helm (Lt.Cdr. C.E. Carroll, USN) joined coming from Auckland.
Around 1330M/26, rendezvous was made with three US Task Forces. USS Salt Lake City parted company to join Task Force 11.
Task Force 62 was joined by several more Naval Transports / Naval Cargo Ships which were; USS President Jackson (AP 37) (9255 GRT, built 1940) (T/Capt. C.W. Weitzel, USN), USS President Adams (AP 38) (9255 GRT, built 1941) (T/Capt. F.H. Dean, USN), USS President Hayes (AP 39) (9255 GRT, built 1941) (T/Capt. F.W. Benson, USN), USS Crescent City (AP 40) (7987 GRT, built 1940) (Capt. I.N. Kiland, USN) and USS Alhena (AK 26) (7101 GRT, built 1941) (T/Capt. C.B. Hunt, USN).
Also a fire support group joined, it was made up of the heavy cruisers USS Astoria ( Capt. W.G. Greenman, USN), USS Quincy ( Capt. S.N. Moore, USN), USS Vincennes (Capt. F.L. Riefkohl, USN), AA cruiser USS San Juan (Capt. J.E. Maher, USN) and the destroyers USS Dewey (Lt.Cdr. C.F. Chillingsworth, Jr., USN), USS Hull ( Lt.Cdr. R.F. Stout, USN), USS Gridley (Lt.Cdr. F.R. Stickney, Jr., USN), USS Ellet (Lt.Cdr. F.H. Gardner, USN), USS Wilson (Lt.Cdr. W.H. Price, USN) and USS Buchanan (Lt.Cdr. R.E. Wilson, USN).
Also joining were the high speed transports (former destroyers) USS Colhoun (T/Lt.Cdr. G.B. Madden, USN), USS Gregory (Lt.Cdr. H.F. Bauer, USN), USS Little (Lt.Cdr. G.B. Lofberg, Jr., USN) and USS McKean (Lt.Cdr. J.E. Shinners, USN) as the high speed minesweepers (also former destroyers) USS Southard (Lt.Cdr. J.B. Cochran, USN), USS Hopkins (Lt.Cdr. B. Coe, USN), USS Zane (T/Lt.Cdr. P.L. Wirtz, USN) and USS Trever (Lt.Cdr. D.M. Agnew, USN).
The convoy arrived at Fiji (off Koro Island) on 28 July 1942. There landing exercises were carried out on 29 and 30 July.
31 Jul 1942
Late in the afternoon of 31 July 1942, the Amphibious Force under Rear-Admiral R.K. Turner, USN (in the transport USS McCawley) departed Fiji for Operation Watchtower, the landings on Guadalcanal.
The Amphibious Force was made up of the following units;
Task Group 62.1 (Transport Group X-Ray) made up of the Naval Transports / Naval Cargo Ships;
Task Group 62.1.1; USS Fuller (AP 14) (8424 GRT, built 1919) (Capt. P.S. Theiss, USN), USS American Legion (AP 35) (13737 GRT, built 1921) (Cdr. T.D. Warner, USN) and USS Bellatrix (AK 20) (8280 GRT, built 1942) (Cdr. W.F. Dietrich, USN).
Task Group 62.1.2; USS McCawley (AP 10) (8156 GRT, built 1928) (Capt. C.P. McFeathers, USN), USS Barnett (AP 11) (8153 GRT, built 1928) (Capt. H.E. Thornhill, USN), USS George F. Elliott (AP 13) (8424 GRT, built 1918) (Capt. W.O. Bailey, USN) and USS Libra (AK 53) (6155 GRT, built 1941) (Cdr. W.B. Fletcher, Jr., USN).
Task Group 62.1.3; USS Hunter Liggett (AP 27) (13712 GRT, built 1922) (Cdr. L.W. Perkins, USCG), USS Fomalhaut (AK 22) (5028 GRT, built 1942) (Cdr. J.D. Alvis, USN), USS Alchiba (AK 23) (6198 GRT, built 1939) (Cdr. J.S. Freeman, USN) and USS Betelgeuse (AK 28) (6198 GRT, built 1939) (T/Capt. H.D. Power, USN) (joined at sea on 3 August 1942).
Task Group 62.1.4; USS President Adams (AP 38) (9255 GRT, built 1941) (T/Capt. F.H. Dean, USN), USS President Hayes (AP 39) (9255 GRT, built 1941) (T/Capt. F.W. Benson, USN), USS Crescent City (AP 40) (7987 GRT, built 1940) (Capt. I.N. Kiland, USN) and USS Alhena (AK 26) (7101 GRT, built 1941) (T/Capt. C.B. Hunt, USN).
Task Group 62.2 (Transport Group Yoke) made up of the Naval Transports and High Speed Transports.
Task Group 62.2.1; USS Zeilin (AP 9) (14124 GRT, built 1921) (Capt. P. Buchanan, USN) (joined at sea on 3 August 1942), USS Heywood (AP 12) (8424 GRT, built 1919) (Capt. H.B. Knowles, USN), USS Neville (AP 16) (8424 GRT, built 1918) (Capt. C.A. Bailey, USN) and USS President Jackson (AP 37) (9255 GRT, built 1940) (T/Capt. C.W. Weitzel, USN).
Task Group 62.2.2; USS Colhoun (T/Lt.Cdr. G.B. Madden, USN), USS Gregory (Lt.Cdr. H.F. Bauer, USN), USS Little (Lt.Cdr. G.B. Lofberg, Jr., USN) and USS McKean (Lt.Cdr. J.E. Shinners, USN).
Task Group 62.3 was the Fire Support Group, made up of the heavy cruisers USS Astoria ( Capt. W.G. Greenman, USN), USS Quincy ( Capt. S.N. Moore, USN), USS Vincennes (Capt. F.L. Riefkohl, USN) and the destroyers USS Dewey (T/Cdr. C.F. Chillingsworth, Jr., USN), USS Hull (T/Cdr. R.F. Stout, USN), USS Ellet T/Cdr. F.H. Gardner, USN) and USS Wilson (Lt.Cdr. W.H. Price, USN).
Task Group 62.4 was also a Fire Support Group, made up of the AA cruiser USS San Juan (Capt. J.E. Maher, USN, flying the flag of Rear-Admiral N. Scott, USN) and the destroyers USS Monssen (T/Cdr. R.N. Smoot, USN) and USS Buchanan (T/Cdr. R.E. Wilson, USN).
Task Group 62.5 was the Minesweeping Group, it was made up of the high speed minesweepers (former destroyers) USS Southard (Lt.Cdr. J.B. Cochran, USN), USS Hovey (Lt.Cdr. W.S. Heald, USN), USS Hopkins (Lt.Cdr. B. Coe, USN), USS Zane (T/Lt.Cdr. P.L. Wirtz, USN) and USS Trever (Lt.Cdr. D.M. Agnew, USN).
Task Group 62.6 was the Screening Group, it was made up of the heavy cruisers HMAS Australia (Capt. H.B. Farncomb, RAN, flying the flag of Rear-Admiral V.A.C. Crutchley, VC, DSC, RN), HMAS Canberra (Capt. F.E. Getting, RAN), USS Chicago (Capt. H.D. Bode, USN), light cruiser HMAS Hobart ( Capt. H.A. Showers, RAN) and the destroyers USS Selfridge (T/Cdr. C.D. Reynolds, USN, with Capt. C.W. Flynn, USN, commanding Destroyer Squadron 4 on board), USS Bagley (T/Cdr. G.A. Sinclair, USN), USS Blue (Cdr. H.N. Williams, USN), USS Helm (T/Cdr. C.E. Carroll, USN), USS Mugford (T/Cdr. E.W. Young, USN), USS Ralph Talbot (Lt.Cdr. J.W. Callahan, USN), USS Henley (Cdr. R.H. Smith, USN), USS Patterson (Cdr. F.R. Walker, USN) and USS Jarvis (Lt.Cdr. W.W. Graham, Jr., USN).
Some ships had to fuel at sea and only joined the Amphibious Force the following day around noon.
------------------------------------------------------------------------------------------------------------------------------------------
Around 0900M/1, the destroyers USS Dewey and USS Mugford were detached to make rendezvous with the transport USS Zeilin and cargo ship USS Betelgeuse. They joined the Betelgeuse around 1540M/1. USS Zeilin joined around 2330M/1. They rejoined Task Force 62 around noon on 3 August.
Around 1115M/2, the destroyers USS Selfridge, USS Bagley, USS Blue, USS Ralph Talbot, USS Henley and USS Jarvis parted company with Task Force 62 to proceed to Port Vila, Efate to fuel. They arrived off Mele Bay around 0700L/3 but found the the tanker from which they were to fuel, the Esso Little Rock (11237 GRT, built 1941) was not there. They left around 1100L/3 to rejoin Task Force 62 to refuel at sea.
Around 1800L/2, HMAS Hobart, USS Southard USS Hovey, USS Hopkins, USS Zane and USS Trever parted company with Task Force 62 to proceed to Port Vila, Efate to fuel. They too left around 1130L/3 to rejoin Task Force 62 to refuel at sea.
USS Colhoun, USS Gregory, USS Little and USS McKean also arrived off Mele Bay to fuel, they too then set course to rejoin Task Force 62 to refuel at sea.
On 4 August 1942, refuelling at sea took place; The oiler USS Cimarron (T/Capt. R.M. Ihrig, USN) briefly joined Task Force 62 and she fuelled HMAS Hobart, USS Ralph Talbot and USS Patterson. USS Alhena fuelled USS Blue and USS Helm. USS Crescent City fuelled USS Selfridge and USS Trever. USS Fuller fuelled USS Ellet and USS Wilson. USS Hunter Liggett fuelled USS Dewey and USS Hull. USS Libra fuelled USS Monssen and USS Buchanan. USS Neville fuelled USS Southard and USS Hopkins. USS President Adamas fuelled USS Mugford and USS Jarvis. USS President Hayes fuelled USS Bagley and USS Henley. USS President Jackson fuelled USS Hovey and USS Zane.
------------------------------------------------------------------------------------------------------------------------------------------
Around 1615L/6, the Amphibious Force took up their approach dispositions. ' Force X ' was to land on Guadacanal and ' Force Y ' was to land on Tulagi.
' Force X ' was made up of was made up of the transports and cargo vessels of Task Group 62.1.1, Task Group 62.1.2, Task Group 62.1.3, Task Group 62.1.4, the ships of Fire Support Group 62.3 and part of Screening Group Task Group 62.6. The ships of the Screening Group that were part of ' Force X ' were the following, HMAS Australia, HMAS Hobart, USS Selfridge, USS Mugford, USS Ralph Talbot, USS Patterson and USS Jarvis.
' Force Y ' was made up of the transports and cargo vessels of Task Group 62.2.1, the high speed transports of Task Group 62.2.2, the ships of Fire Support Group 62.4, the high speed minesweepers of Minesweeping Group 62.5 and part of Screening Group Task Group 62.6. The ships of the Screening Group that were part of ' Force Y ' were the following, USS Chicago, HMAS Canberra, USS Bagley, USS Blue, USS Helm and USS Henley.
' Force Y ' took station six miles astern of ' Force X '.
[For continuation of the events see the event ' Operation Watchtower, the landings on Guadacanal and Tulagi ' for 7 August 1942.]
7 Aug 1942
Operation Watchtower, the landings on Guadacanal Island and the subsequent Battle of Savo Island.
Allied forces taking part;
For this operation Task Forces 61 and 62 were deployed. In overall command was Vice-Admiral R.L. Ghormley, USN who was at Noumea in the Miscellaneous Auxiliary USS Argonne (AG-31) (Cdr. F.W. Connor, USN).
Task Group 61.1 was the Air Support Force under overall command of Rear-Admiral L.Noyes, USN. It was made up of the following units;
Task Group 61.1.1; Aircraft carrier USS Saratoga (Capt. D.C. Ramsey, USN, flying the flag of Rear-Admiral F.J. Fletcher, USN), heavy cruisers USS New Orleans (Capt. W.S. Delany, USN), USS Minneapolis (Capt. F.J. Lowry, USN), and the destroyers USS Phelps (T/Cdr. E.L. Beck, USN, with Capt. S.B. Brewer, USN on board), USS Farragut (Cdr. G.P. Hunter, USN), USS Macdonough (Lt.Cdr. E. van E. Dennet, USN), USS Worden (T/Cdr. W.G. Pogue, USN) and USS Dale (Cdr. H.E. Parker, USN).
Task Group 61.1.2; Aircraft carrier Enterprise (Capt. A.C. Davis, USN, flying the flag of Rear-Admiral T.C. Kincaid, USN), battleship USS North Carolina (Capt. G.H. Fort, USN), heavy cruiser USS Portland (Capt. L.T. Du Bose, USN), AA cruiser USS Atlanta (Capt. S.P. Jenkins, USN) and the destroyers USS Balch (T/Cdr. H.H. Tiemroth, USN, with Capt. E.P. Sauer, USN on board), USS Benham (Lt.Cdr. J.B. Taylor, USN), USS Maury (T/Cdr. G.L. Sims, USN), USS Gwin (Cdr. J.M. Higgins, USN) and USS Grayson (T/Cdr. F.J. Bell, USN).
Task Group 61.1.3; Aircraft carrier USS Wasp (T/Capt. F.P. Sherman, USN, flying the flag of Rear-Admiral L.Noyes, USN), heavy cruisers Salt Lake City (Capt. E.G. Small, USN), USS San Francisco (Capt. C.H. McMorris, USN) and the destroyers USS Farenholt (T/Cdr. Lt.Cdr. E.T. Seaward, USN, with Capt. R.G. Tobin, USN on board), USS Aaron Ward (T/Cdr. O.F. Gregor, USN), USS Lang (T/Cdr. E.A. Seay, USN), USS Stack (Lt.Cdr. A.J. Greenacre, USN) and USS Sterett (Cdr. J.G. Coward, USN).
There was also the fuelling group made up of the oilers USS Kanawha (T/Capt. K.S. Reed, USN), USS Cimarron (T/Capt. R.M. Ihrig, USN), USS Platte (Capt. R.H. Henkle, USN), USS Sabine (T/Capt. H.L. Maples, USN) and USS Kaskaskia (T/Capt. W.L. Taylor, USN). These were usually escorting by destroyers from the air support force.
------------------------------------------------------------------------------------------------------------------------------------------
The Amphibious Force under Rear-Admiral R.K. Turner, USN (in the transport USS McCawley) was made up of the following units;
Task Group 62.1 (Transport Group X-Ray) made up of the Naval Transports / Naval Cargo Ships;
Task Group 62.1.1; USS Fuller (AP 14) (8424 GRT, built 1919) (Capt. P.S. Theiss, USN), USS American Legion (AP 35) (13737 GRT, built 1921) (Cdr. T.D. Warner, USN) and USS Bellatrix (AK 20) (8280 GRT, built 1942) (Cdr. W.F. Dietrich, USN).
Task Group 62.1.2; USS McCawley (AP 10) (8156 GRT, built 1928) (Capt. C.P. McFeathers, USN), USS Barnett (AP 11) (8153 GRT, built 1928) (Capt. H.E. Thornhill, USN), USS George F. Elliott (AP 13) (8424 GRT, built 1918) (Capt. W.O. Bailey, USN) and USS Libra (AK 53) (6155 GRT, built 1941) (Cdr. W.B. Fletcher, Jr., USN).
Task Group 62.1.3; USS Hunter Liggett (AP 27) (13712 GRT, built 1922) (Cdr. L.W. Perkins, USCG), USS Fomalhaut (AK 22) (5028 GRT, built 1942) (Cdr. J.D. Alvis, USN), USS Alchiba (AK 23) (6198 GRT, built 1939) (Cdr. J.S. Freeman, USN) and USS Betelgeuse (AK 28) (6198 GRT, built 1939) (T/Capt. H.D. Power, USN).
Task Group 62.1.4; USS President Adams (AP 38) (9255 GRT, built 1941) (T/Capt. F.H. Dean, USN), USS President Hayes (AP 39) (9255 GRT, built 1941) (T/Capt. F.W. Benson, USN), USS Crescent City (AP 40) (7987 GRT, built 1940) (Capt. I.N. Kiland, USN) and USS Alhena (AK 26) (7101 GRT, built 1941) (T/Capt. C.B. Hunt, USN).
Task Group 62.2 (Transport Group Yoke) made up of the Naval Transports and High Speed Transports.
Task Group 62.2.1; USS Zeilin (AP 9) (14124 GRT, built 1921) (Capt. P. Buchanan, USN), USS Heywood (AP 12) (8424 GRT, built 1919) (Capt. H.B. Knowles, USN), USS Neville (AP 16) (8424 GRT, built 1918) (Capt. C.A. Bailey, USN) and USS President Jackson (AP 37) (9255 GRT, built 1940) (T/Capt. C.W. Weitzel, USN).
Task Group 62.2.2; USS Colhoun (T/Lt.Cdr. G.B. Madden, USN), USS Gregory (Lt.Cdr. H.F. Bauer, USN), USS Little (Lt.Cdr. G.B. Lofberg, Jr., USN) and USS McKean (Lt.Cdr. J.E. Shinners, USN).
Task Group 62.3 was the Fire Support Group, made up of the heavy cruisers USS Astoria ( Capt. W.G. Greenman, USN), USS Quincy ( Capt. S.N. Moore, USN), USS Vincennes (Capt. F.L. Riefkohl, USN) and the destroyers USS Dewey (T/Cdr. C.F. Chillingsworth, Jr., USN), USS Hull (T/Cdr. R.F. Stout, USN), USS Ellet T/Cdr. F.H. Gardner, USN) and USS Wilson (Lt.Cdr. W.H. Price, USN).
Task Group 62.4 was also a Fire Support Group, made up of the AA cruiser USS San Juan (Capt. J.E. Maher, USN, flying the flag of Rear-Admiral N. Scott, USN) and the destroyers USS Monssen (T/Cdr. R.N. Smoot, USN) and USS Buchanan (T/Cdr. R.E. Wilson, USN).
Task Group 62.5 was the Minesweeping Group, it was made up of the high speed minesweepers (former destroyers) USS Southard (Lt.Cdr. J.B. Cochran, USN), USS Hovey (Lt.Cdr. W.S. Heald, USN), USS Hopkins (Lt.Cdr. B. Coe, USN), USS Zane (T/Lt.Cdr. P.L. Wirtz, USN) and USS Trever (Lt.Cdr. D.M. Agnew, USN).
Task Group 62.6 was the Screening Group, it was made up of the heavy cruisers HMAS Australia (Capt. H.B. Farncomb, RAN, flying the flag of Rear-Admiral V.A.C. Crutchley, VC, DSC, RN), HMAS Canberra (Capt. F.E. Getting, RAN), USS Chicago (Capt. H.D. Bode, USN), light cruiser HMAS Hobart ( Capt. H.A. Showers, RAN) and the destroyers USS Selfridge (T/Cdr. C.D. Reynolds, USN, with Capt. C.W. Flynn, USN, commanding Destroyer Squadron 4 on board), USS Bagley (T/Cdr. G.A. Sinclair, USN), USS Blue (Cdr. H.N. Williams, USN), USS Helm (T/Cdr. C.E. Carroll, USN), USS Mugford (T/Cdr. E.W. Young, USN), USS Ralph Talbot (Lt.Cdr. J.W. Callahan, USN), USS Henley (Cdr. R.H. Smith, USN), USS Patterson (Cdr. F.R. Walker, USN) and USS Jarvis (Lt.Cdr. W.W. Graham, Jr., USN).
------------------------------------------------------------------------------------------------------------------------------------------
Around 1615L on 6 August 1942, the Amphibious Force had taken up their approach dispositions. ' Force X ' was to land on Guadacanal and ' Force Y ' was to land on Tulagi.
' Force X ' was made up of was made up of the transports and cargo vessels of Task Group 62.1.1, Task Group 62.1.2, Task Group 62.1.3, Task Group 62.1.4, the ships of Fire Support Group 62.3 and part of Screening Group Task Group 62.6. The ships of the Screening Group that were part of ' Force X ' were the following, HMAS Australia, HMAS Hobart, USS Selfridge, USS Mugford, USS Ralph Talbot, USS Patterson and USS Jarvis.
' Force Y ' was made up of the transports and cargo vessels of Task Group 62.2.1, the high speed transports of Task Group 62.2.2, the ships of Fire Support Group 62.4, the high speed minesweepers of Minesweeping Group 62.5 and part of Screening Group Task Group 62.6. The ships of the Screening Group that were part of ' Force Y ' were the following, USS Chicago, HMAS Canberra, USS Bagley, USS Blue, USS Helm and USS Henley. ' Force Y ' took station six miles astern of ' Force X '.
The landings, 7 August 1942.
At 0224L/7, the moon rose and though it was on the wane and lacked only five days to new moon, it was of great assistance in making the western end of Guadalcanal and then Savo Island, both of which began to show up very clearly.
' Force Y ' set course to pass to the northward of Savo Island and at 0330L/7, HMAS Australia lad ' Force X ' towards Savo Island to pass to the south of it.
It was expected that the enemy would have some type of patrol in the passages on either side of Savo Island and from 0245L/7, the naval escorts were in the first degree of readiness for action. However no patrol were met and when between Savo Island and Cape Escperance, ' Force X ' changed course to proceed direct to the disembarkation area off the north shore of Guadalcanal Island.
As ' Force X ' would pass within six thousand yard of Lunga Point when approaching the disembarkation area, and as enemy AA batteries at least were known to be mounted in the vicinity of the Point, it had been arranged that USS Quincy would come forward from the rear of the formation and take particular responsibility for silencing enemy fire from the Point whilst the formation was drawing past it.
' Force Y ' had in the meantime passed west of Savo Island and then leaving Savo Island to starboard had altered course to the eastward for the disembarkation area off Tulagi Island.
Sunrise was at 0633L/7 and in accordance with pre-arranged shedule, the aircraft of the cruiser escort of both squadrons were launched at 0615L/7 to provide A/S and anti-MTB patrols for the transport groups. After this initial patrol, aircraft patrols were maintained for A/S duties. This was done for every day the Amphibious Force was in the area.
Also around 0615L/7, Allied carrier aircraft were sighted on their intial sortie. The missions assigned to this sortie were as follows; 16 Fighters were to destroy enemy aircraft including seaplanes on the water, motor torpedo boats and submarine in the Tulagi - Gavutu area. With any remaining ammunition, attack anti-aircraft installations on Gavutu. 20 Fighters, mission as above but to be carried out in the area along the north coast of Guadalcanal between Point Cruz and Togama Point. 24 dive bombers, were to destroy naval vessels, anti-aircraft guns and shore batteries in the Tulagi - Gavutu area. 24 dive bombers, were to do the same as the above but along the north coast of Guadalcanal between Point Cruz and Togama Point.
The carrier groups (Air Support Force) were operating close south and south-west of the combat area.
The approach of the Amphibious Force had been a complete surprise to the enemy and no fewer then 18 enemy aircraft were destroyed on the water in this initial sortie of the Allied carrier borne aircraft. No enemy naval surface vessels were encountered and despite previous reports of land based Zero fighters being maintained in the area, none were met.
As ' Forces X and Y ' were approaching their diesembarkation areas, the naval vessels of the escort opened a bombardment on shore targets such as gun positions and encampment areas and on boats and barges moored in close to the shore.
On the Guadalcanal side, a motor auxiliary vessel proceeding from Tulagi to Lungo was fired on by destroyers and shortly afterwards was set on fire by our fighter aircraft. This vessel burned so furiously that it was thought to have been carrying petrol.
Meanwhile other cruiser-borne aircraft had been launched to act as liaison planes over the Tulagi and the Guadalcanal areas. These liaison planes were maintained over their respective areas throughout daylight each day and gave invaluable information regarding the location of enemy troops, batteries and strong points, and later regading the progress of our attacking forces.
' Forces X and Y ' reached their disembarkation areas at 0650L/7 and 0720L/7 respectively and remained underway but stopped, outside the 100 fathom line. The process of lowering, manning and equipping attack boats at once whilst the screening forces acted in accordance with the special instructions they had previously been issued. Broadly, each transport group had an outer arc of screening destroyers and then cruisers between them and the destroyers. With this arrangement both the cruisers and the transports had an anti-submarine screen and against air attack, the enemy aircraft had to pass two outer circles of fire before reaching the transports which would obviously be their objective. In addition the cruisers were able to manoeuvre inside the destroyer screen and yet maintain close support of their transport group.
Throughout daylight carrier borne fighter aircraft were maintained over the combat area as defence against enemy air attack. Fighter Direction was being exercised from USS Chicago to whom a Fighter Direction Group from one of the carriers had been transferred.
In addition to the intial (0615 hours) missions and to the maintenance of fighters over the combat area, the Air Support Force also maintained dive bombers and fighters over both the Tulagi and Guadacanal areas which were available on call to attack shore targets. In the event of enemy air attack the fighters of these patrols would support the aircraft providing fighter protection.
The H-hour, which was the time the troops would actually reach the beaches was set at 0800L/7 for the Tulagi landing at 0910L/7 for the landing on Guadalcanal.
On the Tulagi side, prior to the main landing, there was a secondary landing in the vicinity of Haleta with the object of seizing the promontory and thereby ensuring that the enemy could not fire on the boats making the major landing from the higher ground.
The landings at Haleta and on beach blue (the major landing beach) were accomplished without enemy opposition and the Tulagi landing force soon occupied the northern portion of Tulagi island which was their first objective.
The landing at Haleta had been preceded by a bombardment in which USS San Juan expended 100 rounds of 5" and the destroyers USS Monssen and USS Buchanan each 80 rounds of 5". For 20 minutes these destroyers also stationed themselves as ' goal posts ' to guide the landing craft in towards the main landing zone.
Between 0740L/7 and 0745L/7, USS San Juan expended 560 rounds in bombarding a hill on Tulagi Island. Between 0750L/7 and 0755L/7 were each to expend 200 rounds in close support of the landing and also the northern part of Tulagi Island was dive bombed by 18 aircraft each carrying a 1000lb. bomb. Immediately afterwards followed the landing on the main beach (' Blue beach '). Immediately afterwards USS San Juan fired another 560 rounds against the same hill (Hill 208). The high speed minesweepers were also to spent 60 rounds each on targets on Tulagi and Gavutu Islands. USS Monssen and USS Buchanan were also ordered to each expend 100 round on targets on the southern end of Tulagi Island.
During this period USS San Juan and several destroyers reported sighting a submarine periscope. Heavy depth charge attacks were made and though there is no direct eidence that a submarine was sunk by these attacks, the submarine was not seen again. [No Japanese submarine was present though.]
Meanwhile on the Guadalcanal side, the heavy cruisers USS Astoria, USS Quincy, USS Vincennes and the destroyers USS Dewey, USS Hull, USS Ellet and USS Wilson had been moving close along the north shore of the island keeping targets under almost continuous bombardment. Large fires were raging at Kukum where the enemy was known to have AA batteries and a stores dump.
From 0840L/7, the destroyers had stationed themselves off ' Red Beach ' to mark the line of departure for the attack boats and the ends of the beach were marked by aircraft using coloured smoke bombs.
For the five minutes preceding the actual landing on ' beach Red ' a furious bombardment was put down on the beach area. USS Astoria, USS Quincy, USS Vincennes in this brief interval each fired 45 round of 8" and 200 rounds of 5" whilst the destroyers each fired about 200 rounds. The landing was effected without resistance and our marine forces were on the attack towards Lunga and to seize the line of the Tenaru River without coming into real contact with the enemy. As positions were occupied it became more and more obvious that the enemy had been completely surprised and had taken to the interior of the Island without waiting to render useless any of their plants, stores or material. The aerodrome was found to be intact and the landing strip only required rolling to make it available for our own aircraft. It was evident from the plans captured, from the amount of material and stores captured and from the extensive works which had been started that the establishment of a first class air base on Guadacanal had been the enemy's intention.
A certain number of Japanese pioneer workers were captured and from interrogation it was learned that the garrison which had retired inland was probably 300 strong and that there had escaped with them a considerable number of construction workers.
On the Tulagi side another secondary landing had been made at Halavo. The boats carrying in this landing force had been engaged by shore guns on Bungana and Gatuvu and these defences had also opened fire on the destroyer minesweepers which were supporting the landing. On requist from Rear-Admiral Scott, Rear-Admiral Crutchley sent the destroyer USS Henley to assist in silencing these guns.
On completion of their fire support duties, the destroyer minesweepers streamed their sweepers and made the first sweep in towards Gavutu. No mines were found and the sweepers then carried out a clearance sweep in the Lengo Channel and buoyed the swept lane. Again no mines were found and therefore without waiting for further clearance sweeps, the transports and supply ships moved in close to the beaches to expedite disembarkation of further troop elements and of stores. The minesweepers were released from further sweeping missions and were assigned A/S duties in the landing areas.
On Tulagi Island the landing force having occupied the northern half of the Island, now prepared for the assault against the southern end of the Island where the enemy forces were concentrated. This part of the Island was then subjected to intense aerial and ship bombardment in which task force 62.4 was reinforced by USS Ellet. There were several large explosions and several large fires were started.
At about 1120L/7, a message was received from a Coast Watcher on Bougainville Island reporting a strong force of enemy bombers passing over the Island to the south-east. At about the same time message was received from our shore intelligence advising that enemy submarines were on the move. Shortly after noon it was decided that for the remainder of the day all fighters over the landing area were to be used to protect the Amphibious Force against air attack.
At 1315L/7, our fighters made contact with the enemy bombers about fifteen miles were of Savo Island. One aircraft was soon seen shot down in flames in the vicinity of the Island. At 1323L/7 all ships of ' Force X ' opeened fire on a formation of about 18 Type 97 (Mitsubishi Ki-21) heavy bombers coming over in tight formation and supported by 9 Zero fighters. A pattern bombing attack was carried out by the enemy, the leader giving the release signal by buring a bright light in his glassed-in bomb aimers position in the nose. The bombs were probably 500 pounders. All fell to the north-west of the transports. During their withdrawal the enemy formation continued to be engaged by our fighters. It was later reported that two enemy bombers had been shot down and two had been damaged.
In the assault against the southern portion of Tulagi Island our landing forces was meeting with stiff resistance and in the assault against Gavutu, which however was successfully captured, our marines suffered very heavy casualties.
At 1500L/7, about ten enemy dive bombers came in from the westward and attacked destroyers on the screen to the west of the transports. We had had no warning by radar or from fighter patrols of the approached of this force. Ships at once opened fire and our fighters dived down to attack the enemy, two of which were seen to be shot down. However, USS Mugford received a direct hit aft with a 250 lb. bomb causing loss of life, considerable damage to the after superstructure and putting out of action the two after gun mountings. It is probable that our fighters accounted for many more of this enemy force of dive bombers as dog fights were seen in progress west of Savo Island and the enemy must have been at a disadvantage regarding speed.
During the afternoon the landing of material and stores had progressed on the Guadalcanal side but at Tulagi this operation was held up because the whole Island was not yet in Allied hands. American dive bombers over ' Force X ' periodically attacked target on the north coast of Guadalcanal as the Liaison planes pointed them out. On the other side, the enemy occupied portion of Tulagi Island and Tanambago Island had both been further hammered by ship bombardment and dive bombing and there were large fires burning furiously in each of these areas.
At 1830L/7 (sunset was at 1818 hours), the Screening Group was ordered to take up night dispositions as had been instructed earlier; Two destroyers were stationed to seaward of Savo Island covering the entrances either side of Savo Island as radar and A/S guard patrols. Two groups, each with three 8" cruisers screened by two destroyers on patrol covering the approaches from north of Savo Island and from south of Savo Island to the transport groups. Close A/S and anti-MTB screens of destroyers and destroyer minesweepers around the transports. USS San Juan and HMAS Hobart screened by two destroyers underway between the two transport groups as cover against enemy light forces, entering the combat area from the eastward.
At 2000L/7, the situation with regard to the progress of the marine landing forces was as follows; On Guadacanal all troops ashore occupying on the west the line of the Tenaru river and to the east a line about longitude 160°06'E. No major contact with the enemy garrison forces had been made. In the Tulagi area , Tulagi itself was occupied except the easternmost end where the enemy were still resisting. Gavutu was captured, but with heavy losses on our side. Tanambago was still in the hands of the enemy and our forces were preparing to attack. Halavo was occupied by the Allied forces.
The very stiff resistance offered by the enemy on the Tulagi side called for reinforcement of our forces on Tulagi and Gavutu. These reinforcements were necessarily drawn from the forces held for the occupation of Ndeni in the 3rd phase of the operation and thereby threw out of gear, the planned shedule.
During the night the beach on the Guadacanal side became so congested with gear and equipment landed from the transports and store ships, that unloading had to be suspended.
On the Tulagi side the unloading operation had still not been commenced.
The night passeed without any form of interference from the enemy.
8 August 1942.
Sunrise was at 0638L/8. At 0500L/8, Rear-Admiral Crutchley had ordered the outer patrol units to return to the transport areas and to re-assume their day screen.
As enemy submarines might reach the area today, Rear-Admiral Crutchley ordered the destroyer minesweepers to form an A/S patrol to the westward of the Sealark and Lengo Channels. In addition all cruiser borne aircraft, except one or two for liaison duties, were now available for A/S patrols. At least three at the same time were kept in the air.
At 1027L/8, a message from a coast watcher on Bougainville Island reported 40 heavy bombers proceeding to the south-east. Shortly afterwards the transports were ordered to get underway. Both ' Force X ' and ' Force Y ' were formed independently and manoeuvred between Guadalcanal and Florida Islands awaiting the expected air attack.
At 1200L/8, HMAS Australia sighted 23 large twin engine torpedo bombers to the eastward approaching from behind the clouds over Florida Island. The alarm was given and soon all ships in ' Force X ' were engaging the aircraft which came in low to execute a torpedo bombing attack. A magnificent curtain of bursting high explosive was put up and enemy aircraft were everywhere crashing in flames. Torpedoes were dropped mostly at long range but many of the aircraft continued to fly in towards the formation to strafe personnel. The destroyer USS Jarvis was struck on the starboard side forward by a torpedo and the transport USS George F. Elliott was set on fire by an enemy aircraft flying deliberately into her superstructure. The destroyer USS Dewey was ordered to assist USS Jarvis and try to tow her into shallow water and the destroyer USS Hull was ordered to assist the burning transport.
After the attack on ' Force X ' the torpedo bombers turned towards Savo Island and were then raked by AA fire from ' Force Y '. It is estimated that 12 of the eenmy torpedo bombers were shot down. The attack had been presses well home by a strong force but was badly designed in that all the aircraft attacked from the same direction so enabling us to concentrate the full volume of our AA gunfire on them ans simplifying the avoiding action it was necessary to take. Synchronised with this torpedo bomber attack on ' Force X ' the transports were attacked by a number of high level bombers supported by Zero fighters. Bombs fell close to some of the transports but no damage was caused to any of the Allied ships.
USS Jarvis reached shallow water under her own power going astern and was able to anchor. Inspection showed that her engines and boilers were undamaged but the bottom of her hull was open between stations 30 and 55. She would be able to make four to seven knots under her own power and that night she was sailed to make the beat of her way to Vila but has not been seen or heard since. It was reported that the crew of one of the Japanese aircraft shot down had opened revolver fire on USS Jarvis when she approached their rubber boat to pick them up. The Japanese then shot themselves to avoid being taken prisoner.
The transport USS George F. Elliott continued to burn fiercely but with the assistance of the destroyer USS Hull which had been sent to her. It seemed at one time that the fire would be got under control. However the fire later gained, reached her fire rooms and she had to be abandoned. USS Hull fired four torpedoes into the ship but the burning wreck later grounded in shoal water.
After this attack the transports returned to the unloading areas and the transfer of stores and equipment to the beaches was resumed.
Around 1400L/8, the transport groups were again got under way as warning had been received of another force of enemy bombers proceeding towards the area. No attack developed, however, and at 1630L/8 the unloading operations were again resumed.
In the land areas our troops had extended their occupation area on Guadalcanal and now held from Tenaru to Kukum including the air field.
On the northern side we had completed the capture of Tulagi Island, had consolidated on Gavutu Island and had taken Tanambogo Island though a few isolated snipers had yet to be mopped up.
At 1830L/8, Rear-Admiral Crutchley ordered to naval forces to take up night dispositions as for the previous night.
The situation at the ends of this, the second day, was not quite as favourable as had been expected. Air raids and the threat of air raids causing the transports to get under way to meet them had delayed the unloading operations. Part of a night's unloading had been lost because of the congestion on the beach on the Guadalcanal side. On the Tulagi side the unloading had barely begun because the Island of Tulagi had not been fully conquered earlier. Owing to the very stiff resistance offered by the enemy on the northern side, it had been necessary to employ additional marine forces and these had been draen from the reserve which was intended to occupy Ndeni (Santa Cruz Islands) in the 3rd phase of the operation. So far our losses due to enemy air attack had been one transport and heavy damage to two destroyers. However the enemy continued to receive air reinforcements at Rabaul. Enemy seaplane tenders were moving south and one could expect as heavy and possibly more frequent attacks on our sight with possibly not such lucky results for the Allies. Commander Task Force 61 had said that the time had come for him to withdraw the carrier forces. Enemy submarines were known to be on their way to the area and could be expected at any moment.
At 2045L/8, Rear-Admiral Crutchley was ordered to proceed to the transport USS McCawley for a conference with Rear-Admiral Turner. So at 2055L/8, Rear Admiral Crutchley ordered Captain Bode of the USS Chicago to take charge of the patrol in the southern entrance while HMAS Australia parted company to proceed to the transports of ' Force X '.
During the conference it was decided to retire from the area the following day despite the fact that by no means all material and stores had been landed. Orders were given to give priority to the most vital material and stores to be landed that night.
During the day a report had been received that an enemy force of three cruisers, three destroyers and two seaplane tenders or gunboats had been sighted east of Bougainville Island steering south-east. Rear-Admiral Crutchley asked Rear-Admiral Turner what he thought of this enemy force was up to. Rear-Admiral Turner replied that it was his opinion that the enemy force was destined for Rekata Bay possibly from there to operate torpedo carrying float planes against our forces and that we would have to expect two torpedo attacks a day instead of one. Rear-Admiral Turner also informed Rear-Admiral Crutchley that he had requisted for the next day, full scale bombing of these ships which he felt sure would be in Rekata Bay.
9 August 1942 and the Battle of Savo Island.
It was 0115L/9, when Rear-Admiral Crutchley rejoined HMAS Australia and after 0130L/9, when she got clear of the transport area it was decided not to rejoin the patrol in the southern entrance. HMAS Austalia then patrolled near the transports inside the destroyer screen.
The patrols during this night had been organised as follows; The destroyers USS Blue and USS Ralph Talbot were on the outer radar and A/S patrol, USS Blue off the southern entrance and USS Ralph Talbot off the northern entrance. Patrolling to the south east of Savo Island were patrolling USS Chicago, HMAS Canberra, USS Bagley and USS Patterson. HMAS Australia had originally been with them. Patrolling to the east-north-east of Savo Island were the USS Vincennes, USS Quincy, USS Astoria, USS Helm and USS Wilson.
Not long afterwards, at 0146L/9, green flares were dropped by aircraft. They began to show up to the southward and south-eastward of ' X ' transport area.
At 0150L/9, a flare was dropped in the direction of the channel south-west of Savo Island. Almost at once a few tracer rounds were sighted which were thought to be Oerlikon fire from a ship in the southern patrol group engaging the aircraft that had dropped the flare. However immediately afterwards a burst of heavy surface gunfire was observed to the east of the source of the tracer.
A night naval action then commenced which, as seen from HMAS Australia appreared to move to the tight and to increase tremendously in intensity. HMAS Australia had received no enemy report from either of the Allied guard units or from any ship in the cruiser forces.
What was happening was the following. A Japanese attack force had left Rabaul to attack the Allies. This was the same force that had been sighted an reported but was thought to include seaplane tenders. This was however not the case as the Japanese force was made up of the heavy cruisers Chokai (flying the flag of Vice-Admiral Mikawa), Aoba, Furutaka, Kako, Kinugasa, light cruisers and the destroyer Tenryu, Yubari and the destroyer Yunagi (all offsite links).
They managed to slip by the destroyer USS Blue which despite her radar outfit did not detect the Japanese. The Japanese however, did sighted the destroyer and managed to evade her and proceeded to pass to the southward of Savo Island but before arriving the another destroyer was sighted and evaded. This was the heavily damaged USS Jarvis which was leaving the area for Efate. It seems that the Jarvis also did not see the Japanese but this can not be varified as the destroyer was lost later the same day with all hands. The Japanese destroyer Yunagi was either detached or lost contact with the remainder of the Japanese Force. She had a brief exchange of gunfire with the Jarvis.
The flares that had been dropped came from floatplanes catapulted by the Japanese cruisers. The Japanese then encounted, the ' Southern group ' made up of the USS Chicago, HMAS Canberra, USS Bagley and USS Patterson. The Allies were taken completely by surprise, with their ships not being in first degree of readiness. Not all guns were manned. The Allied crews had been on the alert for two days and it had been decided to rest the crew during the night as much as possible as no attack was expected during the night and enemy air attacks were again expected the following day.
As a result the Japanese engaged the Allied southern patrol force from close range. HMAS Canberra was quickly disabled by gunfire and torpedo hits. Before HMAS Canberra was able to return fire she was already hit by around 24 shells and one or two torpedoes. Both boiler rooms were put out of action, power and lighting were lost and the ship was heavily on fire.
USS Chicago, second in line, was also hit by gunfire and a torpedo in her bow. She retired to the west for about 40 minutes and apparently made no attempt to raise the alarm or give info to other Allied ships on what just happended. For this Captain Bode was heavily criticized. He later committed suicide.
USS Bagley was not damaged in the engagement and managed to fire four torpedoes but they did not hit. After the battle she went to the aid of USS Astoria but also picked up survivors from USS Vincennes and USS Quincy.
USS Patterson, was the first ship to sight the Japanse and the Commanding Officer ordered torpedoes to be fired, however the order was not heard by the torpedo officers when she also opened fire with her guns and in the end no torpedoes were fired by USS Patterson. She was also the only ship that transmitted an enemy report by TBS. Her Commanding Officer had instructed his watch crew to be on their alert as he did not trust the aircraft report on the seaplane tenders. He had also decided to take the watch in which he though it most likely the Japanese might attack himself while all the Commanding Officers of the other ships were asleep. She was hit by enemy gunfire and No.3 and No.4 guns were out of action although No.4 gun soon was able to resume firing. She was also narrowly missed by an enemy torpedo. When the action was over she assisted the heavily damaged HMAS Canberra but the cruiser was beyond salvage and had to be scuttled.
The Japanese then continued around Savo Island at high speed where they encountered the other Allied patrol group, the ' Northern group ', made up of USS Vincennes, USS Quincy, USS Astoria, USS Helm and USS Wilson. Japanese torpedoes were already underway towards the ' Northern group '.
When the aircraft flares were fired the ships of the ' Northern group ' rang the alarm and went to action stations but despite this they too were overwhelmed by the Japanese which now had become divided after the first action. The American ' Northern Force ' was then being attacked from both sides. The Chokai, Aoba, Kako and Kinugasa form one group, the other group was made up of the Furataka, Tenryu and Yubari the other group. In the following action the heavy cruisers USS Vincennes and USS Quincy were sunk while the USS Astoria was heavily damaged. Salvage attempts failed and she later sank as well.
At about 0156L/9, the ' Northern group ' was illuminated and engaged. Fire was returned but the Allied cruisers were soon heavily hit by enemy gunfire and torpedoes. USS Vincennes soon lost electric power but her turrets continued firing in local control. She then received two torpedo hits which halted the ship. Also several fires broke out. The enemy ceased fire around 0215L/9. By 0230L/9 she was listing heavily and the order was given to abandon ship. She sank around 0245L/9.
USS Quincy was hit by the enemy's opening salvo. She was able to open fire but was soon heavily hit topside and fires were soon blazing. She then received a torpedo hit. She turned over at 0235L/9. A large hole was then revealed on her port side.
USS Astoria was able to open fire before being hit but she too was then heavily hit by enemy gunfire which started large fires. By the time the enemy ceased fire she she had lost all power. Her main armament had been able to get off around ten salvoes. Destroyers and destroyer minesweepers went to her aid in fighting the fires but she was beyond salvage and finally sank around 1215L/9.
USS Helm had been unable to identify the enemy in the confusing action and did not open fire.
USS Wilson had fired 212 rounds of 5" at the enemy. She had aimed at the enemy's searchlights for the most part.
Around 0215L/9, USS Ralph Talbot, the other picket destroyer, had turned south-east on observing the action. Around 0230L/9 was illuminated and engaged by the retiring enemy. She sustained fairly extensive superficial damage.
Some damage was inflicted on the enemy, Chokai was hit several times by USS Quincy and USS Astoria. Her No.1 gun turret was hit and out of action. Aoba was hit once. Kinugasa was hit twice. The floatplanes from Aoba and Kako were lost. The biggest loss for the Japanese came the following day where the Kako was torpedoed and sunk by the American submarine USS S-44 (Lt.Cdr. J.R. Moore).
Following the battle most of the wounded that had been picked up by the destroyers were transferred to the transports Barnett and Fuller.
The retirement from the area, which had been planned at 0730L/9, could not be proceeded with. HMAS Canberra was unable to proceed and was ordered to be scuttled. She sank around 0800L/9 with torpedoes fired by USS Ellet after gunfire and torpedoes from USS Selfridge had failed to do the job.
Around 0850L/9, the transports got underway again as coast watchers on Bougainville again reported enemy aircraft on their way. By 1100L/9, no air attacks had developed and unloading was resumed.
Around 1530L/9, the majority of the transports transports of ' Force X ', less USS McCawley got underway eastwards through the Lengo Channel. They were escorted by USS Chicago, USS Mugford, USS Ralph Talbot, USS Patterson, USS Ellet, USS Dewey, USS Southard, USS Hovey, USS Hopkins, USS Zane and USS Trever.
Around 1545L/9, the transports of ' Force Y ' and USS McCawley departed the Tulagi area. They also proceeded eastwards through the Lengo Channel. They were escorted by HMAS Australia, HMAS Hobart, USS San Juan, USS Selfridge, USS Bagley, USS Blue, USS Helm, USS Henley, Hull, USS Wilson, USS Monssen, USS Buchanan, USS Colhoun, USS Gregory, USS Little and USS McKean.
Both forces set course for Nouméa, New Caledonia where they arrived on 13 August 1942. On the 11th, USS Chicago, which had been unable to keep up with the convoy due to her damage was detached to proceed to Nouméa singly escorted by USS Mugford and USS Patterson arriving there on the 14th.
19 Aug 1942
Task Force 44, made up of the heavy cruiser HMAS Australia (Capt. H.B. Farncomb, RAN, flying the flag of Rear-Admiral V.A.C. Crutchley, VC, DSC, RN), light cruiser HMAS Hobart ( Capt. H.A. Showers, RAN) and the destroyers USS Selfridge (T/Cdr. C.D. Reynolds, USN, with Capt. C.W. Flynn, USN, commanding Destroyer Squadron 4 on board), USS Bagley (T/Cdr. G.A. Sinclair, USN) and USS Patterson (Cdr. F.R. Walker, USN) departed Noumea to join the Carrier Fleet (Task Force 61) at sea. Task Force 61 was still operating in the area covering operations in the Guadalcanal area.
21 Aug 1942
Continued operations in the Guadacanal - Tulagi area.
21 August 1942.
Task Force 44, made up of the heavy cruiser HMAS Australia (Capt. H.B. Farncomb, RAN, flying the flag of Rear-Admiral V.A.C. Crutchley, VC, DSC, RN), light cruiser HMAS Hobart ( Capt. H.A. Showers, RAN) and the destroyers USS Selfridge (T/Cdr. C.D. Reynolds, USN, with Capt. C.W. Flynn, USN, commanding Destroyer Squadron 4 on board), USS Bagley (T/Cdr. G.A. Sinclair, USN) and USS Patterson (Cdr. F.R. Walker, USN) made rendezvous with the Carrier Fleet (Task Force 61).
They then joined Task Force 11 (Task Group 61.1), made up of the aircraft carrier USS Saratoga (Capt. D.C. Ramsey, USN, flying the flag of vice-Admiral F.J. Fletcher, USN), heavy cruisers USS Minneapolis (Capt. F.J. Lowry, USN, flying the flag of Rear-Admiral C.H. Wright, USN), USS New Orleans (Capt. W.S. Delany, USN) and the destroyers USS Phelps (T/Cdr. E.L. Beck, USN, with Capt. S.B. Brewer, USN on board), USS Farragut (Cdr. G.P. Hunter, USN), USS Macdonough (Lt.Cdr. E. van E. Dennet, USN), USS Worden (T/Cdr. W.G. Pogue, USN) and USS Dale (Cdr. H.E. Parker, USN).
USS Selfridge was however ordered to join Task Force 18 (Task Group 61.3), made up of the aircraft carrier USS Wasp (T/Capt. F.P. Sherman, USN, flying the flag of Rear-Admiral L. Noyes, USN), heavy cruisers Salt Lake City (Capt. E.G. Small, USN), USS San Francisco (Capt. C.H. McMorris, USN), AA cruiser USS San Juan (Capt. J.E. Maher, USN, flying the flag of Rear-Admiral N. Scott, USN) and the destroyers USS Farenholt (T/Cdr. Lt.Cdr. E.T. Seaward, USN, with Capt. R.G. Tobin, USN on board), USS Aaron Ward (T/Cdr. O.F. Gregor, USN), USS Buchanan (T/Cdr. R.E. Wilson, USN), USS Lang (T/Cdr. E.A. Seay, USN), USS Stack (Lt.Cdr. A.J. Greenacre, USN) and USS Sterett (Cdr. J.G. Coward, USN).
These was also Task Force 16 (Task Group 61.2) made up of the aircraft carrier Enterprise (Capt. A.C. Davis, USN, flying the flag of Rear-Admiral T.C. Kincaid, USN), battleship USS North Carolina (Capt. G.H. Fort, USN), heavy cruiser USS Portland (Capt. L.T. Du Bose, USN, flying the flag of Rear-Admiral M.S. Tisdale, USN), AA cruiser USS Atlanta (Capt. S.P. Jenkins, USN) and the destroyers USS Balch (T/Cdr. H.H. Tiemroth, USN, with Capt. E.P. Sauer, USN on board), USS Benham (Lt.Cdr. J.B. Taylor, USN), USS Ellet (T/Cdr. F.H. Gardner, USN), USS Maury (T/Cdr. G.L. Sims, USN), USS Grayson (T/Cdr. F.J. Bell, USN) and USS Monssen (T/Cdr. R.N. Smoot, USN).
A ' Surface Attack Group ' was then formed in case it would be needed, although the ships assigned remained with the carriers for the moment. It was was made up of the following units; USS San Juan (Independent Flagship) 1st Division; USS North Carolina, USS Minneapolis and New Orleans. 2nd Division; USS Portland, USS Salt Lake City and USS San Francisco. 3rd Division; the third division was to be formed from the screen on signal, the screen was made up of the AA cruiser USS Atlanta and the destroyers USS Selfridge, USS Maury, USS Worden, USS Benham, USS Lang, USS Aaron Ward, USS Bagley and USS Patterson. 4th Division; heavy cruiser HMAS Australia and the light cruisers HMAS Hobart and USS Phoenix (Capt. H.E. Fischer, USN) although this last cruiser was yet to join.
The ' Carrier Attack Group ' was made up of the three aircraft carriers and the remaining destroyers.
Vice-Admiral Fletcher outlines the mission of the ' Air Attack Group as being; To destroy enemy forces prior to and while in the Tulagi - Guadalcanal area, To defend the own carriers.
The mission of the ' Surface Attack Group ' was given as the defence of the carriers against hostile surface attack.
At sunset, the cruisers USS Minneapolis, USS New Orleans, USS San Francisco, USS Salt Lake City and the destroyers USS Selfridge, USS Worden, USS Patterson, USS Benham, USS Lang and USS Maury parted company with the rest of the fleet to form a scouting line 20 miles ahead of the main fleet to guard against night surface attack. They were to rejoin the main force after daylight.
Meanwhile on Guadalcanal, around 0200L/21, an enemy force of about 700 troops attempted to break through our defences at the mouth of the Tenaru River. There was heavy hand to hand fighting until about 0900L/21when the enemy, then retiring, was out-flanked and trapped with their backs to the beach. Fighting continued till about 1700L/21 when our infantery, supported by tanks, completed the destruction of the enemy. 670 Japanese were killed and a few were taken prisoner. Allied casualties were 28 marines killed and 72 wounded. According to an enemy prisoner, their landing force had sailed from Truk on 16 August 1942 in six destroyers and had been landed on 18 August 1942 at a point 18 miles east of Lunga [They had been landed near Cape Taivu by the destroyers Kagero, Arashi, Hagikaze, Hamakaze, Tanikaze and Urakaze (all offsite links)].
At about mid-day four of the fighters now based on Guadalcanal engaged six enemy Zero fighters over the area. One Zero was shot down and one of our own fighters crashed on landing owing to inability to extend the undercarriage.
During the afternoon the seaplane tender (former destroyer) 2314 McFarland (Lt.Cdr. J.C. Alderman, USN) and the high speed transports USS Colhoun (T/Lt.Cdr. G.B. Madden, USN), USS Gregory (Lt.Cdr. H.F. Bauer, USN), USS Little (Lt.Cdr. G.B. Lofberg, Jr., USN), USS McKean (Lt.Cdr. J.E. Shinners, USN), USS Stringham (Lt.Cdr. C.E. Boyd, USN) and uSS Manley (Lt. O.C. Schatz, Jr., USN) (also former destroyers) arrived at Guadacanal with provisions, gear, materials and some personnel. The USS McFarland had aviation gasoline on board. During the approach of this force, a torpedo fired by a submarine passed astern of USS McFarland. If genuine this may have been an attack by the Japanese submarine I-123 (offsite link) who was in the area and did not return from patrol.
At 0900L/21, the seaplane tender USS MacKinac (T/Capt. N.R. Hitchcock, USN), which was operating planes from Ndeni (Santa Cruz Islands) reported being attacked sustaining some damage and casualties. It was later find out this had been allied aircraft which had attacked in error.
22 August 1942.
At 0615L/22, when about 60 miles south of Guadalcanal the aircraft carriers flew off a striking force to attack target of opportunity in the Guadalcanal area. It is considered that this force probably had no success as no enemy were reported in the area this particular morning. During the day the Carrier Groups were kept roughly between San Cristobal and Rennel Islands but no enemy surface foreces were reported within range of our striking forces. An enemy flying boat was shot down by fighters. At the end of the day course was shaped to the eastward and after clearing San Cristobal, changed to the northward and westward to reach a position about 45 miles eastward of the southern end of Malaita Island by daylight the next morning. Ll/22, after the destroyers USS Blue (Cdr. H.N. Williams, USN), USS Helm (T/Cdr. C.E. Carroll, USN) and USS Henley (Cdr. R.H. Smith, USN) had escorted the storeships USS Fomalhaut (AK 22) (5028 GRT, built 1942) (Cdr. J.D. Alvis, USN) and USS Alhena (AK 26) (7101 GRT, built 1941) (T/Capt. C.B. Hunt, USN) through the lengo Channel to Tulagi and Guadalcanal, USS Blue was struck aft by a torpedo which was thought to have been fired by an enemy Motor Torpedo Boat. [The attacker was actually the destroyer Kawakaze, which had been on patrol in the Guadacanal area.] The stern of the destroyer was blown off. She reached Lunga in tow and though disabled, remained seaworthy. USS Alhena discharged her cargo of rations, water, distilling outfits, weapons, ammunition, aviation lubricating oil and bombs. USS Fomalhaut discharged at Guadalcanal a cargo consisting of rations, aviaton spirit, water, distilling outfits, ammunition and materials.
USS McFarland, USS Colhoun, USS Gregory, USS Little and USS McKean left the Guadalcanal area after having discharged their cargoes. USS Stringham and USS Manley remained in the area after having finished unloading. They were to assist USS Helm and USS Henley in screening the Fomalhaut and Alhena.
The morning air reconnaissance reported a Japanese ship, thought to be a light cruiser in approximate position 05°00'N, 159°00'E proceeding south-east at 24 knots. As it was thought this ship might be en-route to attack our seaplane tender at Ndeni so USS MacKinac and the destroyer minelayer USS Breese (T/Cdr. H.F. Staut, USN) were ordered to leave that place.
The light cruiser USS Phoenix which was to join the Fleet arrived at Noumea from Sydney. However she required repairs to one gun turret which were estimated to take 48 hours.
23 August 1942.
At 0630L/23, the three carrier groups had reached a position about 45 miles to the east of the south end of Malaita Island and throughout the day operated between this position and a positiom 70 miles to the south-east. CAP fighter patrols one again accounted for a Japanese flying boat. Our own reconnaissance aircraft made three submarine sightings. [These were the Japanese submarine I-17 (twice) and I-19 (offsite links).] These sightings seems to confirm an earlier intelligence report which had been received indicating a line of enemy submsrines stretching north-west from Ndeni (Santa Cruz Islands).
At 1030L/23, a reconnaissance aircraft reported an enemy force of two cruisers, three destroyers and four transports in approximate position 05°00'N, 160°00'E steering south towards Guadalcanal at 17 knots. At 1515L/23 USS Saratoga launched a striking force of 37 torpedo and dive bombers to attack this enemy force, then estimated to bear 320°, 260 miles from our own carrier forces. From the airfield on Guadalcanal a striking force of 9 dive bombers escorted by fighters was also launched but neither of these striking forces made contact with the enemy. This was not surprising as the reconnaissance aircraft had made only the initial sighting report and with passing rain stroms and a good deal of cloud it was essential that the enemy was effectively shadowed and reported if our striking forces were to reach them to deliver an attack. All the aircraft of these striking forces landed at Guadalcanal airfield. The carrier group then rejoined USS Saratoga the next morning. During the night the Japanese destroyer Kagero had bombarded the area of the airfield.
The enemy convoy sighted by the reconnaissance aircraft had been made up of the transports Boston Maru (5438 GRT, built 1919), Daifuku Maru (3194 GRT, built 1907) and Kinryu Maru (9310 GRT, built 1938). They had a close escort made up of the light cruiser Jintsu and the patrol boats Patrol Boat No.1, Patrol Boat No.2, Patrol Boat No.34 and Patrol Boat No.35.
Five Catalina flying boats were to attack this convoy with bombs and torpedoes in moonlight but these also could not find it. It was later heard that the enemy convoy had made a drastic alteration of course to the north-west. It was a pity that failure on the part of the reconnaissance plane to make further reports had led to so much wasted efforts of the Allied air striking forces.
In the evening Task Force 18 (USS Wasp group), parted company and proceeded to the south to refuel from USN tankers in approximate position 13°00'S, 164°00'E.
As no attack had developed against Ndeni, USS MacKinac and USS Breese returned to Graciosa Bay.
During the afternoon it became clear that the damaged destroyer USS Blue could not towed away from the Guadalcanal area. She was therefore scuttled in the evening by scuttling charges and gunfire (a torpedo had missed) from USS Henley.
During the night of 23/24 August, Task Forces 11 and 16 proceeded to the south-east, then to the north and finally to the westward to be back in the same area as today for continued operations. (1)
24 Aug 1942
Continued operations in the Guadacanal - Tulagi area / Battle of the Eastern Solomons.
24 August 1942.
At daylight on 24 August, Task Forces 11 and 16 had reached a position about 50 miles east of the southern end of Malaita Island.
The composition of Task Force 11 was as follows; the aircraft carrier USS Saratoga (Capt. D.C. Ramsey, USN, flying the flag of vice-Admiral F.J. Fletcher, USN), heavy cruisers USS Minneapolis (Capt. F.J. Lowry, USN, flying the flag of Rear-Admiral C.H. Wright, USN), USS New Orleans (Capt. W.S. Delany, USN), HMAS Australia (Capt. H.B. Farncomb, RAN, flying the flag of Rear-Admiral V.A.C. Crutchley, VC, DSC, RN), light cruiser HMAS Hobart ( Capt. H.A. Showers, RAN) and the destroyers USS Phelps (T/Cdr. E.L. Beck, USN, with Capt. S.B. Brewer, USN on board), USS Farragut (Cdr. G.P. Hunter, USN), USS Macdonough (Lt.Cdr. E. van E. Dennet, USN), USS Worden (T/Cdr. W.G. Pogue, USN), USS Dale (Cdr. H.E. Parker, USN), USS Bagley (T/Cdr. G.A. Sinclair, USN) and USS Patterson (Cdr. F.R. Walker, USN).
Task Force 16 was made up of Enterprise (Capt. A.C. Davis, USN, flying the flag of Rear-Admiral T.C. Kincaid, USN), battleship USS North Carolina (Capt. G.H. Fort, USN), heavy cruiser USS Portland (Capt. L.T. Du Bose, USN, flying the flag of Rear-Admiral M.S. Tisdale, USN), AA cruiser USS Atlanta (Capt. S.P. Jenkins, USN) and the destroyers USS Balch (T/Cdr. H.H. Tiemroth, USN, with Capt. E.P. Sauer, USN on board), USS Benham (Lt.Cdr. J.B. Taylor, USN), USS Ellet (T/Cdr. F.H. Gardner, USN), USS Maury (T/Cdr. G.L. Sims, USN), USS Grayson (T/Cdr. F.J. Bell, USN) and USS Monssen (T/Cdr. R.N. Smoot, USN).
Task Force 18, made up of the aircraft carrier USS Wasp (T/Capt. F.P. Sherman, USN, flying the flag of Rear-Admiral L. Noyes, USN), heavy cruisers Salt Lake City (Capt. E.G. Small, USN), USS San Francisco (Capt. C.H. McMorris, USN), AA cruiser USS San Juan (Capt. J.E. Maher, USN, flying the flag of Rear-Admiral N. Scott, USN) and the destroyers USS Selfridge (T/Cdr. C.D. Reynolds, USN, with Capt. C.W. Flynn, USN, on board), USS Farenholt (T/Cdr. Lt.Cdr. E.T. Seaward, USN, with Capt. R.G. Tobin, USN on board), USS Aaron Ward (T/Cdr. O.F. Gregor, USN), USS Buchanan (T/Cdr. R.E. Wilson, USN), USS Lang (T/Cdr. E.A. Seay, USN), USS Stack (Lt.Cdr. A.J. Greenacre, USN) and USS Sterett (Cdr. J.G. Coward, USN) was some 250 miles to the southward to fuel from the tankers USS Cimarron (T/Capt. R.M. Ihrig, USN), USS Platte (Capt. R.H. Henkle, USN). These tankers were escorted by the destroyers USS Clark (T/Capt. M.T. Richardson, USN) and USS Gwin (Cdr. J.M. Higgins, USN). The tanker group had departed Efate on 23 August 1942. Fuelling commenced around 0920L/24.
Allied reconnaissance aircraft were soon in contact with the enemy surface forces and it became clear that widespread enemy movement was under way. At 0800L/24, a convoy of five ships was sighted. This convoy was escorted by a cruiser, three destroyers and a submarine. Location of the convoy was was to the south of Bougainville steering to the south-east. Later there were reports of two cruisers and two destroyers in the New Ireland - Isabel Island area.
Following these sightings our reconnaissance aircraft sighted strong enemy naval forces to the north-east of Ontong Java Atoll steering to the southward. These naval forces when sighted were about 300 miles north of Task Forces 11 and 16. When this strong enemy naval force was sighted USS Saratoga had just landed on her aircraft which had stayed overnight on the airfield at Guadalcanal.
Vice-Admiral Fletcher ordered all ships to have steam for full speed by 1200L/24. The Task Forces then proceeded to the north and east whilst preparing air strike groups to attack the enemy.
The aircraft reports of the enemy naval forces when plotted failed to give a clear picture of the situation because the reports were not amplified and were not kept up to date. It was obvious, also, that the enemy types were being mistaken, particularly that destroyers were being reported as cruisers. However the reports showed that the enemy had a very considerable naval force, including an aircraft carrier, to the northward of the Allied Task Forces 11 and 16.
The Japanese forces operating in the area were the following; The ' Main Force ' was made up of the heavy cruisers Atago, Takao, Maya, Myoko, Haguro, light cruiser Yura and the destroyers Asagumo, Yamagumo, Kuroshio, Oyashio and Hayashio. The ' Support Force ' was made up of the battleship Mutsu, seaplane tender Chitose and the destroyers Natsugumo, Murasame, Harusame and Samidare. The ' Carrier Force ' was made up of the aircraft carriers Shokaku, Zuikaku and the destroyers Akigumo, Yugumo, Makigumo, Kazagumo, Shikinami. The ' Cover Force ' was to provide cover for the ' Carrier Force ' and was made up of the battlecruisers Hiei, Kirishima, heavy cruisers Kumano, Suzuya, Chikuma, light cruiser Nagara and the destroyers Akizuki, Hatsukaze, Maikaze, Nowaki, Tanikaze and Yukikaze. The ' Distraction Force ' was made up of the light carrier Ryujo, heavy cruiser Tone and the destroyers Amatsukaze and Tokitsukaze (all links are offsite links).
Around 1330L/24, USS Saratoga launched a striking force against the ' Ryujo ' Force. The striking force was made up of 30 dive bombers and 8 torpedo bombers. Around 1530L/24, they attacked the Ryujo and managed to heavily damage the Japanse carrier with bombs and torpedo(es). The damaged carrier sinks later the same day in position 06°10'S, 160°50'E.
Shortly after 1405L/24, two large enemy carriers were sighted by a reconnaissance aircraft from USS Enterprise. At 1430L/24, it was however decided not to launch the available striking force from USS Enterprise (only 25 aircraft were available), as these aircraft would not be able to return before dark. Two of the scouts from USS Enterprise attacked the Shokaku with bombs. One very near miss was obtained and she suffered some minor damage to her hull.
The strike force from the Enterprise however was launched to clear the deck between 1625L/24 and 1640L/24 when Japanese aircraft were detected to be approaching. The strike force was ordered to search for and attack the damaged Ryujo and then land on Guadalcanal. They however did not find the Ryujo.
Around the same time USS Saratoga also launched her remaining eight attack planes to attack the enemy battleship and cruiser force reported to the north. They later attacked the Chitose (They identified the target as the Mutsu.) All aircraft, except for one dive bomber which had returned early and two torpedo aircraft which landed on San Christobal Island, returned to the carrier.
At 1602L/24, the radar on the USS Enterprise detected a large unidentified flight of aircraft coming towards, bearing 320°, range 88 miles. At that time there were 25 fighters on Combat Air Patrol and USS Saratoga had 20 ready on deck. The sun was bearing 325°, so the enemy was approaching from the direction of the sun. The radar contact was however soon lost and was not picked up again for 17 minutes. USS Saratoga meanwhile launched her aircraft and a returning search group was ordered to stay clear as enemy attack was imminent but not all picked up this message. It is believed that the Japanese were trailing these returning aircraft.
At 1619L/24, the enemy flight was picked up again on the same bearing but now at a range of 44 miles. Some fighters in the meantime had landed for refuelling while others were launched. In all there were now 38 fighters on CAP. At 1625L/24, one section of our fighters sighted the enemy consisting of about 36 bombers with many Zero fighters above and below. They were then about 33 miles from the Enterprise which at that time was about 10 miles to the north-west of the Saratoga. Shortly afterwards also enemy torpedo aircraft were seen.
USS Saratoga then launched an additional 15 fighters bringing the total in the air to 53. Fighter direction was however not as effective as it could have been due to much non-essential chatter on the radio.
At a range of about 25 miles the enemy split into multiple sections and veered to the north. It was during this interval that the radar screen became confused with the many enemy groups, our returning search aircraft, the Enterprise strike group just launched to attack the Ryujo, the second Saratoga attack group and the many fighters in the air. This, with the poor radio discipline, made it difficult to obtain correct information on the various enemy groups and to control our fighters.
When the enemy aircraft were about 14 miles from the Enterprise, a fighter reported them to be at 18000 feet. Our fighters attacked promptly but had to climb through Zero fighters to reach the bombers, hence the majority of the dive bombers were not intercepted until they were in their dives.
Meanwhile Task Force 61 was doing 27 knots, manoeuvring radically with maximum rudder. The screen came in to close support distance, 2000 yards for cruiser and destroyer within 1800 yards. The USS North Carolina was at 2500 yards from the USS Enterprise proceeding at her full speed.
At 1641L/24, USS Enterprise was near missed by the first group of enemy dive bombers. but soon more groups came in and in the end USS Enterprise was hit by three bombs and suffered many near misses. Many of the attackers were shot down or damaged (Japanese gives 18 dive bombers and 6 fighters lost out of 27 dive bombers and 10 fighters). Repairs were made on board the USS Enterprise and she was able to remain in operation.
Meanwhile speed had been increased to 30 knots by USS Enterprise and her cruiser and destroyer escort. The result was that the North Carolina dropped behind and was now also attacked by Japanese aircraft, she was not hit but suffered three near misses.
During the night of 24/25 August 1942, Task Forces 11 and 16 retired to the south. Task Force 11 was to refuel and Task Force 16 with the Enterprise was to retire for repairs. Task Force 18, having refuelled proceeded northwards.
With the enemy still at large the seaplane tender USS MacKinac (T/Capt. N.R. Hitchcock, USN) and destroyer minelayer USS Breese (T/Cdr. H.F. Staut, USN) were ordered again to retire from Ndeni (Santa Cruz Islands). (1)
25 Aug 1942
Continued operations in the Guadacanal - Tulagi area following the Battle of the Eastern Solomons.
25 August 1942.
During the night of 24 August/ 25 August, Task Forces 11 and 16 retired to the south to refuel or retire from the area for repairs respectively. Task Force 18 had completed fuelling and now proceeded northwards to take their place.
The composition of Task Force 11 was as follows; the aircraft carrier USS Saratoga (Capt. D.C. Ramsey, USN, flying the flag of Vice-Admiral F.J. Fletcher, USN), heavy cruisers USS Minneapolis (Capt. F.J. Lowry, USN, flying the flag of Rear-Admiral C.H. Wright, USN), USS New Orleans (Capt. W.S. Delany, USN), HMAS Australia (Capt. H.B. Farncomb, RAN, flying the flag of Rear-Admiral V.A.C. Crutchley, VC, DSC, RN), light cruiser HMAS Hobart (Capt. H.A. Showers, RAN) and the destroyers USS Phelps (T/Cdr. E.L. Beck, USN, with Capt. S.B. Brewer, USN on board), USS Farragut (Cdr. G.P. Hunter, USN), USS Dewey (T/Cdr. C.F. Chillingsworth, Jr., USN), USS Macdonough (Lt.Cdr. E. van E. Dennet, USN), USS Worden (T/Cdr. W.G. Pogue, USN), USS Bagley (T/Cdr. G.A. Sinclair, USN) and USS Patterson (Cdr. F.R. Walker, USN).
Task Force 16 was made up of Enterprise (Capt. A.C. Davis, USN, flying the flag of Rear-Admiral T.C. Kincaid, USN), battleship USS North Carolina (Capt. G.H. Fort, USN), heavy cruiser USS Portland (Capt. L.T. Du Bose, USN, flying the flag of Rear-Admiral M.S. Tisdale, USN), AA cruiser USS Atlanta (Capt. S.P. Jenkins, USN) and the destroyers USS Balch (T/Cdr. H.H. Tiemroth, USN, with Capt. E.P. Sauer, USN on board), USS Benham (Lt.Cdr. J.B. Taylor, USN), USS Ellet (T/Cdr. F.H. Gardner, USN), USS Maury (T/Cdr. G.L. Sims, USN), USS Grayson (T/Cdr. F.J. Bell, USN) and USS Monssen (T/Cdr. R.N. Smoot, USN).
Task Force 18, made up of the aircraft carrier USS Wasp (T/Capt. F.P. Sherman, USN, flying the flag of Rear-Admiral L. Noyes, USN), heavy cruisers Salt Lake City (Capt. E.G. Small, USN), USS San Francisco (Capt. C.H. McMorris, USN), AA cruiser USS San Juan (Capt. J.E. Maher, USN, flying the flag of Rear-Admiral N. Scott, USN) and the destroyers USS Selfridge (T/Cdr. C.D. Reynolds, USN, with Capt. C.W. Flynn, USN, on board), USS Farenholt (T/Cdr. Lt.Cdr. E.T. Seaward, USN, with Capt. R.G. Tobin, USN on board), USS Aaron Ward (T/Cdr. O.F. Gregor, USN), USS Buchanan (T/Cdr. R.E. Wilson, USN), USS Lang (T/Cdr. E.A. Seay, USN), USS Stack (Lt.Cdr. A.J. Greenacre, USN) and USS Sterett (Cdr. J.G. Coward, USN).
The battleship USS North Carolina, the AA cruiser USS Atlanta and the destroyers USS Grayson and USS Monssen were ordered to detach from Task Force 16 and join the other Task Forces.
Another Task Force, Task Force 17, made up of the aircraft carrier USS Hornet (Capt. C.P. Mason, USN , flying the flag of Rear-Admiral G.D. Murray, USN), heavy cruisers USS Northampton (Capt. W.D. Chandler, Jr., USN, flying the flag of Rear-Admiral H.H. Good, USN), USS Pensacola (Capt. F.L. Lowe, USN), AA cruiser USS San Diego (Capt. B.F. Perry, USN) and the destroyers USS Morris (Lt.Cdr. R.B. Boyer, USN, with Capt. G.C. Hoover, USN on board), USS Hughes (T/Cdr. D.J. Ramsey, USN), USS Anderson (T/Cdr. R.A. Guthrie, USN), USS Mustin (T/Cdr. W.F. Petersen, USN), USS Russell (T/Cdr. G.R. Hartwig, USN) and USS O'Brien (T/Cdr. T. Burrowes, USN) were approaching the New Hebrides area from the eastward. With them was also the tanker USS Guadalupe (T/Capt. J.S. Freeman, USN). Originally intended as reinforcements but they now could take the place of Task Force 16. USS Guadalupe parted company with Task Force 17 on this day as did USS Hughes which was detailed to escort the tanker.
Shortly after midnight during the night of 24/25 August, enemy destroyers shelled our positions in the Guadalcanal / Tulagi area but they inflicted almost no damage. Casualties among our troops were two killed and three wounded. Some dive bombers took off from Henderson Field and claimed to have obtained on hit on an enemy destroyer. The Japanese destroyers which were operating in the Guadalcanal / Tulagi area this night were the Kagero, Isokaze, Kawakaze, Mutsuki and Yayoi. Our positions on Guadacanal were also bombed by high level bombers shortly before noon this day.
After daylight on the 25th, Task Force 11 and part of Task Force 16 commenced fuelling from the tankers USS Cimarron (T/Capt. R.M. Ihrig, USN), USS Platte (Capt. R.H. Henkle, USN) and USS Sabine (T/Capt. H.L. Maples, USN) which were escorted by the destroyers USS Clark (T/Capt. M.T. Richardson, USN), USS Dale (Cdr. H.E. Parker, USN) and USS Gwin (Cdr. J.M. Higgins, USN).
On completion of the fuelling USS Enterprise, USS Portland, USS Balch, USS Benham and USS Ellet parted company to leave the operations area. USS Maury was ordered to proceed to Tulagi. She rejoined on the 28th. Task-Force 16 arrived at Tonga on 30 August 1942.
Meanwhile Task Force 18 was operating in support of the Marines on Guadalcanal. Three enemy reconnaissance aircraft were shot down by fighters from USS Wasp. In addition aircraft from USS Wasp reconnoitred Rakata Bay which was suspected to be used by the enemy but the Bay was found to be empty.
Two submarine contacts were obtained by Task Force 18 on the 25th. The destroyer USS Grayson sighted a ship on the horizon and was detached to invesitigate. The ' ship ' turned out to be a large submarine which submerged. USS Grayson then attacked with several patterns of depth charges. She was later joined by USS Patterson. When USS Grayson ran out of depth charges USS Monssen took over from her. In the end the Japanese submarine, which was the I-9 (offsite link), managed to escape damaged. The other submarine contact was attacked by a dive bomber from USS Enterprise which claimed a direct hit.
26 August 1942.
Shortly after midnight Task Force 11 (Saratoga Group) completed fuelling and reinforced by USS North Carolina, USS Atlanta, USS Grayson and USS Monssen proceeded northwards to join Task Force 18 (Wasp Group).
At 1215L/26, our positions on Guadacanal were raided by sixteen twin engined enemy bombers supported by twelve Zero fighters. Allied land based fighters intercepted them and shot down seven bombers and five fighters for the loss of one fighter including its pilot.
On joining up both Carrier Task Forces operated during the night of 26/27 August on the parallel of 11°S, between San Christobal Island and the Santa Cruz Islands.
27 August 1942.
During the day the carrier groups had steered to the southward and by sunset had reached position 12°00'S, 165°00'E. In the afternoon the CAP had shot down a large four-engined enemy flying boat which attempted to shadow the carrier forces.
Allied reconnaissance aircraft from Ndeni again found enemy naval forces to the north-east of the Solomons. The forces comprised a battleship, cruisers and destroyers. They were reported on various courses during the day but always in the vicinity of position 02°00'S, 162°00'E.
According to intelligence more and more units of the Japanese Fleet were known to be in the area as were a lot of the Japanese senior naval commanders. This indicated the magnitude of the effort the Japanese are preparing to make in the area.
The Allied Commander South Pacific (Vice-Admiral Ghormley) decided that every effort should be made to reinforce our positions in the Guadalcanal - Tulagi area.
During the day the seaplane tender (former destroyer) McFarland (Lt.Cdr. J.C. Alderman, USN) relieved the destroyer minelayer USS Breese (T/Cdr. H.F. Staut, USN) at Ndeni thus joining the seaplane tender USS MacKinac (T/Capt. N.R. Hitchcock, USN) there.
In the Guadalcanal - Tulagi area there were no reports of enemy activity. A large patrol had been sent to attack a Japanese outpost at Kukumbona (seven miles west of Lunga Point). In the afternoon four additional fighters landed at Henderson Field. On their way in they had damaged and hopefully destroyed a large four-engined enemy flying boat.
During the night Task Forces 11 and 18 cruised around latitude 12°00'S between meridians 165°00'E and 162°00'E.
28 August 1942.
At daylight the two carrier groups were sixty miles south of San Cristobal Island and operated throughout the day to provide cover for a convoy en-route to the Guadacanal - Tulagi area from the New Hebrides area.
This convoy was made up of the transports USS William Ward Burrows (AP 6) (4577 GRT, built 1929) (T/Cdr. E.I. McQuiston, USN) and Kopara (New Zealand, 679 GRT, built 1938). They were escorted by the destroyer minelayers 2157 Gamble (Lt.Cdr. S.N. Tackney), 2368 Tracy (Lt.Cdr. J.L. Collis, USN) and the high speed transports (former destroyers) USS Colhoun (T/Lt.Cdr. G.B. Madden, USN), USS Gregory (Lt.Cdr. H.F. Bauer, USN) and USS Little (Lt.Cdr. G.B. Lofberg, Jr., USN).
Reconnaissance aircraft found no enemy naval forces in the area north-east of the Solomon Islands. Enemy submarine activity in the area between 05°S and 15°S, and 160° to 170° has greatly increased during the last few days and it is estimated that there area now at least ten enemy submarines in the area. It would appear that the enemy is aware of the approximate vicinity of our forces and is andeavouring to achieve some success against our carriers with this concentration of submarines. However, the carrier forces have an ample number of screening destroyers and strong A/S air patrols which are maintained during daylight and have been keeping the submarines down and scoring some successes against them.
During the day Rear-Admiral Scott transferred from the USS San Juan to the San Francisco. The USS San Juan then parted company to join Task Force 16 (the Enterprise Group) as she had a defective gun mount for which she needed to undergo repairs.
In the Guadalcanal area, the US Marines patrol returned after dealing with the enemy detachmentt at Kukumbona. US casualties had been five killed and ten wounded. Enemy casualties uncertain.
An afternoon air patrol from Guadalcanal located an enemy force comprising three large destroyers and one smaller one seventy miles to the northward and steering south. Eleven dive bombers took off and attacked this force resulting in one large destroyer blowing up and sinking, one large destroyer being hit amidships and set on fire and the smaller destroyer being hit and left proceeding at slow speed and in distress. The remaining large destroyer escaped. One of our dive bombers failed to return. It was reported that these destroyer had carried considerable quantities of gear on deck. The destroyer attacked were the Asagiri which was sunk while the Shirakumo and Yugiri sustained heavy damage and the Amagiri sustained minor damage. [All these destroyers were the same size as all belonged to the Fubuki-class, all links are offsite links.]
It was learnt that about 100 Japanese had landed on Mahige Island (South end of Isabel Island) the previous afternoon from two rafts. It is probable that this party consised of survivors from the transport which had been sunk about 120 miles to the northward on the 25th by our aircraft.
During the night of 28/29 August 1942, both carrier groups proceeded to the northward.
29 August 1942.
At daylight the carrier groups were in approximate position 10°00'S, 163°00'E, able to cover the arrival at Guadalcanal of the convoy mentioned earlier. In this position Task Forces 11 and 18 were joined by Task Force 17. During the day they operated to the southward reaching latitude 12°S by sunset.
At 0440L/29, our position in Guadalcanal was bombed by 6 enemy aircraft and at 1155L/29 our position was again bombed. In this raid, which was carried out by 18 twin-engined bombers, supported by 9 fighters, our shore based fighters intercepted and shot down at least three enemy bombers and four enemy fighters (Type Zero). In addition one bombers was brought down by AA fire. Two Allied fighters were destroyer on the ground and two were damaged in aerial combat. Some ammunition and AA material had been destroyed. Allied casualties were 3 killed and 9 wounded.
The Commanding General Guadalcanal has reported that only the F4F Wildcat fighters are able to compete against the enemy's bombing formations owing to the great height at which they approach.
At 1250L/29, our convoy arrived in the Tulagi area with a much needed cargo of ammunition, rations, aviation spirit and stores. After unloading, the three high speed transports (former destroyers) will remain in the area to transport Marine raider detachments in mopping up operations against outlying enemy detachments.
The next movement of supplies to Guadalcanal area began today with the departure from Esperitu Santo of the destroyer USS Helm (T/Cdr. C.E. Carroll, USN) escorting the patrol tenders YP 239, YP 284 and YP 326 and of the destroyer USS Henley (Lt.Cdr. E.K. van Swearingen, USN) escorting the Naval Cargo Ship USS Betelgeuse (AK 28) (6198 GRT, built 1939) (T/Capt. H.D. Power, USN).
A report was received the enemy cruisers or destroyers have left Faisi (Shortland Islands) to proceed to Guadalcanal at high speed. Orders were therefore given for the USS William Ward Burrows, Kopara and their escort to retired to the eastward through the Lengo Channel and to return to the area the next day to complete unloading. Indeed the Japanese destroyers Isokaze, Kawakaze, Suzukaze and Umikaze had departed followed by the Fubuki, Hatsuyuki and Murakumo. They landed Japanese troops near Cape Taivu during the night of 28/29 August 1942.
During the night of 29/30 August 1942, the Carrier Groups cruiser in the vicinity of position 12°00'S, 164°00'E.
30 August 1942.
At daylight the light cruiser USS Phoenix (Capt. H.E. Fischer, USN) finally joined the Carrier Forces which at 0800M/12 were reorganized as follows; Task Force 61 (Vice-Admiral F.J. Fletcher, USN) Task Group 61.1, under Vice-Admiral Fletcher was made up of the aircraft carrier USS Saratoga, battleship USS North Carolina, heavy cruisers USS Minneapolis, USS New Orleans, AA cruiser USS Atlanta and the destroyers USS Phelps, USS Farragut, USS Dewey, USS Macdonough, USS Worden, USS Grayson and USS Monssen. Task Group 61.2, under Rear-Admiral G.D. Murray, USN, was made up of the aircraft carrier USS Hornet, heavy cruisers USS Northampton, USS Pensacola, light cruiser USS Phoenix, AA cruiser USS San Diego and the destroyers USS Morris, USS Anderson, USS Mustin, USS Russell, USS O'Brien, USS Bagley and USS Patterson. Task Group 61.3, under Rear-Admiral L. Noyes, USN, was made up of the aircraft carrier USS Wasp, heavy cruisers HMAS Australia, USS San Francisco, USS Salt Lake City, light cruiser HMAS Hobart and the destroyers USS Selfridge, USS Farenholt, USS Aaron Ward, USS Buchanan, USS Lang, USS Stack and USS Sterret.
During the day the combined Task Force operated in the vicinity of position 12°30'S, 164°00'E.
In the Guadalcanal area there was an aerial engagement in the forenoon in which Allied fighters shot down 8 land-based enemy type Zero fighters for a loss to themselves if 4 aircraft of which 1 pilot was rescued. Around 1500M/30, 18 enemy bombers attacked Allied ships unloading of Kukum during which the high speed transport USS Colhoun was sunk. No other ships were hit. During the night of 29/30 August the transport William Ward Burrows had grounded on Sylvia shoal off Tulagi. She was towed off, with great difficulty, the following day. It was believed that USS Gamble and USS Little each destroyed an enemy submarine in the area on the 29th. [USS Gamble indeed sunk the I-123 (offsite link).]
In the afternoon 17 F4F fighters and 4 scout dive bombers arrived as reinforcements at Henderson Field.
During the afternoon an enemy force of four cruisers was located between Isabel and New Georgia Islands, proceeding to the north-west. They were then bombed by the aircraft which made the sighting but no hits were obtained. [More likely this were destroyers though.]
During the night of 30/31 August 1942 the combined carrier forces steered to the northward. Task Force 18 / 61.3 ('Wasp'-Group) was to be detached during the night to proceed to Noumea for fuel, provisions, ammunition and a few days of in harbour. Task Forces 11 / 61.1 and 17 / 61.2 would reach latitude 10°S at daylight to continue the operations.
31 August 1942.
Shorty after midnight, Task Group 61.3 turned to the southward to proceed to Noumea as planned.
However, at 0748M/31, in position 10°34'S, 164°18'E, USS Saratoga was hit by a torpedo from the Japanese submarine I-26 (offsite link) which had fired a salvo of six. The torpedoes were spotted by USS Macdonough which alerted the carrier which was able to dodge the other torpedoes, one of which had broken surface as well. The carrier came to a standstill. Prior to the attack, at 0310M/31, the new SG radar of USS North Carolina had detected a surface contact and at 0337M/31, USS Farragut had been detached to investigate but she could not find anything [obviously, the submarine had submerged and tried to get into an attack position.]
Towing gear was then rigged and USS Minneapolis and USS New Orleans were ordered to make ready to take the disabled carrier in tow but at 0835M/31, USS Saratoga was able to get underway on one shaft and commenced to leave the area. the destroyer USS Monssen was left behind with orders to keep the sumbarine down until sunset and then rejoin. At the same time USS Phelps obtained a contact. While maintaining contact USS Macdonough came in and dropped depth charges. USS Monssen then took over.
Around 1018M/31, the destroyer USS Bagley joined from Task Force 17 / 61.2 to reinforce the damaged carrier's destroyer screen. Eight minutes later a second shaft could be used to propel the damaged carrier which by now was back on an even keel.
At 1043M/31, all power was however lost and she was dead in the water again. At 1204M/31, a towline was established with the cruiser USS Minneapolis and towing commenced around half an hour later.
Around 1310M/31, both usable shafts were back 'online' and she was able to propel herself again. Towing was still continued though and the ship was towed into the wind and at 1330M/31, 29 aircraft were flown off to Esperitu Santo. Tow was casted at 1637M/31.
During 1 September 1942, 5 more aircraft were flow off to Esperitu Santo while 2 returned from there. Also an A/S patrol was maintained throughout the day. Around 1842M/1, the tug Navajo (T/Cdr. J.A. Ouellet, USN), escorted by the destroyer Laffey (Lt.Cdr. W.E. Hank, USN) joined.
On 2 september USS Saratoga flew off 2 aircraft to Esperitu Santo and a total of 32 fighters to Efate. also the Task Group, less the Saratoga fuelled from the tanker USS Guadalupe which had arrived escorted by the destroyer USS Dale. Also during the day personnel and bagage were transferred to the destroyers USS Monssen and USS Grayson. Early in the afternoon 17 aircraft landed on from Esperitu Santo for gear, torpedoes, etc.. These aircraft later took off again to return to Esperitu Santo but one crashed on taking off, the pilot being rescued by USS Navajo. Again A/S patrols were maintained throughout the day.
On 3 September fuelling was completed and USS Guadalupe and USS Dale were detached around 1245M/3. As usual air patrols were maintained throughout the day. Task Force 11 arrived at Tonga on 6 September 1942.
Meanwhile around 1200M/1, Task Force 18 / Task Group 61.3 turned around. The destroyers then fuelled from the bigger ships.
On 31 August 1942, in the Guadalcanal area, moonlight air patrol had located two enemy cruisers and two destroyers near Cape Taivu. They were close inshore and are thought to have been discharging troops and cargo. Dive bombers then attacked them forcing them to withdraw. [In fact during the night of 31 August / 1 September, 1000 troops and stores were landed by the Japanese destroyers Kagero, Kawakaze, Suzukaze, Umikaze, Fubuki, Amagiri, Hatsuyuki and Murakumo.]
In the afternoon the USS Betelgeuse escorted by USS Henley arrived at Guadalcanal. On board were much needed stores including aviation spirit. Also on board were 200 Navy construction personnel to assist in unloading operations. On their departure these two ships were to evacuate 400 POW's. Also on this day the Kopara completed unloaded and departed escorted by the USS Tracy.
Around 1800M/31, HMAS Australia, HMAS Hobart and USS Selfridge parted company with Task Group 61.3 with orders to proceed to Brisbane, Australia.
Around 1900M/31, USS Phoenix, USS Bagley and USS Patterson parted company with Task Group 61.2 also with orders to proceed to Brisbane, Australia. All these ships were to revert to the control of the Commander-in-Chief South-West Pacific.
2 Sep 1942
Around 1330L/2, HMAS Australia (Capt. H.B. Farncomb, RAN, flying the flag of Rear-Admiral V.A.C. Crutchley, VC, DSC, RN), HMAS Hobart (Capt. H.A. Showers, RAN) and USS Selfridge (T/Cdr. C.D. Reynolds, USN, with Capt. C.W. Flynn, USN on board) are joined by USS Phoenix (Capt. H.E. Fischer, USN), USS Bagley (T/Cdr. G.A. Sinclair, USN) and USS Patterson (Cdr. F.R. Walker, USN) joined company. They then continued their passage to Brisbane. (1)
3 Sep 1942
In the afternoon, Task Force 44, made up of the heavy cruiser HMAS Australia (Capt. H.B. Farncomb, RAN, flying the flag of Rear-Admiral V.A.C. Crutchley, VC, DSC, RN), light cruisers HMAS Hobart (Capt. H.A. Showers, RAN), USS Phoenix (Capt. H.E. Fischer, USN) and the destroyers USS Selfridge (T/Cdr. C.D. Reynolds, USN, with Capt. C.W. Flynn, USN on board), USS Bagley (T/Cdr. G.A. Sinclair, USN) and USS Patterson (Cdr. F.R. Walker, USN) arrived in Moreton Bay. They arrived at Brisbane early in the evening. (1)
7 Sep 1942
Operations by Task Force 44 in the south-west Pacific / Milne Bay area.
7 September 1942.
Around 1100K/7, ships of Task Force 44, the heavy cruiser HMAS Australia (Capt. H.B. Farncomb, RAN, flying the flag of Rear-Admiral V.A.C. Crutchley, VC, DSC, RN), light cruiser USS Phoenix (Capt. H.E. Fischer, USN) and the destroyers USS Selfridge (T/Cdr. C.D. Reynolds, USN, with Capt. C.W. Flynn, USN, commanding Destroyer Squadron 4 on board) and USS Bagley (T/Cdr. G.A. Sinclair, USN) departed Brisbane to patrol in the Coral Sea so as to be in position to support operations in the Milne Bay area if called upon. Reinforcements were to join as soon as possible as some ships of Task Force 44 had been detached on other duties or were undergoing repairs.
On departure from Brisbane it had been intended to conducted gunnery exercises using a target that was being towed by the auxiliary M/S trawler HMAS Tongkol (?). Bad weather conditions hover prevented the exercises proceeding as the towline of the target fouled the srew of HMAS Tongkol. USS Bagley briefly stood by the M/S trawler but rejoined the other ships later the same day.
8 September 1942.
At 1200K/8, Task Force 44 was in position 23°27'S, 154°45'E, course 345°, speed of advance 15 knots.
Around 1 830K/9, USS Selfridge and USS Bagley parted company with the cruisers for a night encounter exercise. On completion of the exercise they rejoined the cruisers.
9 September 1942.
During the forenoon Allied bomber aircraft made contact with the force in order to learn the recognition and identification of our ships.
At 1200K/9, Task Force 44 was in position 17°42'S, 152°58'E, course 345°, speed of advance 15 knots.
At 1500K/9, course was reversed to make contact with the destroyers USS Helm (T/Cdr. C.E. Carroll, USN) and USS Henley T/Cdr. E.K. van Swearingen, USN) who were approaching the area coming from Efate. They were however not sighted and at 1745K/9 course was shaped to the north-west and speed was increased to 22 knots.
10 September 1942.
Around 0700K/10, USS Helm and USS Henley were sighted and joined company and the force then entered the area in which it had been intended to operate. Course was thus set to the northward at 15 knots to get within striking distance of Milne Bay whilst awaiting the results of our land based reconnaissance aircraft.
At 1200K/10, Task Force 44 was in position 13°45'S, 148°47'E, course 350°, speed of advance 15 knots.
Around 1145K/10, HMAS Hobart ( Capt. H.A. Showers, RAN), with her repairs completed, departed Brisbane to join Task Force 44 at sea.
By 1800K/10, no reports of enemy forces had been received to Task Force 44 retired to the southwards for the night.
11 September 1942.
At daylight Task Force 44 turned and steered towards the north-east to await the result of this mornings air reconnaissance.
At 1200K/11, Task Force 44 was in position 12°49'S, 147°49'E.
The forenoon air searches had not located any enemy forces within reach of Milne Bay. Task Force 44 therefore turned to the south-east and USS Selfride and USS Bagley were ordered to fuel from HMAS Australia and USS Phoenix. Fuelling was barely begun when an aircraft report was received placing two enemy destroyers east of the Trobriand Islands at noon steering to the south-west. As this was the type of force that had previously been sent into Milne Bay and that when these ships would continue to Milne Bay they would find the destroyer HMAS Arunta (Cdr. J.C. Morrow, DSO, RAN) and two transports there.
Fuelling was at once stopped and Rear-Admiral Crutchley ordered Captain Flynn to proceed, from position 13°09'S, 148°03'E, with USS Selfridge, USS Helm, USS Henley and USS Bagley at 28 knots towards Milne Bay to destroy any enemy force entering or found in the bay or to withdraw to the southward in case the enemy was forced to withdraw due to our bombing by land based striking forces or to withdraw by early dawn if his force had entered Milne Bay and contact had not been made with the enemy.
Meanwhile HMAS Australia and USS Phoenix would proceed to the northward to be in position to provide cover if needed. At 1600K/11, a reconnaissance aircraft reported an enemy cruiser north of Woodlark Island and on a southerly course. It was seen that this enemy vessel could also reach Milne Bay during the night and Rear-Admiral Crutchley therefore turned his cruisers towards China Strait at 22 knots. At 1630K/11, an air striking force from Port Moresby attacked the two enemy destroyers which had now reached Normanby Island and scored on hit on the stern of one of them, setting her on fire and bringing her to a standstill. The second enemy destroyer was last seen at 1725K/11, heading 160° at 30 knots. No other report subsequent to the original sighting report was received of the enemy cruisers. It seemed, therefore, that one enemy destroyer and one enemy cruiser might enter the Milne Bay area during the night and that Captain Flynn's force would be ample to deal with them. [The Japanese destroyers were the Isokaze and Yayoi of which the last one was sunk in position 08°45'S, 151°25'E.]
By 2030K/11, no further information had been received and so being confident that cruiser support was not required, Rear-Admiral Crutchley turned HMAS Australia and USS Phoenix to the southward to make rendezvous with HMAS Hobart the next morning. Speed was set to 17 knots.
12 September 1942.
Around 0800K/12, HMAS Hobart joined having steamed from Brisbane at 22 knots. The three cruisers then shaped course to the northward to make contact with the four destroyers now withdrawing from the Milne Bay area.
At 1200K/12, the cruisers were in position 14°03'S, 148°02'E steering 000° at 15 knots.
Around 1600K/12, the destroyers rejoined. USS Helm and USS Henley were at once fuelled by HMAS Australia and USS Phoenix.
Captain Flynn reported that they had entered Milne Bay at 2345K/11 and then swept to the westward to 150°33'E and then patrolled east and west between that longitude and 150°54'E on either side of latitude 10°24'S. They had cleared China Strait at 0615K/12 and had sighted nothing of interest. HMAS Arunta and two transports then entered the Bay at 0600K/12.
On completion of fuelling the two destroyers Task Force 44 set course to the south-west of the night.
13 September 1942.
At 0630K/13, USS Selfridge and USS Bagley commenced fuelling from HMAS Australia and USS Phoenix.
At 1200K/13, Task Force 44 was in position 12°21'S, 147°37'E, steering 130° at 15 knots.
14 September 1942.
At 1200K/14, Task Force 44 was in position 14°07'S, 149°25'E, steering 050° at 15 knots.
Shortly after noon, HMAS Henley obtained a promising A/S contact which was immediately attacked with a full pattern of depth charges after which contact was lost. An A/S patrol launched by HMAS Australia then patrolled the area of the attack but found no sign of an enemy submarine being present.
During the night the force proceeded to the southward.
15 September 1942.
At 1200K/15, Task Force 44 was in position 14°02'S, 149°00'E, steering 010° at 15 knots.
Around 1400K/15, Task Force 44 turned to the South-West to proceed to Challenger Bay, Palm Islands to fuel.
16 September 1942.
At 0545K/15, USS Phoenix launched two aircraft for A/S patrol off Grafton Passage through which the force was to pass.
Task Force 44 passed through the Grafton Passage around 0745K/15 and arrived at Challenger Bay around 1545K/15. They now had to wait for the tanker to arrive, meanwhile the sloop HMAS Warrego (Lt.Cdr. A.D.C. Inglis, RN) conducted A/S patrol off the bay. This duty was later taken over by HMAS Castlemaine (T/Lt.Cdr. P.J. Sullivan, RANR(S)).
A transport with fresh supplies was also sent from Townsville. (50)
18 Sep 1942
Continued operations by Task Force 44 in the south-west Pacific / Milne Bay area.
18 September 1942.
Around 0900K/18, Task Force 44, made up of the heavy cruiser HMAS Australia (Capt. H.B. Farncomb, RAN, flying the flag of Rear-Admiral V.A.C. Crutchley, VC, DSC, RN), light cruisers HMAS Hobart (Capt. H.A. Showers, RAN), USS Phoenix (Capt. H.E. Fischer, USN) and the destroyers USS Selfridge (T/Cdr. C.D. Reynolds, USN, with Capt. C.W. Flynn, USN, commanding Destroyer Squadron 4 on board), USS Bagley (T/Cdr. G.A. Sinclair, USN), USS Helm (T/Cdr. C.E. Carroll, USN) and USS Henley T/Cdr. E.K. van Swearingen, USN) sailed from Challenger Bay (Palm Islands) to operate again to the south of New Guinea. On sailing USS Selfridge developed a steering gear defect and she had to be left behind to effect repairs and join on completion of these. The chartered tanker British Sailor (British, 5576 GRT, built 1918) and supply ship Yunnan (British, 2812 GRT, built 1934) also departed for Townsville escorted by HMAS Castlemaine (T/Lt.Cdr. P.J. Sullivan, RANR(S)).
Around 1730K/18, Task Force 44 cleared the Grafton Passage and shaped course to the north-east at 15 knots. USS Selfridge rejoined around 1800K/18 having completed repairs to her steering gear.
19 September 1942.
At 1200K/19, Task Force 44 was in position 13°24'S, 148°46'E, course 110°, speed of advance 15 knots.
As HMAS Stuart (Cdr. S.H.K. Spurgeon, DSO, RAN), which had been at Milne Bay with four transports, had to retire to Port Moresby to fuel, Task Force 44 changed course to the northward at 1600K/19 so as to give close cover to these ships. By 2100K/19 there had been no report of enemy activity in the area and Task Force 44 turned to the southward for the night.
20 September 1942.
At 0600K/20, Task Force 44 turned to the north-west.
At 1200K/20, Task Force 44 was in position 12°37'S, 149°07'E, course 330°, speed of advance 15 knots.
Around 1600K/20, Task Force 44 changed course to the southward to meet the destroyer USS Mugford (T/Cdr. E.W. Young, USN) which was coming north from Sydney having completed repairs there.
During the day USS Bagley reported her gun director out of action. This additional casualty now makes it necessary for her to be the first destroyer to be withdrawn to Sydney for overhaul.
21 September 1942.
Around 0800K/21, USS Mugford joined.
At 1200K/21, Task Force 44 was in position 14°09'S, 149°07'E, course 080°, speed of advance 14 knots.
Around 1400K/21, course was altered to the northward. USS Bagley was then detached to proceed to Sydney so as to arrive there during daylight on 24 September.
Around 1800K/21, Task Force 44 turned to the westward as no enemy sightings had been made by our reconnaissance aircraft.
22 September 1942.
Around 0600K/22, course was altered to the eastward.
At 1200K/22, Task Force 44 was in position 13°29'S, 147°49'E, course 060°, speed of advance 15 knots. This course was maintained until 2000K/22 by which time there had been no enemy sightings by our reconnaissance aircraft and Task Force 44 retired to the southward during the night.
23 September 1942.
At 1200K/23, Task Force 44 was in position 12°26'S, 150°05'E, course 070°, speed of advance 15 knots.
At 1300K/23, course was altered to the north and at 2000K/23 course was altered to 220° for the night.
24 September 1942.
During the forenoon HMAS Hobart and the destroyers were fuelled by HMAS Australia and USS Phoenix.
At 1200K/24, Task Force 44 was in position 15°45'S, 148°37'E, course 120°.
Fuelling was completed around 1300K/24, and course was changed to north with speed set at 15 knots.
25 September 1942.
During the forenoon two unidentified aircraft flew over the Task Force at 15000 feet. Visibility was poor and it was hoped the aircraft did not see Task Force 44. They later disappeared of the radar screen steering a steady course of 190°.
At 1200K/25, Task Force 44 was in position 13°45'S, 148°02'E, course 060°, speed of advance 15 knots.
At 2000K/25, Task Force 44 turned to the south for the night.
26 September 1942.
Around 0600K/26, Task Force 44 turned to the east-north-east.
At 1200K/26, Task Force 44 was in position 14°41'S, 149°46'E, course 030°, speed of advance 15 knots.
By 1800K/26, no reports of enemy warships within reach of Milne Bay had been received course was set for the Grafton Passage as Task Force 44 needed to refuel.
27 September 1942.
Around 1130L/27, Task Force 44 entered the Grafton Passage. Half an hour later USS Mugford, which had collected mails from all ships, parted company to proceed to Townsville so as to arrive there around 1830L/27. She had orders to remain at Townsville overnight and having embarked mails, stores and personnel for Task Force 44, to leavy harbour around 0800L/28 and then rejoin the force at Cid Harbour.
At 1230L/27, HMAS Australia's aircraft was launched to fly to Townsville with despatches. the aircraft was recovered at 1800L/27 when Task Force 44 was near the Brook Islands.
28 September 1942.
At 0730L/28, Task Force 44, less USS Mugford, reached Cid Harbour and began fuelling and provisioning from the chartered tanker British Sailor (British, 5576 GRT, built 1918) and supply ship Merkur (Australian, 5946 GRT, built 1924).
At 1400L/28, USS Mugford arrived from Townsville.
A/S patrol of the area was maintained during daylight hours on 28 and 29 September by a Catalina flying boat. (50)
30 Sep 1942
Continued operations by Task Force 44 in the south-west Pacific / Milne Bay area.
30 September 1942.
At 0530L/30, USS Henley (T/Cdr. E.K. van Swearingen, USN) departed Cid Harbour to pick up mails at Townsville. She was to join Task Force 44 at sea later the same day.
At 0700L/30, Task Force 44, made up of the heavy cruiser HMAS Australia (Capt. H.B. Farncomb, RAN, flying the flag of Rear-Admiral V.A.C. Crutchley, VC, DSC, RN), light cruisers HMAS Hobart (Capt. H.A. Showers, RAN), USS Phoenix (Capt. H.E. Fischer, USN) and the destroyers USS Selfridge (T/Cdr. C.D. Reynolds, USN, with Capt. C.W. Flynn, USN, commanding Destroyer Squadron 4 on board), USS Helm (T/Cdr. C.E. Carroll, USN) and USS Mugford (T/Cdr. E.W. Young, USN) departed Cid Harbour to operate again to the south of New Guinea.
Around 1330L/30, USS Henley rejoined and the mails were distributed among the other ships. HMAS Australia's aircraft, which had flown to Townsville with despatches, was recovered at 1615L/30.
At 1750L/30, a man fell overboard on board HMAS Hobart but he was quickly recovered.
Around 2200L/30, Grafton Passage was cleared and Task Force 44 shaped course 060° at 15 knots.
1 October 1942.
At 1200L/1, Task Force 44 was in position 14°57'S, 149°21'E, course 060°, speed 15 knots.
At 1300L/1, course was altered to 010°.
At 1830L/1, course was altered to 280° and to 230° at 2100L/1.
2 October 1942.
At 0700L/1, course was again shaped in the general direction of Milne Bay.
At 1200L/2, Task Force 44 was in position 14°42'S, 148°21'E, course 030°, speed 15 knots.
At 1900L/2, course was altered to the north.
At 2100L/2, Task Force 44 retired to the south-south-east for the night.
Around 1900L/2, USS Helm was detached to the Grafton Passage as a signal had been received from the Commander-in-Chief South-West Pacific that could not be decyphered. USS Helm was to transmit a signal to inform the Commander-in-Chief South-West Pacific of this.
3 October 1942.
At 0900L/3, Task Force 44 turned to the north-west.
At 1200L/3, Task Force 44 was in position 15°03'S, 150°00'E. USS Helm rejoined and course was then shaped to the north. Speed still 15 knots.
At 2100L/3, Task Force 44 turned to the south-west for the night.
4 October 1942.
At 0900L/4, course was altered to 070°.
At 1200L/4, Task Force 44 was in position 14°50'S, 148°54'E, course 340°, speed 15 knots.
Around 1845L/4, course was altered to the southward to reach a position suitable for fuelling the destroyers out of range of enemy air reconnaissance.
5 October 1942.
Around 0730L/5, HMAS Hobart, which had on board mails from all ships of Task Force 44, parted company to proceed to Sydney to give leave to her crew and to undergo a short refit.
During the morning, USS Helm and USS Mugford fuelled from HMAS Australia and USS Selfridge and USS Henley from USS Phoenix.
During the fuelling operation the aircraft of HMAS Australia provided A/S patrol, unfortunately when it got alongside to be picked up it hit the ships side, capsized and sank. The crew was picked up.
At 1127L/5, course was set in the direction of China Strait.
At 2130L/5, course was altered to the southwestward for the night.
6 October 1942.
At 0645L/6, Task Force 44 altered course to the north-east. USS Phoenix now had to supply the dawn A/S patrol from now on.
At 1200L/6, Task Force 44 was in position 14°33'S, 148°37'E, course 050°, speed 15 knots.
At 2030L/6, Task Force 44 altered course to 250°, to rendezvous with the destroyer USS Patterson (T/Cdr. W.C. Schultz, USN), which is coming from Sydney, the following day.
7 October 1942.
At 0640L/7, Task Force 44 altered course to 107° along USS Patterson's approach route to the rendezvous position in 14°00'S, 148°00'E.
Around 0702L/7, USS Patterson was sighted ahead and then joined company. She delivered correspondence from Sydney to all ships.
Around 0910L/7, USS Henley parted company to proceed to Sydney for her maintenance period. She had collected mails from all ships of Task Force 44.
At 1200L/7, Task Force 44 was in position 14°26'S, 149°09'E, course 070°, speed 15 knots.
At 1600L/7, course was altered to 330° and at 2100L/7 to the westward for the night.
8 October 1942.
At 0642L/8, Task Force 44 altered course to 170°.
At 1200L/8, Task Force 44 was in position 14°27'S, 147°29'E, course was now altered to 025°, speed still 15 knots.
At 2100L/8, course was altered to 170°, speed was now 13.5 knots.
9 October 1942.
At 0637L/9, course was altered to 110°, speed 15 knots.
At 1000L/9, course was altered to 340°,
At 1200L/9, Task Force 44 was in position 14°23'S, 149°25'E.
At 1600L/9, course was shaped for Grafton Passage as the fuel in Task Force 44 was no longer sufficient to provide for an operation in the Milne Bay area at high speed with a safe margin for return to base.
10 October 1942.
The Grafton Passage was reached around 0800L/10.
At 1545L/10, Task Force 44, anchored in Challenger Bay, Palm Island. Fuelling was commenced from the chartered tanker Aase Maersk (British, 6184 GRT, built 1930). The supply ship Yunnan (British, 2812 GRT, built 1934) was also present with provisions and mail for all ships. (50)
25 Oct 1942
Around 0800L/25, HMAS Hobart (Capt. H.A. Showers, RAN), arrived in Moreton Bay (near Brisbane) from Sydney.
About one hour later Rear-Admiral V.A.C. Crutchley, VC, DSC, RN, struck his flag in HMAS Australia (Capt. H.B. Farncomb, RAN) and hoisted it in HMAS Hobart.
HMAS Australia and the destroyer USS Selfridge (T/Cdr. C.D. Reynolds, USN, with Capt. C.W. Flynn, USN, commanding Destroyer Squadron 4 on board) then departed Moreton Bay for Sydney. (51)
15 Nov 1942
Continued operations by Task Force 44 in the south-west Pacific / Milne Bay area.
15 November 1942.
At 1900L/15, Task Group 44.4, made up of the light cruiser USS Phoenix (Capt. J.R. Redman, USN) and the destroyers USS Helm (T/Cdr. C.E. Carroll, USN), USS Mugford (T/Cdr. E.W. Young, USN) and USS Patterson (T/Cdr. W.C. Schultz, USN) departed Cid Harbour to patrol in the area to the south of New Guinea. Rear-Admiral Crutchley had been ordered that half his force was to proceed on patrol to cover shipping movements in the New Guinea area. The other half of his force was to proceed to a forward reef anchorage.
16 November 1942.
At 1200L/16, Task Group 44.4, was in position 17°05'S, 146°06'E.
At 2100L/16, Task Group 44.6, made up of the light cruiser HMAS Hobart (Capt. H.A. Showers, RAN, flying the flag of Rear-Admiral V.A.C. Crutchley, VC, DSC, RN) and the destroyers USS Selfridge (T/Cdr. C.D. Reynolds, USN, with Capt. C.W. Flynn, USN, commanding Destroyer Squadron 4 on board), USS Bagley (T/Cdr. G.A. Sinclair, USN) and USS Henley (T/Cdr. E.K. van Swearingen, USN) departed Cid Harbour for Challenger Bay (Palm Islands).
17 November 1942.
At 0500L/17, when Task Group 44.6 was abreast Townsville, USS Bagley was detached to that place to land despatches and to embark mails. Also a sick rating was landed for hospitalisation.
At 0845L/17, Task Group 44.6 (minus USS Bagley, anchored in Challenger Bay which USS Bagley rejoining around 1325L/17. Task Group 44.6 kept at 2 hours notice for steam.
At 1200L/17, Task Group 44.4, was in position 12°30'S, 147°19'E.
18 November 1942.
At 0800L/18, the chartered tanker Aase Maersk (British, 6184 GRT, built 1930) arrived in Challenger Bay.
At 1200L/18, Task Group 44.4, was in position 13°30'S, 149°24'E.
Information was received that convoy movements in the New Guinea area were delayed
Japanese forces, made up of one cruiser and two destroyers were reported at Buna, New Guinea. 12 B-17 bombers attacked them and the cruiser and one destroyer were reported to have been sunk. [In fact three destroyers were at Buna, these were the Asashio, Kawakaze and Umikaze of which the last two were damaged.]
19 November 1942.
At 0800L/19, the supply ship Merkur (Australian, 5946 GRT, built 1924) arrived at Challenger Bay.
Task Group 44.6 then completed with fuel and provisions.
At 1200L/16, Task Group 44.4, was in position 13°24'S, 148°40'E.
20 November 1942.
At 0800L/20, the Aase Maersk departed Challenger Bay with 6294 tons of fuel remaining. She proceeded to Townsville to fuel Task Group 44.4 there.
At 1200L/20, Task Group 44.4, was in position 13°48'S, 147°48'E. USS Phoenix fuelled the three destroyers of her Task Group during the day.
21 November 1942.
At 0800L/20, the Merkur departed Challenger Bay for Townsville to supply Task Group 44.4 there.
At 1000L/20, Task Group 44.4 departed Challenger Bay to relieve Task Group 44.6 on patrol. Grafton Passage was cleared around 1900L/20.
At 1200L/21, Task Group 44.4, was in position 13°14'S, 147°57'E.
22 November 1942.
At 0915L/22, rendezvous was made between Task Groups 44.4 and 44.6 in approximate position 14°00'S, 148°00'E. Exercises were then carried out, despatches were exchanged by line and both groups then opened out for radar calibration.
At 1200L/22, Task Group 44.4 was detached to withdraw to the Palm Islands for fuel and stores. Task Group 44.6 commenced patrol. Noon position was 13°49'S. 148°29'E.
23 November 1942.
At 1200L/23, Task Group 44.6, was in position 14°35'S, 149°48'E.
Around 1330L, Task Group 44.4 arrived at Challenger Bay. USS Phoenix then fuelled USS Helm and USS Mugford while USS Phoenix and USS Patterson fuelled from the Aase Maersk which had returned to Challenger Bay as did the Merkur.
USS Phoenix sent two of her floatplanes to Townsville with despatches.
24 November 1942.
At 0140L/24, USS Phoenix completed fuelling from the Aase Maersk.
At 0800L/24, the Aase Maersk departed Challenger Bay for Townsville.
Around 0815L/24, USS Bagley parted company with Task Group 44.6 to transmit a signal near Osprey Reef. She rejoined Task Group 44.6 around 1910L/24.
At 0915L/24, USS Patterson departed Challenger Bay for Townsville to transport two hospital cases there.
At 1200L/24, Task Group 44.6, was in position 14°10'S, 150°09'E.
25 November 1942.
At 1200L/25, Task Group 44.6, was in position 14°45'S, 149°48'E.
At 1755L/25, USS Patterson returned to Challenger Bay from Townsville.
26 November 1942.
At 0850L/26, HMAS Hobart commenced fuelling USS Bagley for a little over an hour. Apparently the destroyer was a bit short of fuel.
At 1200L/26, Task Group 44.6, was in position 14°24'S, 150°38'E.
At 1740L/26, the minesweeper HMAS Colac (T/Lt.Cdr. S.B. Komoll, RANR(S)) arrived at Challenger Bay with mails for the ships of the Task Group.
27 November 1942.
At 1000L/27, the Merkur departed Challenger Bay for Townsville.
At 1100L/27, Task Group 44.4 departed Challenger Bay to relieve Task Group 44.6 on patrol.
At 1200L/27, Task Group 44.6, was in position 14°02'S, 149°35'E.
Around 1915L/27, Task Group 44.4 cleared the Grafton Passage.
28 November 1942.
Around 0915L/27, rendezvous was made between Task Groups 44.4 and 44.6 in approximate position 14°00'S, 148°00'E. Exercises were then carried out, despatches were exchanged by line.
At 1200L/28, Task Group 44.6 was detached to withdraw to the Palm Islands for fuel and stores. Task Group 44.4 commenced patrol. Noon position was 13°51'S. 148°31'E.
29 November 1942.
Around 0700L/29, Task Group 44.6 entered the Grafton Passage. USS Bagley was then detached to proceed to Townsville to land mails and hospital cases.
At 1200L/29, Task Group 44.4, was in position 13°25'S, 148°58'E.
At 1430L/29, Task Group 44.6 arrived at Challenger Bay where the Aase Maersk and Merkur had also arrived and fuelling and provisioning was commenced. This was completed the following morning.
30 November 1942.
At 1200L/29, Task Group 44.4, was in position 13°34'S, 148°46'E.
Around 1515L/30, USS Bagley arrived at Challenger Bay from Townsville to rejoin Task Group 44.6.
At 1700L/30, the Aase Maersk departed Challenger Bay for Townsville with 2059 tons of fuel still on board.
1 December 1942.
At 1200L/1, Task Group 44.4, was in position 13°53'S, 149°08'E.
Around 1300L/1, the Merkur departed Challenger Bay for Townsville.
2 December 1942.
At 1200L/29, Task Group 44.4, was in position 14°35'S, 148°32'E.
3 December 1942.
Shortly before noon the Merkur and the tanker USS Victoria (Lt.Cdr. J.G. Olsen, USNR) arrived at Challenger Bay from Townsville.
At 1200L/3, Task Group 44.4, was in position 14°05'S, 149°30'E.
Around 1600L/3, the heavy cruiser HMAS Australia (Capt. H.B. Farncomb, RAN) arrived at Challenger Bay from Sydney (via Brisbane). Rear-Admiral Crutchley then transferred his flag from HMAS Hobart to HMAS Australia.
4 December 1942.
At 0815L/4, USS Henley departed Challenger Bay for escort duties.
At 0930L/4, Task Group 44.6, now made up of HMAS Hobart, USS Selfridge and USS Bagley departed Challenger Bay to relieve Task Group 44.4 on the Coral Sea patrol. While clear off Challenger Bay, HMAS Hobart conducted refuelling at sea trials with USS Victoria.
At 1200L/4, Task Group 44.4, was in position 13°33'S, 148°57'E.
Around 1915L/4, Task Group 44.6 cleared the Grafton passage and commenced patrol.
During the day the Merkur departed Challenger Bay for Townsville and then onwards to Brisbane.
5 December 1942.
Around 0900L/5, Task Group 44.4 entered the Grafton Passage.
At 1200L/5, Task Group 44.6, was in position 14°42'S, 149°57'E.
Around 1700L/5, Task Group 44.4 arrived at Challenger Bay, Palm Island.
Around 2200L/5, USS Phoenix and USS Mugford departed Challenger Bay for Sydney for overhaul and give leave.
The following temporary Task Force organisation came into effect on the 5th; Task Group 44.3 was made up of HMAS Australia, USS Helm, USS Henley and USS Patterson. Task Group 44.5 was made up of HMAS Hobart, USS Selfridge and USS Bagley.
6 December 1942.
At 1200L/6, Task Group 44.5 (former Task Group 44.6), was in position 14°26'S, 149°25'E.
7 December 1942.
At 1200L/7, Task Group 44.5, was in position 14°07'S. 148°28'E.
8 December 1942.
At 1200L/8, Task Group 44.5, was in position 14°21'S, 149°38'E.
9 December 1942.
At 1200L/9, Task Group 44.5, was in position 13°54'S, 149°00'E.
Around 2359L/9, USS Bagley was detached from Task Group 44.5 for escort duties.
10 December 1942.
Around 0830L/10, USS Henley arrived at Challenger Bay where she fuelled from USS Victoria. Commander E.W. Young, USN then hoisted his pennant as Commander Destroyer Division Seven on board USS Henley.
At 1145L/10, Task Group 44.3 departed Challenger Bay. While clear off Challenger Bay, HMAS Australia conducted refuelling at sea trials with USS Victoria.
At 1200L/10, Task Group 44.5, was in position 13°39'S, 148°34'E.
11 December 1942.
Around 0930L/11, Task Groups 44.3 and 44.5 made rendezvous with each other and exercises were then commenced.
Around 1020L/11, USS Bagley rejoined Task Group 44.5 having returned from escort duties.
Around 1500L/11, the Task Groups parted company. Radar calibration test were then carried out. Task Group 44.3 took over the patrol in the Coral Sea while Task Group 44.5 set course for the Dunk Island anchorage where the ships of this task group were to fuel and resupply.
Also on this day the Merkur departed Brisbane escorted by the minesweeper HMAS Goulburn (Lt.Cdr. B. Paul, RANR(S)). USS Victoria departed Townsville for Dunk Island.
12 December 1942.
At 0745L/12, Task Group 44.5 entered the Grafton Passage.
At 0900L/12, USS Selfridge parted company with Task Group 44.5 to proceed to Cairns.
At 1200L/12, Task Group 44.3, was in position 14°22'S, 149°27'E.
Around 1300L/12, Task Group 44.5, minus USS Selfridge, arrived at Dunk Island where the ships were fuelled by USS Victoria.
At 1715L/12, USS Selfridge arrived at Dunk Island from a short call at Cairns.
Today it was noted that Japanese air reconnaissance reached further into the Coral Sea presumable to search for Allied aircraft carriers. Seems that an operation in the New Guinea area might be on shortly.
13 December 1942.
At 1200L/13, Task Group 44.3, was in position 14°27'S, 149°14'E.
Around 1300L/13, Allied reconnaissance aircraft reported two Japanese cruisers and three destroyers about 200 miles north-west of Vitiaz Strait and proceeding south-east at high speed. This was obviously a force with reinforcements for the New Guinea area. The enemy force was successfully shadowed and tracked all day but attacks by Allied bombers were apparently unsuccessful. [The force reported was actually made up of five destroyers; Yugumo, Kazagumo, Arashio, Inazuma and Isonami.
14 December 1942.
The reported enemy force had landed troops near Gona, New Guinea during the night. The force was again tracked by Allied reconnaissance aircraft from daylight onwards. They were proceeding at high speed towards Rabaul. Bombing attacks were again unsuccessful.
At 0630L/14, USS Patterson completed with fuel from HMAS Australia.
At 1200L/14, Task Group 44.3, was in position 14°28'S, 148°47'E.
At 1800L/14, USS Patterson parted company with Task Group 44.5 for Cairns and subsequent escort duty.
On this day the Merkur arrived at Townsville where she embarked mails for Task Force 44. She departed for Dunk Island later the same day.
During the day, Japanese reconnaissance in the Coral Sea came as far south as 14°S.
15 December 1942.
At 1200L/15, Task Group 44.3, was in position 14°33'S, 149°31'E.
16 December 1942.
At 0700L/16, USS Bagley departed Dunk Island with mails for Cairns.
At 1200L/16, Task Group 44.3, was in position 14°23'S, 149°47'E.
At 1340L/16, Task Group 44.5, minus USS Bagley, departed Dunk Island to make rendezvous with Task Group 44.3.
Around 1730L/16, USS Bagley rejoined Task Group 44.5 with mails from Cairns.
17 December 1942.
Around 0930L/17, Task Groups 44.3 and 44.5 made rendezvous. Exercises were then commenced.
Around 1500L/17, Task Group 44.3 and 44.5 parted company with the former setting course for Dunk Island while Task Group 44.5 took over the Coral Sea patrol.
18 December 1942.
Around 1200L/18, Task Group 44.3 reached Dunk Island where the destroyers were fully fuelled by USS Victoria. HMAS Australia also fuelled from the tanker but was still 600 tons short when the tanker was empty. Provisions were supplied by the Merkur.
At 1200L/18, Task Group 44.5, was in position 14°06'S, 149°04'E.
Around 1530L/18, USS Patterson arrived at Dunk Island from escort duties. She then rejoined Task Group 44.3.
19 December 1942.
At 1130L/19, USS Victoria departed Dunk Island for Brisbane, via Townsville.
At 1200L/19, Task Group 44.5, was in position 14°10'S, 149°32'E.
During the day Japanese air reconnaissace even proceeded further to the south. An aircraft was tracked as far as latitude 16°S in longitude 153°E.
Also on this day the Aase Maersk arrived at Townsville where she embarked mails. She then departed for Dunk Island.
20 December 1942.
At 0800L/20, the Aase Maersk arrived at Dunk Island.
At 1200L/20, Task Group 44.5, was in position 13°30'S, 148°23'E.
21 December 1942.
At 1030L/21, the supply ship Yunnan (British, 2812 GRT, built 1934) arrived at Dunk Island with provisions for Task Group 44.3.
At 1200L/21, Task Group 44.5, was in position 14°00'S, 149°24'E.
At 1800L/21, the Yunnan departed Dunk Island for Townsville.
At 2000L/21, the Merkur departed Dunk Island for Townsville.
22 December 1942.
At 0630L/22, USS Mugford arrived at Palm Island following her overhaul at Sydney.
At 0800L/22, USS Patterson then left Dunk Island for Sydney for overhaul.
During the forenoon, HMAS Australia and USS Mugford completed with fuel from the Aase Maersk.
At 1200L/22, Task Group 44.5, was in position 14°18'S, 150°17'E.
At 1400L/22, Task Group 44.3, now made up of HMAS Australia, USS Henley, USS Mugford and USS Helm departed Dunk Island for patrol. USS Mugford however developed engine problems and had to be left behind for repairs. She sailed a few hours later to overtake and join Task Group 44.3 the following morning.
23 December 1942.
At 0915L/23, USS Mugford rejoined Task Group 44.3. Task Force 44.5 was sighted by Task Group 44.3 around the same time.
At 1000L/23, Both task groups commenced exercises.
At 1640L/23, the exercises were completed. Task Group 44.3 proceeded on patrol while Task Group 44.5 set course for Challenger Bay.
24 December 1942.
At 0740L/24, Task Force 44.5 entered the Grafton Passage. They were clear 40 minutes later.
Around 0900L/24, USS Bagley parted company with Task Force 44.5 to proceed to Townsville for mails and to land hospital cases.
At 1200L/24, Task Group 44.3, was in position 14°35'S, 148°57'E.
Around 1515L/24, Task Force 44.5 arrived in Challenger Bay where the ships commenced fuelling from the Aase Maersk and embarking stores from the Merkur.
Around 1940L/24, USS Bagley arrived at Challenger Bay from Townsville.
25 December 1942.
At 1200L/25, Task Group 44.3, was in position 14°34'S, 149°05'E.
26 December 1942.
At 1200L/26, Task Group 44.3, was in position 14°24'S, 149°09'E.
Around 1800L/26, USS Mugford parted company with Task Group 44.3 and set course for Brisbane where she is to conduct exercises.
27 December 1942.
At 1200L/27, Task Group 44.3, was in position 14°14'S, 148°56'E.
28 December 1942.
At 0950L/28, Task Force 44.5 departed Challenger Bay to make rendezvous with Task Force 44.3.
At 1200L/28, Task Group 44.3, was in position 14°04'S, 148°56'E.
29 December 1942.
Around 1000L/29, Task Groups 44.3 and 44.5 met in approximate position 14°S, 148°'E. Exercises were then commenced.
At 1415L/29, the Task Groups parted company with Task Group 44.3 setting course for the Palm Islands while Task Group 44.5 took over the Coral Sea patrol.
As of 29 December 1942, Task Force 44 was orginised as follows; Task Group 44.3 made up of the heavy cruiser HMAS Australia and the destroyers USS Henley and USS Helm. Task Group 44.5 made up of the light cruiser HMAS Hobart and the destroyers USS Selfridge and USS Bagley. Task Group 44.7 made up of the light cruiser USS Phoenix and the destroyers USS Mugford and USS Ralph Talbot (T/Cdr. J.W. Callahan, USN).
30 December 1942.
Around 0830L/30, Task Group 44.3 entered the Grafton Passage.
At 1200L/30, Task Group 44.5, was in position 14°03'S, 149°25'E.
Around 1530L/30, Task Group 44.3 arrived at Challenger Bay, Palm Islands to embark fuel and stores from the Aase Maersk and Merkur.
31 December 1942.
At 1200L/31, Task Group 44.5, was in position 14°21'S, 149°21'E.
1 January 1943.
During the morning HMAS Hobart fuelled USS Bagley and USS Selfridge.
At 1200L/1, Task Group 44.5, was in position 14°07'S, 149°15'E.
2 January 1943.
At 0740L/2, USS Henley departed Challenger Bay, Palm Islands for Townsville with mails where she arrived around 1400L/2.
At 1200L/2, Task Group 44.5, was in position 14°12'S, 150°03'E.
3 January 1943.
Around 0730L/3, USS Henley departed Townsville with mails for Task Force 44. She arrived at Challenger Bay around 0930L/3.
Around 1015L/3, Task Group 44.3 departed Challenger Bay to make rendezvous with Task Group 44.5.
At 1200L/3, Task Group 44.5, was in position 14°01'S, 150°16'E.
4 January 1943.
Around 0900L/4, Task Groups 44.3 and 44.5 made rendezvous. Mails were then transferred by USS Henley.
Around 1005L/5, USS Bagley parted company with Task Group 44.5 to proceed to Sydney for upkeep.
Around 1230L/4, the Task Groups parted company with Task Group 44.3 proceeding on patrol while Task Group 44.5 set course for Cid Harbour.
5 January 1943.
At 0920L/5, Task Group 44.5 (HMAS Hobart and USS Selfridge) entered the Grafton Passage.
At 1200L/5, Task Group 44.3, was in position 14°26'S, 149°37'E.
6 January 1943.
Around 0700L/6, Task Group 44.5 (minus USS Bagley arrived at Cid Harbour.
Around 0930L/6, Task Group 44.7 (minus USS Ralph Talbot) arrived at Cid Harbour.
Around 1005L/6, the chartered tanker Aase Maersk arrived at Cid Harbour to supply ships of Task Groups 44.5 and 44.7 with fuel.
At 1200L/6, Task Group 44.3, was in position 13°22'S, 147°05'E.
7 January 1943.
Around 0650L/7, the Aase Maersk departed Cid Harbour for Townsville.
Around 0945L/7, USS Selfridge departed Cid Harbour for Townsville where she was to be provisioned.
At 1200L/7, Task Group 44.3, was in position 14°01'S, 148°11'E.
Around 1345L/7, HMAS Hobart departed Cid Harbour for Brisbane.
On this day the organisation of Task Force 44 changed. Task Force 44.5 was disbanded. Task Group 44.3 was made up of the heavy cruiser HMAS Australia and the destroyers USS Henley and USS Helm. Task Group 44.5 was made up of the light cruiser USS Phoenix and the destroyers USS Selfridge and USS Mugford. (50)
1 Feb 1943
'Pamphlet' convoy, Suez - Sydney, 1 February to 27 February 1943.
This convoy, made up of the troop transports Queen Mary (British, 81235 GRT, built 1936), Aquitania (British, 45647 GRT, built 1914), Ile de France (British, 43548 GRT, built 1927, former French), Nieuw Amsterdam (Dutch, 36287 GRT, built 1938) and the armed merchant cruiser HMS Queen of Bermuda (A/Capt.(Retd.) A.D. Cochrane, DSO, RN) (22575 GRT, built 1933) were transporting 30000 men of the Australian 9th Division from Suez to Melbourne and Sydney. [HMS Queen of Bermuda also served in the role of troopship.]
This convoy had departed Suez on 1 February 1943 and were escorted during their passage through the Red Sea by the destroyers HMS Pakenham (Capt. E.B.K. Stevens, DSO, DSC, RN), HMS Petard (Lt.Cdr. R.C. Egan, RN), HMS Isis (Cdr. B. Jones, DSC, RN), HMS Hero (Lt.Cdr. W. Scott, DSC and Bar, RN), RHS Vasilissa Olga (Lt.Cdr. G. Blessas, DSO, RHN) and the escort destroyer Derwent (Cdr. R.H. Wright, DSC, RN).
The convoy was joined around 1545C/4 by the heavy cruiser HMS Devonshire (Capt. D. Young-Jamieson, RN).
Around 1800E/6, HMS Hero and HMS Derwent parted company with the convoy to proceed to Aden.
Around 2000E/6, HMS Pakenham, HMS Petard, HMS Isis and RHS Vasilissa Olga parted company with the convoy to proceed to Aden.
Around 1230FG/9, the destroyers HMS Quilliam (Capt. S.H. Carlill, DSO, RN) and HMS Foxhound (Cdr. C.J. Wynne-Edwards, DSC and Bar, RN) joined the convoy.
The convoy entered Addu Atoll late in the afternoon / early in the evening of the 9th where all warships fuelled.
The convoy departed Addu Atoll to continue its passage to Australia in the afternoon of the 10th. The light cruiser HMS Gambia (Capt. M.J. Mansergh, CBE, RN, flying the flag of Rear Admiral W.G. Tennant, CB, MVO, RN) had joined the convoy escort.
Around 0030FG/11, HMS Quilliam and HMS Foxhound parted company to proceed to Addu Atoll.
Around 0840H/16, the light cruiser HrMs Tromp (Capt. J.B. de Meester, RNethN) and the destroyer HrMs Van Galen (Lt.Cdr. F.T. Burghard, RNethN) joined the convoy in approximate postion 26°06'S, 101°09'E.
Around 2000H/16, the AA cruiser HrMs Jacob van Heemskerck (Capt. E.J. van Holthe, RNethN) joined the convoy in approximate position 27°41'S, 104°35'E.
Around 2000H/17, the destroyer HrMs Tjerk Hiddes (Lt.Cdr. W.J. Kruys, RNethN) joined the convoy in approximate position 30°30'S, 112°52'E.
In the afternoon of the 18th the convoy arrived off Fremantle.
Around 1800I/20, the convoy, minus HMS Queen of Bermuda departed Fremantle now escorted by the light cruiser HMAS Adelaide (A/Capt. J.C.D. Esdaile, OBE, RAN), AA cruiser HrMs Jacob van Heemskerck and the destroyers HrMs Van Galen and HrMs Tjerk Hiddes.
Around 2300I/21, HrMs Van Galen parted company to return to Fremantle.
Around 1645KL/24, the convoy was joined by the heavy cruiser Australia (Capt. H.B. Farncomb, MVO, DSO, RAN) and the destroyers USS Henley (Lt.Cdr. E.K. van Swearingen, USN) and USS Bagley (Lt.Cdr. T.E. Chambers, USN). The New Amsterdam escorted by HMAS Adelaide, HrMs Heemskerk and HrMs Tjerk Hiddes then departed the convoy and proceeded to Port Phillip where they arrived arrived around 1000L/25. The other ships continued to Sydney.
In the afternoon of the 26th the HrMs Heemskerck rejoined the convoy. Later in the afternoon the destroyer Le Triomphant (Cdr. P.M.J.R. Auboyneau) also joined.
The convoy arrived at Sydney on the 27th.
9 Mar 1943
Around 0800L/9, the heavy cruiser HMAS Australia (Capt. H.B. Farncomb, MVO, DSO, RAN, flying the flag of Rear-Admiral V.A.C. Crutchley, VC, DSC, RN), light cruisers HMAS Hobart (Capt. H.A. Showers, RAN), USS Phoenix (Capt. A.G. Noble, USN) and the destroyers USS Bagley (T/Cdr. T.E. Chambers, USN), USS Mugford (T/Cdr. H.G. Corey, USN) and USS Ralph Talbot (T/Cdr. J.W. Callahan, USN) departed Dunk Island for exercises.
On completion of the exercises they proceeded to Challenger Bay where they arrived between 1230 and 1300 hours. (52)
17 Mar 1943
Around 1505L/17, the heavy cruiser HMAS Australia (Capt. H.B. Farncomb, MVO, DSO, RAN, flying the flag of Rear-Admiral V.A.C. Crutchley, VC, DSC, RN), light cruisers HMAS Hobart (Capt. H.A. Showers, RAN) and USS Phoenix (Capt. A.G. Noble, USN) departed Challenger Bay, Palm Islands for exercises.
Around 1845L/17, the destroyers USS Mugford (T/Cdr. H.G. Corey, USN), USS Bagley (T/Cdr. T.E. Chambers, USN), USS Helm (T/Cdr. W.B. Braun, USN), USS Henley (T/Cdr. E.K. van Swearingen, USN) and USS Patterson (T/Cdr. W.C. Schultz, USN) departed Challenger Bay to join the exercises.
Exercises continued until the following day and also included underway refuelling exercises with the tanker USS Victoria (Lt.Cdr. J.G. Olsen, USNR).
On completion of the exercises all ships, which was since 15 March 1943 known as Task Force 74, arrived at Dunk Island in the afternoon of 18 March 1943. (53)
19 Apr 1943
Around 1830K/19, HMAS Hobart (Capt. H.A. Showers, RAN) departed Cid harbour for exercises.
Around 1845K/19, USS Selfridge (T/Cdr. C.D. Reynolds, USN, with T/Capt. F.R. Walker, USN, commanding Destroyer Squadron 4 on board), USS Helm (T/Cdr. W.B. Braun, USN) and USS Henley (T/Cdr. E.K. van Swearingen, USN) departed Steamer Passage, Palm Island for exercises. They were joined shortly afterwards by USS Bagley (T/Cdr. T.E. Chambers, USN) coming from Townsville.
Around 1930K/19, HMAS Australia (Capt. H.B. Farncomb, MVO, DSO, RAN, flying the flag of Rear-Admiral V.A.C. Crutchley, VC, DSC, RN) departed Cid harbour for exercises.
Exercises were carried out during the night and the following morning.
All ships arrived at Challenger Bay, Palm Island around 1000K/20 (the destroyers) and 1300K/20 (the cruisers). (54)
26 Apr 1943
Ships from Task Force 74, the heavy cruiser HMAS Australia (Capt. H.B. Farncomb, MVO, DSO, RAN, flying the flag of Rear-Admiral V.A.C. Crutchley, VC, DSC, RN), light cruiser HMAS Hobart (Capt. H.A. Showers, RAN) and the destroyers USS Selfridge (T/Cdr. C.D. Reynolds, USN, with T/Capt. F.R. Walker, USN, commanding Destroyer Squadron 4 on board), USS Helm (T/Cdr. W.B. Braun, USN) and USS Ralph Talbot (T/Cdr. J.W. Callahan, USN) departed Challenger Bay for exercises. These also included underway refuelling exercises with the RFA tanker Bishopdale (8406 GRT, built 1937).
On completion of the exercises Task Force 74 anchored off Dunk Island in the afternoon. (54)
29 Apr 1943
Around 0730K/29, the RFA tanker Bishopdale (8406 GRT, built 1937) departed Dunk Island for exercises.
Around 0815K/29, the heavy cruiser HMAS Australia (Capt. H.B. Farncomb, MVO, DSO, RAN, flying the flag of Rear-Admiral V.A.C. Crutchley, VC, DSC, RN) and the light cruiser HMAS Hobart (Capt. H.A. Showers, RAN) also departed.
Around 0900K/29, the destroyers USS Selfridge (T/Cdr. C.D. Reynolds, USN, with T/Capt. F.R. Walker, USN, commanding Destroyer Squadron 4 on board), USS Helm (T/Cdr. W.B. Braun, USN), USS Mugford (T/Cdr. H.G. Corey, USN), USS Henley (T/Cdr. E.K. van Swearingen, USN) and USS Ralph Talbot (T/Cdr. J.W. Callahan, USN) also departed.
On completion of the exercises all ships arrived at Challenger Bay early in the afternoon. USS Ralph Talbot (T/Cdr. J.W. Callahan, USN) (54)
25 May 1943
Around 0730K/25, the destroyers USS Perkins (T/Cdr. G.L. Ketchum, USN, with COMDESRON 5, T/Capt. J.H. Cartes, USN on board), USS Mahan (T/Cdr. J.T. Smith, USN), USS Drayton (T/Cdr. V.A. King, USN), USS Flusser (T/Cdr. J.A. Robbins, USN), HMAS Warramunga (Cdr. E.F.V. Dechaineux, DSC, RAN) and HMAS Arunta (Cdr. J.C. Morrow, DSO, RAN) departed Cid Harbour for exercises.
Around 0830K/25, the heavy cruiser HMAS Australia (Capt. H.B. Farncomb, MVO, DSO, RAN, flying the flag of Rear-Admiral V.A.C. Crutchley, VC, DSC, RN) and light cruiser HMAS Hobart (Capt. H.A. Showers, RAN) also sailed to join the exercises.
On completion of the exercises all ship returned to Cid Harbour arriving the around or shortly after midnight. (55)
27 May 1943
Around 0730K/27, the destroyers USS Perkins (T/Cdr. G.L. Ketchum, USN, with COMDESRON 5, T/Capt. J.H. Cartes, USN on board), USS Drayton (T/Cdr. V.A. King, USN), USS Flusser (T/Cdr. J.A. Robbins, USN), HMAS Warramunga (Cdr. E.F.V. Dechaineux, DSC, RAN) and HMAS Arunta (Cdr. J.C. Morrow, DSO, RAN) departed Cid Harbour for exercises.
Around 0830K/27, the heavy cruiser HMAS Australia (Capt. H.B. Farncomb, MVO, DSO, RAN, flying the flag of Rear-Admiral V.A.C. Crutchley, VC, DSC, RN) and light cruiser HMAS Hobart (Capt. H.A. Showers, RAN) also sailed to join the exercises.
On completion of the exercises all ship returned to Cid Harbour arriving between around 1630K/27 and 1800K/27. (55)
31 May 1943
Around 1245K/31, the heavy cruiser HMAS Australia (Capt. H.B. Farncomb, MVO, DSO, RAN, flying the flag of Rear-Admiral V.A.C. Crutchley, VC, DSC, RN), light cruiser HMAS Hobart (Capt. H.A. Showers, RAN) and the destroyers USS Perkins (T/Cdr. G.L. Ketchum, USN, with COMDESRON 5, T/Capt. J.H. Cartes, USN on board), USS Flusser (T/Cdr. J.A. Robbins, USN), HMAS Warramunga (Cdr. E.F.V. Dechaineux, DSC, RAN) and HMAS Arunta (Cdr. J.C. Morrow, DSO, RAN) departed Cid Harbour for exercises which would include night exercises.
They arrived at Challenger Bay around 0950K/1.
(56)
8 Jun 1943
Around 1510K/8, the heavy cruiser HMAS Australia (Capt. H.B. Farncomb, MVO, DSO, RAN, flying the flag of Rear-Admiral V.A.C. Crutchley, VC, DSC, RN) and light cruiser HMAS Hobart (Capt. H.A. Showers, RAN) departed Challenger Bay for exercises.
They were followed around 1630K/8 by the destroyers USS Perkins (T/Cdr. G.L. Ketchum, USN, with COMDESRON 5, T/Capt. J.H. Cartes, USN on board), USS Mahan (T/Cdr. J.T. Smith, USN), USS Flusser (T/Cdr. J.A. Robbins, USN) and USS Smith (T/Cdr. R.A. Theobald, Jr., USN) which were to join the exercises.
Around 2030K/8, the destroyers USS Perkins and USS Smith were detached to proceed to Brisbane for A/S exercises, ammunitioning and to give leave to the crew.
Around 0615K/9, HMAS Australia, HMAS Hobart, USS Mahan and USS Flusser arrived at Cid Harbour. (57)
20 Jun 1943
Around 0745K/20, the Commanding Officer of Task Force 74, Rear-Admiral Crutchley, his operations officer and some staff transferred from the heavy cruiser HMAS Australia (Capt. H.B. Farncomb, MVO, DSO, RAN) to the destroyer HMAS Arunta (Cdr. J.C. Morrow, DSO, RAN) which then took them to Townsville for a meeting with the Commander-in-Chief South-West Pacific, the Commanding Officer of Task Force 76 and their staffs.
The conference was held on board HMAS Arunta in the early afternoon and pending operations were fully discussed. On completion of the conferance HMAS Arunta returned to Challenger Bay.
During the forenoon, HMAS Australia, light cruiser HMAS Hobart (Capt. H.A. Showers, RAN) and the destroyers USS Flusser (T/Cdr. J.A. Robbins, USN), USS Helm (T/Cdr. W.B. Braun, USN) and USS Mugford (T/Cdr. H.G. Corey, USN) conducted exercises with RAAF aircraft. On completion of the exercises they returned to Challenger Bay.
Early in the evening HMAS Hobart departed again for more exercises with RAAF aircraft. She returned to Challenger Bay on completion of the exercises around 0055K/21. (58)
21 Jun 1943
Around 0945K/21, Task Force 74, made up of the heavy cruiser HMAS Australia (Capt. H.B. Farncomb, MVO, DSO, RAN, flying the flag of Rear-Admiral V.A.C. Crutchley, VC, DSC, RN), light cruiser HMAS Hobart (Capt. H.A. Showers, RAN) and the destroyers HMAS Arunta (Cdr. J.C. Morrow, DSO, RAN), USS Flusser (T/Cdr. J.A. Robbins, USN), USS Helm (T/Cdr. W.B. Braun, USN) and USS Mugford (T/Cdr. H.G. Corey, USN) departed Challenger Bay for exercises.
All ships returned to Challenger Bay in the afternoon with the exception of USS Flusser which proceeded to Townsville on completion of the exercises.
From 1845K/21 to 0030K/22, HMAS Hobart again went to sea for exercises with RAAF aircraft. (58)
22 Jun 1943
Around 0915K/22, Task Force 74, made up of the heavy cruiser HMAS Australia (Capt. H.B. Farncomb, MVO, DSO, RAN, flying the flag of Rear-Admiral V.A.C. Crutchley, VC, DSC, RN), light cruiser HMAS Hobart (Capt. H.A. Showers, RAN) and the destroyers HMAS Warramunga (Cdr. E.F.V. Dechaineux, DSC, RAN), HMAS Arunta (Cdr. J.C. Morrow, DSO, RAN) and USS Helm (T/Cdr. W.B. Braun, USN) departed Challenger Bay for exercises with RAAF aircraft.
On completion of these exercises the destroyers proceeded to Townsville to land the dummy aircraft torpedoes they had recovered. HMAS Warramunga returned to Challenger Bay later the same day.
HMAS Hobart returned to Challenger Bay late in the afternoon.
HMAS Australia returned to Challenger Bay in the evening. (58)
26 Jun 1943
Around 0600K/26, the destroyer HMAS Arunta (Cdr. J.C. Morrow, DSO, RAN) departed Challenger Bay with mails for Cairns.
Around 1000K/26, Task Force 74, made up of the heavy cruiser HMAS Australia (Capt. H.B. Farncomb, MVO, DSO, RAN, flying the flag of Rear-Admiral V.A.C. Crutchley, VC, DSC, RN), light cruiser HMAS Hobart (Capt. H.A. Showers, RAN) and the destroyers HMAS Warramunga (Cdr. E.F.V. Dechaineux, DSC, RAN) and USS Lamson (T/Cdr. P.H. Fitzgerald, USN) departed Challenger Bay for the Flinders Group.
Around 1600K/26, Task Force 74 was joined by HMAS Arunta.
Around 0915K/27, Task Force 74 arrived in the Fly Channel, Flinders Group. (58)
29 Jun 1943
Around 0645K/29, Task Force 74, made up of the heavy cruiser HMAS Australia (Capt. H.B. Farncomb, MVO, DSO, RAN, flying the flag of Rear-Admiral V.A.C. Crutchley, VC, DSC, RN), light cruiser HMAS Hobart (Capt. H.A. Showers, RAN) and the destroyers HMAS Warramunga (Cdr. E.F.V. Dechaineux, DSC, RAN) and USS Lamson (T/Cdr. P.H. Fitzgerald, USN), departed Flinders Group to provide cover for operations in the Solomon Islands area. They were to patrol to the south of the Louisiades.
The destroyer HMAS Arunta (Cdr. J.C. Morrow, DSO, RAN) was to have departed with them but was delayed due to mechanical problems. After repairs she sailed to join at sea which she did around 1300K/29.
At 1200K/30, Task Force 74 was in position 11°59'S, 150°52'E.
At 1200K/1, Task Force 74 was in position 13°07'S, 151°30'E.
After sunrise on 2 July, HMAS Warramunga and HMAS Arunta were fuelled by HMAS Australia.
At 1200K/2, Task Force 74 was in position 13°50'S, 150°48'E.
At 1200K/3, Task Force 74 was in position 12°27'S, 149°54'E.
At 1200K/4, Task Force 74 was in position 12°42'S, 151°05'E.
At 2200K/4, Task Force 74 set course to return to the Flinders Group to fuel and resupply.
At 1200K/5, Task Force 74 was in position 12°42'S, 148°12'E.
At 0915K/6, Task Force 74 anchored off the western side of Stanley Island, Flinders Group.
During the day Task Force 74 was provisioned by the stores ship USS Mizar and fuelled from the Mizar and the chartered tanker Aase Maersk (British, 6184 GRT, built 1930). (59)
10 Jul 1943
Around 0800K/10, Task Force 74, made up of the heavy cruiser HMAS Australia (Capt. H.B. Farncomb, MVO, DSO, RAN, flying the flag of Rear-Admiral V.A.C. Crutchley, VC, DSC, RN), light cruiser HMAS Hobart (Capt. H.A. Showers, RAN) and the destroyers HMAS Warramunga (Cdr. E.F.V. Dechaineux, DSC, RAN), HMAS Arunta (Cdr. J.C. Morrow, DSO, RAN) and USS Lamson (T/Cdr. P.H. Fitzgerald, USN), departed Flinders Group first for a few hours of exercises after which they proceeded to provide cover for operations in the Solomon Islands area. They were again to patrol to the south of the Louisiades.
At 1200K/11, Task Force 74 was in position 12°04'S, 150°15'E.
At 1200K/12, Task Force 74 was in position 13°25'S, 151°10'E.
During the morning of 13 July, HMAS Warramunga and HMAS Arunta were fuelled by HMAS Australia.
At 1200K/13, Task Force 74 was in position 13°45'S, 150°45'E.
As three Allied cruiser had been damaged in a naval battle with the Japanese and one destroyer had been sunk it was anticipated by Rear-Admiral Crutchley that his force would be called up to reinforce the Allied Fleet in the Solomons. Course was therefore set accordingly and the Commander-in-Chiefs were informed. These later indeed ordered Task Force 74 to proceed to Tulagi. This was later changed to Esperitu Santo.
At 1200K/14, Task Force 74 was in position 13°06'S, 156°16'E.
At 1200L/15, Task Force 74 was in position 14°17'S, 162°58'E.
Around 0900L/15, Task Force 74 arrived at Esperitu Santo. (60)
17 Jul 1943
Around 0830L/17, the destroyers of Task Force 74, HMAS Warramunga (Cdr. E.F.V. Dechaineux, DSC, RAN), HMAS Arunta (Cdr. J.C. Morrow, DSO, RAN) and USS Lamson (T/Cdr. P.H. Fitzgerald, USN) departed Esperitu Santo for an A/S sweep off the harbour.
Around 0900L/17, the cruisers of Task Force 74, HMAS Australia (Capt. H.B. Farncomb, MVO, DSO, RAN, flying the flag of Rear-Admiral V.A.C. Crutchley, VC, DSC, RN) and HMAS Hobart (Capt. H.A. Showers, RAN) departed the harbour and joined the destroyers.
Course was then set for position 12°30'S, 163°00'E.
Around 0700L/18, rendezvous was made with DESRON 21, made up of the destroyers USS Nicholas (T/Cdr. A.J. Hill, Jr., USN, with COMDESRON 21, T/Capt. F.X. McInerney, USN on board), USS Redford (T/Cdr. W.K. Romoser, USN), USS Jenkins (T/Cdr. M. Hall, Jr., USN) and USS O'Bannon (T/Cdr. D.J. MacDonald, USN). The destroyers of Task Force 74 were then detached. Course was set to operate between position 11°30'S, 164°20'E and 12°30'S, 166°30'E.
At 1200L/18, Task Force 74 was in position 12°30'S, 163°58'E.
At 1300L/18, USS Jenkins was detached to perform escort duties.
At 1200L/19, Task Force 74 was in position 12°06'S, 164°56'E.
At 1515L/19, Task Force 74 was ordered to operate in the northern half of area ' Fox ' (Area ' Fox ' was a circle with a radius of 100 miles from position 14°30'S, 162°00'E.)
At 1115L/20, orders were received from the Commander 3rd Fleet directing Task Force 74 to proceed to Esperitu Santo via Bougainville Strait so as to arrive at daybreak the next morning. Course was then set to 105°, speed 23 knots. The Force was zig-zagging.
At 1846L/20, in position 15°07'S, 163°34'E, HMAS Hobart was struck on the port side aft by a torpedo fired by a submarine. [This was the Japanese I-11 (offsite link).] At this time HMAS Australia and HMAS Hobart were formed in column 600 yards apart and were screened by USS Nicholas, USS Radford and USS O'Bannon. Base course was 105°, speed 23 knots and British zig-zag no.38 was being carried out. The night was clear and dark (starlit) and the moon had not yet risen. Sea slight.
in accordance with the zig-zag plan, course had been altered to 115° (10° right of base course) at 1835L/20 and at 1845L/20 course was altered to 135° (30° right of base course). HMAS Australia had just made or were making this latter alteration of course of course but, by HMAS Hobart's clock the wheel would have been put over in another 20 seconds.
On being struck HMAS Hobart immediately reported ' Jig Emerg '. This was by night the emergency turn procedure. So the remainder of the force was manoeuvred clear to starboard. The destroyers USS Nicholas and USS Radford were ordered to stand by HMAS Hobart while HMAS Australia screened by USS O'Bannon continued on. By TBS Rear-Admiral Crutchley informed T/Capt. McInerney that he would make the initial report (signal) of the happening and that he was to make subsequent reports in order to keep all authorities advised of Hobart's condition and off progress being made in getting her clear of the area.
The initial report of Rear-Admiral Crutchley was passed only after considerable communication difficulty for, in spite of the urgent priority given in the transmission, no station answered immediately except Thursday Island (which answered within two minutes). There was much traffic between ships and shore stations on both Task Force Commander's frequency and ship-shore wave. Radio Noumea eventually accepted the message after considerable delay.
After clearing to the southward, HMAS Australia and USS O'Bannon shaped course for Bougainville Strait and re-commenced zig-zag.
On receipt of the report of the casualty to HMAS Hobart, the Commander 3rd Fleet immmediately despatched tugs and additional escorts and also ordered COMPATWING 1 to provide A/S cover from dawn on 21 July until HMAS Hobart and escorts reached Esperitu Santo.
HMAS Australia and USS O'Bannon arrived at Esperitu Santo around 0700L/21. Shortly afterwards USS Jenkins arrived having completed her escort duties. All three then immediately completed with fuel and stores.
Shortly afterwards USS O'Bannon was ordered to proceed on escort duties. HMAS Australia and USS Jenkins were kept at one hour notice for sea.
During the day, reports from COMDESRON 21 in USS Nicholas with HMAS Hobart and escorts showed that the damaged ship was making good progress towards Espiritu Santo and would arrive after dark.
At 0510K/21, the destroyer USS Saufley (T/Cdr. B.F. Brown, USN) had joined HMAS Hobart, she was followed by three tugs, at 0815K/21, the USS Apache (Lt. C.S. Horner, USN) joined, followed at 0930K/21 by the USS Sioux (Lt.(jg) L.M. Jahnsen, USN) and at 1015K/21 by the USS Vireo (T/Lt. C.H. Stedman, USN).
At 1230K/21, USS Apache was detached.
At 1440K/21, USS Saufley was detached.
At 1700K/21, USS Sioux secured to HMAS Hobart forwards and took her in tow.
At 1725K/21, USS Vireo secured alongside on the starboard side. She casted off after 15 minutes.
At 0145L/22, HMAS Hobart safely reached Segond Channel and she dropped anchor around 0230K/22. USS Nicholas and USS Radford were ordered to hasten completion of logistic requirements and Rear-Admiral Crutchley reported to the Commander 3rd Fleet that HMAS Australia, USS Nicholas, USS Radford and USS Jenkins would be ready on two hour's notice from 1600K/22.
Damage to HMAS Hobart was severe. She was taken in hand at Esperitu Santo for temporary repairs before she was able to proceed to Sydney for permanent repairs. (60)
18 Aug 1943
Around 1400K/18, HMAS Vendetta (Lt.Cdr. J. Plunkett-Cole, RAN) departed Moreton Bay to proceed to position 25°32'S, 156°13'E where rendezvous was to be made with HMAS Australia (Capt. H.B. Farncomb, MVO, DSO, RAN, flying the flag of Rear-Admiral V.A.C. Crutchley, VC, DSC, RN) and then escort her to Brisbane.
Rendezvous was effected around 0545K/19.
HMAS Australia and HMAS Vendetta arrived at Brisbane around 1745K/19. (61)
21 Aug 1943
Around 0830K/21, HMAS Australia (Capt. H.B. Farncomb, MVO, DSO, RAN, flying the flag of Rear-Admiral V.A.C. Crutchley, VC, DSC, RN) and HMAS Vendetta (Lt.Cdr. J. Plunkett-Cole, RAN) departed Brisbane for Sydney where they arrived around 1100K/22. (62)
1 Nov 1943
HMAS Australia (Capt. H.B. Farncomb, MVO, DSO, RAN, flying the flag of Rear-Admiral V.A.C. Crutchley, VC, DSC, RN) and HMAS Shropshire (Capt. J.A. Collins, CB, RAN) conducted day and night gunnery exercises in Moreton Bay. (63)
2 Nov 1943
Around 1130L/2, Task Force 74, made up of the heavy cruisers HMAS Australia (Capt. H.B. Farncomb, MVO, DSO, RAN, flying the flag of Rear-Admiral V.A.C. Crutchley, VC, DSC, RN), HMAS Shropshire (Capt. J.A. Collins, CB, RAN) and the destroyers HMAS Warramunga (Cdr. E.F.V. Dechaineux, DSC, RAN, with COMDESRON 4, T/Capt. F.R. Walker, USN on board), HMAS Arunta (Cdr. A.E. Buchanan, RAN) and USS Helm (T/Cdr. W.B. Braun, USN) departed Moreton Bay for exercises and then to the Percy Islands. The next day Rear-Admiral Crutchley was ordered to take Task Force 74 to Milne Bay, New Guinea. (63)
5 Nov 1943
Around 0930L/5, Task Force 74, made up of the heavy cruisers HMAS Australia (Capt. H.B. Farncomb, MVO, DSO, RAN, flying the flag of Rear-Admiral V.A.C. Crutchley, VC, DSC, RN), HMAS Shropshire (Capt. J.A. Collins, CB, RAN) and the destroyers HMAS Warramunga (Cdr. E.F.V. Dechaineux, DSC, RAN, with COMDESRON 4, T/Capt. F.R. Walker, USN on board), HMAS Arunta (Cdr. A.E. Buchanan, RAN) and USS Helm (T/Cdr. W.B. Braun, USN) arrived at Milne Bay from Moreton Bay (Brisbane).
COMDESRON 4, T/Capt. F.R. Walker, USN, then transferred his flag to the destroyer USS Ralph Talbot (T/Lt.Cdr. R.D. Shepard, USN). (64)
8 Nov 1943
Around 0800L/8, Task Force 74, made up of the heavy cruisers HMAS Australia (Capt. H.B. Farncomb, MVO, DSO, RAN, flying the flag of Rear-Admiral V.A.C. Crutchley, VC, DSC, RN), HMAS Shropshire (Capt. J.A. Collins, CB, RAN) and the destroyers USS Ralph Talbot (T/Lt.Cdr. R.D. Shepard, USN, with COMDESRON 4, T/Capt. F.R. Walker, USN), USS Helm (T/Cdr. W.B. Braun, USN), HMAS Warramunga (Cdr. E.F.V. Dechaineux, DSC, RAN) and HMAS Arunta (Cdr. A.E. Buchanan, RAN) departed Milne Bay for exercises.
They returned to Milne Bay (Gili Gili) around 1020L/9. (64)
11 Nov 1943
Around 1700L/11, Task Force 74, made up of the heavy cruisers HMAS Australia (Capt. H.B. Farncomb, MVO, DSO, RAN, flying the flag of Rear-Admiral V.A.C. Crutchley, VC, DSC, RN), HMAS Shropshire (Capt. J.A. Collins, CB, RAN) and the destroyers USS Ralph Talbot (T/Lt.Cdr. R.D. Shepard, USN, with COMDESRON 4, T/Capt. F.R. Walker, USN), USS Helm (T/Cdr. W.B. Braun, USN), HMAS Warramunga (Cdr. E.F.V. Dechaineux, DSC, RAN) and HMAS Arunta (Cdr. A.E. Buchanan, RAN) departed Milne Bay for Purvis Bay, Florida Island, Solomon Islands. (64)
13 Nov 1943
Around 0900L/13, Task Force 74, made up of the heavy cruisers HMAS Australia (Capt. H.B. Farncomb, MVO, DSO, RAN, flying the flag of Rear-Admiral V.A.C. Crutchley, VC, DSC, RN), HMAS Shropshire (Capt. J.A. Collins, CB, RAN) and the destroyers USS Ralph Talbot (T/Lt.Cdr. R.D. Shepard, USN, with COMDESRON 4, T/Capt. F.R. Walker, USN), USS Helm (T/Cdr. W.B. Braun, USN), HMAS Warramunga (Cdr. E.F.V. Dechaineux, DSC, RAN) and HMAS Arunta (Cdr. A.E. Buchanan, RAN) arrived at Purvis Bay from Milne Bay. (64)
15 Nov 1943
Around 1500L/15, Task Force 74, made up of the heavy cruisers HMAS Australia (Capt. H.B. Farncomb, MVO, DSO, RAN, flying the flag of Rear-Admiral V.A.C. Crutchley, VC, DSC, RN), HMAS Shropshire (Capt. J.A. Collins, CB, RAN) and the destroyers USS Ralph Talbot (T/Lt.Cdr. R.D. Shepard, USN, with COMDESRON 4, T/Capt. F.R. Walker, USN), USS Helm (T/Cdr. W.B. Braun, USN), HMAS Warramunga (Cdr. E.F.V. Dechaineux, DSC, RAN) and HMAS Arunta (Cdr. A.E. Buchanan, RAN) departed Purvis Bay to return to Milne Bay. (64)
17 Nov 1943
Around 1645L/17, Task Force 74, made up of the heavy cruisers HMAS Australia (Capt. H.B. Farncomb, MVO, DSO, RAN, flying the flag of Rear-Admiral V.A.C. Crutchley, VC, DSC, RN), HMAS Shropshire (Capt. J.A. Collins, CB, RAN) and the destroyers USS Ralph Talbot (T/Lt.Cdr. R.D. Shepard, USN, with COMDESRON 4, T/Capt. F.R. Walker, USN), USS Helm (T/Cdr. W.B. Braun, USN), HMAS Warramunga (Cdr. E.F.V. Dechaineux, DSC, RAN) and HMAS Arunta (Cdr. A.E. Buchanan, RAN) arrived at Milne Bay from Purvis Bay. (64)
19 Nov 1943
Around 0830L/19, the heavy cruisers HMAS Australia (Capt. H.B. Farncomb, MVO, DSO, RAN, flying the flag of Rear-Admiral V.A.C. Crutchley, VC, DSC, RN), HMAS Shropshire (Capt. J.A. Collins, CB, RAN) and the destroyers HMAS Warramunga (Cdr. E.F.V. Dechaineux, DSC, RAN) and HMAS Arunta (Cdr. A.E. Buchanan, RAN) departed Milne Bay for exercises.
The destroyers returned around 1330L/19, the cruisers around 1700L/19. (64)
6 Dec 1943
Around 1000L/06, Task Force 74, made up of the heavy cruisers HMAS Australia (Capt. H.B. Farncomb, MVO, DSO, RAN, flying the flag of Rear-Admiral V.A.C. Crutchley, VC, DSC, RN), HMAS Shropshire (Capt. J.A. Collins, CB, RAN), light cruisers USS Nashville (Capt. H.A. Spanagel, USN), USS Phoenix (Capt. A.G. Noble, USN) and the destroyers USS Ralph Talbot (T/Lt.Cdr. R.D. Shepard, USN, with COMDESRON 4, T/Capt. F.R. Walker, USN), USS Helm (T/Lt.Cdr. S.K. Santmyers, USN), HMAS Warramunga (Cdr. E.F.V. Dechaineux, DSC, RAN) and HMAS Arunta (Cdr. A.E. Buchanan, RAN) departed Milne Bay for exercises.
At 0615L/7, HMAS Warramunga and USS Helm were detached to make rendezvous with the troop transport West Point (American, 26454 GRT, built 1940) approaching Milne Bay from the southward.
The other ships of Task Force 74 returned to Milne Bay (Gili Gili) in the forenoon of December 7th. (65)
10 Dec 1943
The cruisers of Task Force 74; HMAS Australia (Capt. H.B. Farncomb, MVO, DSO, RAN, flying the flag of Rear-Admiral V.A.C. Crutchley, VC, DSC, RN), HMAS Shropshire (Capt. J.A. Collins, CB, RAN), USS Nashville (Capt. H.A. Spanagel, USN) and USS Phoenix (Capt. A.G. Noble, USN) conducted AA gunnery and bombardment exercises at Milne Bay. (66)
15 Dec 1943
Operation Director
Landings at Arawe on New Britain.
Cover Force
Around 0700L/14, Task Group 74.1, made up of Task Group 74.1.1, which were the heavy cruisers HMAS Australia (Capt. H.B. Farncomb, MVO, DSO, RAN, flying the flag of Rear-Admiral V.A.C. Crutchley, VC, DSC, RN), HMAS Shropshire (Capt. J.A. Collins, CB, RAN) and Task Group 74.1.2 which were the destroyers HMAS Warramunga (Cdr. E.F.V. Dechaineux, DSC, RAN (now Commander Destroyers Task Force 74)) and HMAS Arunta (Cdr. A.E. Buchanan, RAN) , USS Ralph Talbot (T/Lt.Cdr. R.D. Shepard, USN) and USS Helm (T/Lt.Cdr. S.K. Santmyers, USN) departed Milne Bay to support the landings at Arawa on New Britain (operation Director) as part of operation Dexterity which in itself was part of operation Cartwheel which objection was to neutralise the major Japanese base at Rabaul. Task Group 74.1 was the cover group for operation Director.
Task Group 74.2, made up of the light cruisers USS Nashville (Capt. H.A. Spanagel, USN) and USS Phoenix (Capt. A.G. Noble, USN), remained at Milne Bay at two hours notice for the moment.
Landing Force
The landings were to be carried out by Task Force 76 which was organised as follows; CTG 76 (Headquarters Group) was on board the destroyer USS Conyngham. COMTASKFOR 76 was T/R.Adm. D.E. Barbey, USN. Task Group 76.1 was the Transport Task Group of the amphibious transport HMAS Westralia and the dock landing ship USS Carter Hall. Task Group 76.2 was the APD Task Group made up of seven APD's (APD = High Speed Transport). Task Group 76.5 was the LCT Task Group made up of LCT from LCT Flot 7. Task Group 76.6 was the Destroyer Task Group. This group was divided into Task Group 76.6.1 which was the escort unit made up of the destroyers USS Shaw, USS Drayton, USS Bagley and USS Mugford. Task Group 76.6.2 which was the bombardment unit made up of the destroyers USS Mahan, USS Lamson, USS Flusser, USS Reid and USS Smith. Task Group 76.7 was the Escort and Minesweeping Group and was made up of 4 PC's, 9 SC's, 5 YMS and 1 APc. But more ships were in available in the forward area. Task Group 76.8 was the Service Group and was made up of a repair ship, two landing craft repair ships (LST's), a 'medical' landing ship (LST) and two tugs. Task Group 76.9 was the landing craft control group and was divided into four sub groups; 76.9.1 was the Buna Unit. 76.9.2 was the Cro Bay Unit. 76.9.3 was the Goodenough Unit. 76.9.4 was the Cape Cretin Unit. Task Group 76.10 was the Beachmaster Unit.
At 1530L/14, CTF 76 in USS Conyngham (T/Cdr. J.H. Ward, USN, with T/R.Adm. D.E. Barbey, USN on board) departed Buna for Arawe in company with the first and second attack echelons and their escorts. The other ships in the convoy were the following, amphibious transport HMAS Westralia (Cdr. A.V. Knight, RD, RANR(S)), dock landing ship USS Carter Hall (Lt.Cdr. F.J. Harris, USNR), high speed transports USS Humphreys (T/Lt.Cdr. Frank Dewey Schwartz, USN) and USS Sands (Lt.Cdr. L.C. Brogger, Jr., USNR), destroyers USS Shaw (T/Cdr. R.H. Phillips, USN, with COMDESRON 5, T/Capt. J.H. Carter, USN on board), USS Drayton (T/Cdr. R.S. Craighill, USN), USS Bagley (T/Cdr. T.E. Chambers, USN), USS Mugford (T/Cdr. H.G. Corey, USN), USS Mahan (T/Cdr. J.T. Smith, USN), USS Lamson (T/Cdr. J.R. Rubins, USN), USS Flusser (T/Cdr. J.A. Robbins, USN), USS Reid (T/Cdr. H.H. McIlhenny, USN, with COMDESDIV 10, T/Capt. C.D. Reynolds, USN on board), USS Smith (T/Cdr. R.A. Theobald, Jr., USN), patrol craft USS PC-479 (Lt. M.C. White, USNR), USS PC-1122 (Lt. J.J. Peck, USNR), USS SC-742 (Lt. R.H. Blake, USNR), USS SC-981 (Lt.(jg) R.A. Campbell, USNR) and minesweeper USS YMS-51 (Lt. F.P. Allen, Jr., USNR).
1800L/14, after passing Cape Ward Hunt this force set course for Finschhaven as a deceptive move. Two Catalina flying boats provided A/S escort for the convoy.
1900L/14, the third attack echelon was scheduled to depart Cape Cretin. This echelon was made up of seven LCT's; USS LCT 172, USS LCT 174, USS LCT 176, USS LCT 374, USS LCT 378, LCT 380 and USS LCT 381. They were escorted by the patrol vessel USS SC-699 (Lt.(jg) J.W. Foristel, USNR), minesweeper USS YMS-70 (Lt. B.M. Brink, USNR) and coastal transport USS APc-4 (Lt.(jg) E.R. Edwards, USNR). USS LCT-378 and USS LCT-380 however were stuck on the beach and could not sail with the third attack echelon and remained behind but were able to departed around 1945L/14.
1900L/14, Task Group 74.1 passed north of Kiriwina Island and proceeded to the north-west at 27 knots.
2030L/14, the convoy with the first and second echelons changed its course to 040 to proceed to Arawe.
0100L/15, Task Group 74.1 was now about 25 nautical to the east of the first and second attack echelons. Task Group 74.1 remained 25 nautical miles to the east of the Arawe attack force until 0400L/15.
0315L/15, an enemy floatplane circled the convoy and dropped a stick of bombs near USS Reid. It was now apparent that the Allied movement had been spotted and that the element of surprise had been lost.
0400L/15, the convoy was led into the Transport Area by USS Conyngham. USS Humpreys and USS Sands had previously left the formation (around 0320L/15) escorted by USS Lamson and USS Shaw, they were to proceed to vicinity of Cape Merkus. HMAS Westralia and USS Carter Hall immediately began unloading. By 0500L/15, USS Cartel Hall had launched all her 41 DUKW's, Buffaloes and Alligators.
Task Group 74.1, the cover group, at this moment still 25 nautical miles to the east of the Arawe attack force commenced to sweep eastwards along the south coast of New Britain about 15 miles from the coast.
0500L/15, Task Group 74.1 had just increased speed to 27 knots and set course for a position to the north of Kiriwina Island when HMAS Warramunga got a sound contact and dropped a full pattern of depth charges on it. The attack could not be followed up as dawn was approaching and HMAS Warramunga was ordered to rejoin the Task Group.
0505L/15, HMAS Westralia and USS Carter Hall had completed unloading and then left the area for Buna escorted by the destroyers USS Bagley, USS Mugford, USS Drayton and the patrol vessels USS PC-1120 and USS PC-1129. They arrived at Buna around 1625L/15. HMAS Westralia, USS Carter Hall then immediately departed for Milne Bay, escorted by USS Conyngham and USS Bagley.
0515L/15, the leading wave of amphibious tractors was sighted heading full speed towards Arawe harbour, which if continued, would place them well ahead of schedule. USS SC-742, having learned from the leader that he had misunderstood his orders, ordered them to turn back to kill time.
0530L/15, the landing plan for Blue Beach called for three waves of five rubber boats each, but the troop commander desired to use four waves of four boats each. Due to the narrowness of the beach, this change appeared feasible and was accepted. Just as the first wave was about to land, Japanese, entrenched along and in the general vicinity of Blue Beach opened up with machine gun and mortar fire. The Japanese fire raked back and forth across all waves. The situation became most critical since it was not possible to determine the exact location of our troops, and it was considered better not to open ship counter battery fire until our troops could be located definitely.
0533L/15, USS Shaw proceed to a firing position where she was able to open fire without endangering our own troops. Two salvos silenced the Japanese. As far as is known, no troops reached the beach. The succeeding waves scrattered and returned to USS Shaw. After daylight survivors were recovered by destroyers and landing craft in the area.
USS SC-742 escorted the amphibious tractors of the first wave toward Orange Beach, via Pilelio Passage, but the succeeding waves failed to join up. The control LCVP was sent to herd them on, while the first wave stalled along losing time rapidly.
0615L/15, the Naval Gun Fire Support Group commenced bombardment on Orange Beach five minutes behind schedule, anticipating a delay in the first wave.
0625L/15, Six B-25 bombers reported on station in the Arawe Area for close support.
0637L/15, the naval bombardment ceased on Orange Beach and USS Shaw opened fire for three minutes on the ridge east of Cape Merkub. The bombardment did not draw enemy fire.
0645L/15, USS SC-742 fired 20mm on Cape Merkub as she entered the pass into Arawe Harbour. At the same time USS SC-981 laid a heavy and accurate rocket barrage on the beach and bluff east of the Cape. They drew no return fire.
0705L/15, USS SC-742 fired 49 rockets on Orange Beach as the first wave was 200 yards from the shore.
0708L/15, the B-25 bombers were ordered to bombard and stafe Cape Merkub and the area behind Orange Beach.
0710L/15, The first wave of amphibious tractors hit the beach, 40 minutes late, due partly to the late start, partly to the slowness in joining up, and partly to the unexpected current in Pilelio Passage.
0715L/15, Eight P-38 aircraft arrived on station as air cover over the landing area. USS Shaw was acting as fighter director ship, with USS Reid standing by.
0730L/15, Seven B-25 bombers comprising the second air support group relieved the first which departed to the eastward to find alternate targets to bomb on the track leading to Cape Bali.
0750L/15, The third wave of alligators landed, followed closely the fourth and fifth waves. The following three waves (ESB craft) were forced to lay to in Pelelio passage due to the slowness of the alligators.
0800L/15, Sixteen P-38's were on aircombat patrol over the landing area.
0810L/15, The sixth wave landed. The LCP's beached 30 yards from the shore and the troops waded ashore in three feet of water over the reefs.
0820L/15, USS Shaw, standing by as support off Blue Beach, picked up one officer and 19 men of the assault troops who failed to reach the beach.
0830L/15, The beachmaster reported the landing going well, but thst he was having difficulty in finding suitable landing points for boats.
0835L/15, Echelon number three arrived on schedule from Cape Cretin. While entering Pilelo Passage, numerous army personnel were picked up from the rubber boats and from the water. These men were the survivors of the unsuccessful attack on Blue Beach. At 0855, while waiting on the signal to beach, units of this echelon were subjected to an attack by 15 enemy dive bombers. Fortunately the craft had been dispersed and were thus able to maneuver and avoid serious damage. Three enemy planes were shot down.
0841L/15, USS Reid reported two groups of unidentified planes bearing 052°, 55 miles at 18000 feet and then lost them in the land echo in the vicinity of Gasmata.
0850L/15, Both USS Reid and USS Shaw regained radar contact of the enemy planes bearing 054°, 34 miles, course 190° and speed 180 knots. USS Shaw vectored our fighter patrol out at 23000 feet. USS Conyngham departed the Arawa area at 30 knots.
0857L/15, Our planes made contact with enemy planes.
0901L/15, USS Shaw reported enemy aircraft, 335°, 14 miles. This placed the enemy over USS Conyngham, which was indeed correct. Thirty or more planes were starting an attack. About 24 enemy Val aircraft released bombs on Arawe harbour. One Val bombed USS Conyngham but skillful maneuvering caused the bombs to miss, resulting in no damage.
0909L/15, USS Shaw reported enemy aircraft bearing 030°, 30 miles.
0926L/15, USS Shaw and USS Reid lost radar contact with the enemy aircraft at 080° at a range of 59 miles.
1600L/15, All destroyers of the gunfire support and escort group joined the return convoy south of Cape Ward Hunt. USS Conyngham proceeded independently to Buna.
1800L/15, Task Group 74.1, the cover group, which had spent the day to the north of Kiriwina Island now set corse to return to the Arawe area to protect the landing forces from possible enemy attack by surface ships but at 2000L/15, when it became clear that no enemy surface ships were to interfere with the landings, Task Group 74.1 was ordered to return to Milne Bay.
1830L/15, Echelon four departed Cape Cretin for Arawe. It was made up of six LCT's; USS LCT-82, USS LCT-88, USS LCT-384, USS LCT-386, USS LCT-387 and USS LCT-388. They were escorted by the patrol vessel USS SC-743 (Lt. W.W. Robinson, USNR) and the coastal transport APc-21 (Lt.(jg) W.J. Bates, USNR). Later the same evening they were ordered to return to Cape Cretin.
1900L/15, Echelon three completed unloading at Arawe and departed to return to Cape Cretin.
0630L/16, Echelon four again departed Cape Cretin for Arawa. It was made up of the same ships listed as above with the addition of LCT-378 and LCT-380. Also the minesweeper YMS-50 had joined as escort.
0800L/16, The cover group, Task Group 74.1 arrived at Milne Bay from the Arawe area. They now remained at Milne Bay at two hours readiness for sea.
1630L/16, Echelon four, en route from Cape Cretin to Arawe was attacked by twelve Japanese Val and Zeke aircraft but no damage was done by the enemy.
0130L/17, Echelon four, which was unloading at Arawe was submitted to intermittent air attacks during the night. The enemy attacks lasted until 0845L/17. At 0810L/17 around 50 enemy Val and Nate aircraft attacked by dive bombing and strafing. USS APc 21 was sunk by a direct hit at 0815L/17. USS YMS-50 sustained underwater damage by a near miss. USS LCT-88, USS LCT-378, USS LCT-380, USS LCT-384 and USS LCT-386 all sustained hull damage. USS LCT-380 had to be beached but was later able to return to Cape Cretin under her own power.
Sailing of echelon five was cancelled.
1900L/17, Echelon six departed Cape Cretin for Arawe. It was made up of six LCT's; USS LCT-142, USS USS LCT-166, USS LCT-245, USS LCT-248, USS LCT-391 and USS LCT-393. They were escorted by the patrol vessel USS SC-699, minesweeper USS YMS-49 (Lt. J.R. Lewis, USNR) and the coastal transport APc-15 (Lt.(jg) K. Goffigon, III. USNR).
2300L/17, Echelon four returned to Cape Cretin from the Arawe area only half unloaded.
0800L/18, Echelon six arrived at Arawe and unloaded as scheduled.
1900L/18, Echelon six, having completed unloading at Arawe, departed that place to return to Cape Cretin. During the unloading operations they had not been attacked. Fighter cover of the area had now been much inproved compared to the previous day.
0800L/19, Echelon six arrived at Cape Cretin from Arawe.
1700L/19, Echelon seven departed Cape Cretin for Arawe. This echelon was made up of six LCT's; USS LCT-61, USS LCT-177, USS LCT-179, USS LCT-183, USS LCT-184 and USS LCT-371. They were escorted by the patrol vessel USS SC-703 (Lt.(jg) R.M. Baird, USNR), minesweeper YMS-70 and the coastal transport APc-22 (Lt.(jg) V.G. Martin, USNR). Very bad weather was encountered and USS LCT-179 sustained weather damage and after two hours had to turn back to Cape Cretin.
0620L/20, Echelon seven arrived at Arawe from Cape Cretin.
1645L/20, Echelon seven completed unloading at Arawe and departed that place to return to Cape Cretin.
1700L/20, Echelon eight departed Cape Cretin for Arawe. This echelon was made up of six LCT's; USS LCT-85, USS LCT-171, USS LCT-172, USS LCT-176, USS LCT-374 and USS LCT-381. They were escorted by the patrol vessels USS SC-738 (Lt.(jg) R.B. Woodcock, USNR), USS SC-743 and the coastal transport APc-2.
0330L/21, Three enemy aircraft attack Arawa but no damage was done.
0630L/21, Echelon seven arrived at Cape Cretin from Arawe.
0715L/21, Echelon eight arrived at Arawe from Cape Cretin.
1150L/21, While unloading at Arawe, echelon eight was attacked by enemy aircraft, 30 Vals and 15 Zero's dive bombed and strafed them. USS APc-2 was near missed and started to take on water. USS LCT-171, sustained multiple holes on her starboard side forward, from shrapnel.
1700L/21, Echelon eight, still at Arawe, was again attacked by Japanese aircraft. 45 Vals and 15 Zero's again dive bombed and strafed them but no further damage was done by the enemy. Echelon eight then departed Arawe to return to Cape Cretin.
1200L/22, Echelon eight arrived at Cape Cretin from Arawe.
26 Dec 1943
Operation Dexterity
Landings at Cape Gloucester on New Britain.
Plan.
Operation Dexterity comprised the second phase of the operations against the Japanese on New Britain. The first phase had been the landings at Arawe.
Troops were to be landed in the Cape Gloucester area by the Cape Gloucester Task Force which would be transported to the combat area by ships from Task Force 76 which were given cover by ships from Task Force 74.
Cover Force, Task Force 74.
The Corver Force was given three main tasks; Covering the overwater transport of the amphibious force which would land in the Cape Gloucester area on 26 December 1943 at 0745L. Bombardment of shore targets prior to the landing of troops. Subsequent to the initial assault, providing a covering force in the combat area.
Task Force 74, made up of the heavy cruisers HMAS Australia (Capt. H.B. Farncomb, MVO, DSO, RAN, flying the flag of Rear-Admiral V.A.C. Crutchley, VC, DSC, RN), HMAS Shropshire (Capt. J.A. Collins, CB, RAN), light cruiser USS Nashville (Capt. H.A. Spanagel, USN), USS Phoenix (Capt. A.G. Noble, USN) and the destroyers USS Bush (T/Cdr. T.A. Smith, USN, with COMDESDIV 48, T/Capt. W.F. Petersen, USN on board), USS Bache (T/Cdr. F.M. Adamson, USN), USS Ammen (T/Cdr. H. Williams, Jr., USN), USS Mullany (T/Cdr. B.J. Mullaney, USN), USS Ralph Talbot (T/Lt.Cdr. R.D. Shepard, USN), USS Helm (T/Lt.Cdr. S.K. Santmyers, USN), HMAS Warramunga (Cdr. E.F.V. Dechaineux, DSC, RAN) and HMAS Arunta (Cdr. A.E. Buchanan, RAN).
Task Force 74 was divided in several Task Units; Task Unit 74.1.1 were HMAS Australia and HMAS Shropshire. Task Unit 74.1.2 were HMAS Warramunga, HMAS Arunta, USS Ralph Talbot and USS Helm. Task Unit 74.2.1 were USS Nashville and USS Phoenix. Task Unit 74.2.2 were USS Bush, USS Bache, USS Ammen and USS Mullany.
Amphibious Force, Task Force 76.
Task Group 76.1 was the 'Eastern Assault Group', it was made up of the following Task Units;
Task Unit 76.1.1 was the Headquarters Unit. It was made up of the destroyer USS Conyngham (T/Cdr. J.H. Ward, USN, with the commander Task Force 76 (CTG 76), T/R.Adm. D.E. Barbey, USN on board).
Task Unit 76.1.2 was the APD Task Unit under T/Capt. J.D. Sweeney, USN. It was made up of Task Units 76.1.21 and 76.1.22. Task Unit 76.1.21 was made up of the high speed transports USS Stringham (Lt.Cdr. R.H. Moureau, USNR, with T/Capt. J.D. Sweeney, USN on board), USS Kilty (T/Lt.Cdr. D.L. Mattie, USN), USS Ward (Lt.Cdr. F.W. Lemly, USNR) and USS Crosby (Lt. W.E. Sims, USNR). Task Unit 76.1.22 was made up of the high speed transports USS Brooks (Lt.Cdr. C.V. Allen, USNR, with T/Cdr. J.S. Willis, USN on board), USS Gilmer (Cdr. J.S. Horner, USNR), USS Humphreys (T/Lt.Cdr. F.D. Schwartz, USN), USS Sands (Lt.Cdr. L.C. Brogger, Jr., USNR) and USS Noa (Lt. H.W. Boud, USNR).
Task Unit 76.1.3 was the LCI Unit. It was made up of Task Units 76.1.31, 76.1.32 and 76.1.33. Task Unit 76.1.31 (for Beach Yellow One) was made up of the LCI's USS LCI(L)-71 (?, with Lt.Cdr. J.P. Hurndall, USNR on board), USS LCI(L)-30 (?), USS LCI(L)-72 (Lt.(jg) S.Z. Kepner, USNR), USS LCI(L)-74 (Lt.(jg) R.J. Liechti, USNR), USS LCI(L)-226 (Lt.(jg) O.L. Miles, USNR) and USS LCI(L)-338 (Ens. C.W. Griffin, USNR). Task Unit 76.1.32 (for Beach Yellow Two) was made up of the USS LCI(L)-73 (Lt.(jg) N.M. Taylor, USNR), USS LCI(L)-337 (Lt.(jg) M.D. Skelton, USNR), USS LCI(L)-340 (Lt.(jg) H.F. Eckenrode, USNR), USS LCI(L)-342 (Lt.(jg) R.A. Smith, USNR), USS LCI(L)-343 (Lt.(jg) C.P. Heinrich, USNR) and USS LCI(L)-344 (Lt.(jg) R.B. Ruby, USNR). Task Unit 76.1.33 (Rocket Section) was made up of the LCI(R)'s USS LCI(R)-31 (Lt.(jg) T.J. Morrissey, USNR) and USS LCI(R)-34 (Lt.(jg) J.F. Keefe, USNR).
Task Unit 76.1.4 was the Destroyer Unit. It was made up of Task Units 76.1.41 and 76.1.42. Task Unit 76.1.41 was the Escort Section and was made up of the destroyers USS Shaw (T/Cdr. R.H. Phillips, USN, with COMDESRON 5, T/Capt. J.H. Carter, USN on board), USS Drayton (T/Cdr. R.S. Craighill, USN), USS Lamson (T/Cdr. J.R. Rubins, USN), USS Bagley (T/Cdr. T.E. Chambers, USN), USS Mugford (T/Cdr. H.G. Corey, USN), USS Hutchins (T/Cdr. E.W. Herron, USN, with COMDESRON 24, T/Capt. K.M. McManes, USN, on board), USS Beale (T/Capt. J.B. Cochran, USN), USS Brownson (T/Cdr. J.B. Maher, USN) and USS Daly (T/Cdr. R.G. Visser, USN). Task Unit 76.1.42 was the Close Fire Support Section and was made up of the destroyers USS Flusser (T/Cdr. J.A. Robbins, USN) and USS Mahan (T/Lt.Cdr. E.G. Campbell, USN).
Task Unit 76.1.5 was the Cruiser Bombardment Unit. It was made up of Task Units 76.1.51 and 76.1.52. Task Unit 76.1.51 was made up of Task Unit 74.1.1 (see above). Task Unit 76.1.52 was made up of Task Unit 74.1.2 (see above).
Task Unit 76.1.6 was the Beach Yellow harbour Unit. It was made up of Task Units 76.1.61 and 76.1.62. Task Unit 76.1.61 was the Control Section which was made up of the patrol vessels USS SC-742 (Lt. R.H. Blake, USNR) and USS SC-981 (Lt.(jg) R.A. Campbell, USNR). Task Unit 76.1.62 was the Minesweeping Section made up of the motor minesweepers USS YMS-51 (Lt. F.P. Allen, Jr., USNR), USS YMS-52 (Lt. A.I. Roche, USNR) and USS YMS-70 (Lt. B.M. Brink, USNR). Task Group 76.2 was the 'Eastern Supply Group', it was made up of the following Task Units;
Task Unit 76.2.1 was the First Supply Section. It was made up of seven LST's; USS LST-466 (Lt. H.M. Graham, USNR with COMLSTFLOT 7, T/Capt. J.B. Mallard, USN on board), USS LST-18 (Lt. J. Lencie, USCG), USS LST-66 (Lt. H.A. White, USCG), USS LST-67 (Lt.(jg) G.A. Gyland, USCG), USS LST-68 (Lt. K.A.E. Linquist, USCG), USS LST-202 (Lt. B. Ayesa, USCGR) and USS LST-204 (Lt. A.I. Roberts, USCG). Task Unit 76.2.2 was the Second Supply Section. It was made up of seven LST's; USS LST-452 (Lt. R.D. Jones, USNR, with COMLSTGR20, T/Capt. R.M. Scruggs, USN on board), USS LST-22 (Lt. G.P. Phillip, USNR), USS LST-26 (Lt. E. Kiernan USCGR), USS LST-454 (Lt. E.R. Swanton, USNR), USS LST-456 (Lt.(jg) G.W. Prue, USN), USS LST-457 (Lt.Cdr. J.E. van Zandt, USNR) and USS LST-465 (Lt.Cdr. M.F. Stiling, USNR). Task Unit 76.2.3 was the Third Supply Section. It was made up of five LST's; USS LST-459 (Lt. E.F. Arthur, USNR), USS LST-168 (Lt. A.S. Moreau, USCGR), USS LST-170 (Lt. T.N. Kelly, USCGR), USS LST-171 (Lt.Cdr. H.A. West, USNR) and USS LST-458 (Lt. F.W. Hinrichs, USNR) and the patrol vessels USS PC-1119 (Lt.Cdr. H.M. Blake, USNR), USS PC-1120 (Lt.Cdr. C.S. Molitor, USNR) and USS PC-1122 (Lt. J.J. Peck, USNR). Task Unit 76.2.3 was the Fourth Supply Section. It was made up of five LST's; USS LST-474 (Lt. R.W. Langworthy, USNR), USS LST-467 (Lt.(jg) M.B. Taylor, USNR), USS LST-468 (Lt. I.K. Stevenson, USNR), USS LST-470 (Lt. D.J. Guthridge, USNR) and USS LST-475 (Lt. M.S. Whitsett, USNR) and the patrol vessels USS SC-703 (Lt.(jg) R.M. Baird, USNR), USS SC-734 (Lt. R.B. MacLean, USNR) and USS SC-738 (Lt.(jg) R.B. Woodcock, USNR).
Task Group 76.3 was the 'Western Assault Group', under T/Capt. C.D. Reynold, USN, it was made up of the following Task Units; Task Unit 76.3.1 was the Escort and Bombardment Unit and was made up of the destroyers USS Reid (T/Cdr. H.H. McIlhenny, USN, with COMDESDIV 10, T/Capt. C.D. Reynolds, USN on board) and USS Smith (T/Cdr. R.A. Theobald, Jr., USN). Task Unit 76.3.2 was the Small Craft Unit and was made up of 12 LCT's and several smaller landing craft including 16 LCM's. They were escorted by the patrol craft USS PC-479 (Lt. M.C. White, USNR), USS SC-637 (?) and USS SC-699 (Lt.(jg) J.W. Foristel, USNR). Task Unit 76.3.3 was the LCI Unit and was made up of the following LCI's; USS LCI(L)-25 (Lt.(jg) W.R. Maliek, USNR), USS LCI(L)-26 (Lt. H.J. Adams, Jr., USNR), USS LCI(L)-27 (Lt.(jg) H.G. Hibbard, USNR), USS LCI(L)-29 (Lt. T.R. Hopkins, USNR) and USS LCI(L)-224 (Lt. W.A.P. Watkins, USNR).
Task Group 76.4 was the Service group which was made up of the repair ship USS Rigel (Capt. R. Dudley, USN), landing craft repair ship USS LST-455 (Lt. W.E. Peterton, Jr., USNR) and the landing craft (medical) USS LST-464 (Lt. A.K. Ridgway, USNR).
Task Group 76.5 was the Landing Craft Control Group. It was made up of the following Task Units; Task Unit 76.5.1 was the Buna Unit and it was made up of the landing craft repair ship USS Amycus (Lt. J.J. Reidy, Jr., USNR). Task Unit 76.5.2 was the Oro Bay Unit and it was made up of the coastal transport USS APc 15 (Lt.(jg) K. Goffigon, III. USNR). Task Unit 76.5.3 was the Cape Cretin Unit and it was made up of the landing craft repair ship USS LST-453 (Lt.Cdr. O.L. Norman, USNR) and coastal transport USS APc 6 (Lt. C.R. Rosebro, Jr., USNR).
Task Group 76.6 was the Reserve Group made up of the amphibious transport HMAS Westralia (Cdr. A.V. Knight, RD, RANR(S)), dock landing ship USS Carter Hall (Lt.Cdr. F.J. Harris, USNR) and the attack cargo ship USS Etamin (Lt.Cdr. G.W. Stedman, USCGR).
Task Group 76.7 was the Salvage Group and was made up of the tugs USS Sonoma (Lt.(jg). N.G. Irwin, USN) and HMAS Reserve (T/A/Lt.Cdr. G.A. Keith, RANR(S)).
-------------------------------------------------------
1400L/24, The fifth echelon, made up of seven LST's; USS LST-452, USS LST-452, USS LST-22, USS LST-26, USS LST-454, USS LST-456, USS LST-457 and USS LST-465 departed Cape Sudest for the Cape Gloucester area via Cape Cretin. They were escorted by the destroyers USS Beale, USS Hutchins, USS Brownson and USS Daly. HMAS Reserve also accompanied this echelon.
1630L/24, Task Force 74, the cover force, departed Milne Bay.
0100L/25, The third echelon, made up of seven LST's; USS LST-466, USS LST-18, USS LST-66, USS LST-67, USS LST-68, USS LST-202 and USS LST-204 departed Cape Sudest for Cape Gloucester. They were escorted by the destroyers USS Drayton, USS Lamson, USS Bagley and USS Mugford.
0600L/25, Task Force 76's flagship for the operation, the destroyer USS Conyngham departed Cape Sudest for the Cape Gloucester area. With the flagship were the first and second echelons which were made up of the high speed transports USS Stringham, USS Kilty, USS Ward, USS Crosby, USS Brooks, USS Gilmer, USS Humphreys, USS Sands, USS Noa, the LCI(L)'s USS LCI(L)-30, USS LCI(L)-31, USS LCI(L)-34, USS LCI(L)-70, USS LCI(L)-71, USS LCI(L)-72, USS LCI(L)-73, USS LCI(L)-74, USS LCI(L)-226, USS LCI(L)-337, USS LCI(L)-338, USS LCI(L)-340, USS LCI(L)-342, USS LCI(L)-343, USS LCI(L)-344, [USS LCI(L)-28 (Lt.(jg) E.A. Winton, USNR) apparently was also with them though she is not listed in the Task Force originsation form for the operation]. They were escorted by the destroyers USS Shaw, USS Mahan, USS Flusser, USS Reid, USS Smith, patrol vessels USS SC-742, USS SC-981 and the minesweepers USS YMS-50, USS YMS-51 and USS YMS-70.
1130L/25, Task Force 74 cleared Cape Ward Hunt and began to overtake the attack echelons. It was the plan that Task Force 74 would be about 12 miles ahead of the leading echelon before dark and during the night approach would therefore be covering all the echelons which were following.
1600L/25, The fourth echelon made up of 12 LCT's and 16 LCM's departed Cape Cretin for Cape Gloucester. They were escorted by the patrol vessels USS PC-479, USS SC-637 and two PT-boats. This echelon was to land on Green Beach in the Western area.
2000L/25, When it was now just dark Task Force 74 was ahead of the leading echelon.
2120L/25, USS YMS-50 had to part company with the first en second echelon due to engine trouble. She was ordered to proceed to Cape Cretin.
2130L/25, the sixth echelon departed Cape Sudest for Yellow Beach, Cape Glouceter. It was made up of LST's USS LST-459, USS LST-168, USS LST-170, USS LST-171 and USS LST-458. They were escorted by the patrol vessels USS PC-1119, USS PC-1120 and USS PC-1122. The destroyers USS Flusser and USS Mahan were to join this echelon about 25 nautical miles south of Langemak Bay and shortly afterwards also USS Reid and USS Smith around 1600L/26.
0455L/26, the seventh echelon departed Cape Sudest for Yellow Beach, Cape Glouceter. It was made up of LST's USS LST-474, USS LST-467, USS LST-468, USS LST-470 and USS LST-475. They were escorted by the patrol vessels USS SC-703, USS SC-734 and USS SC-738. The destroyers USS Lamson, USS Drayton, USS Bagley and USS Mugford were to join this echelon near Langemak Bay.
0445L/26, Taks Force 74 split into Task Group 74.1 and 74.2 (see above) to enter their respective fire support areas.
0600L/26, As scheduled HMAS Australia, HMAS Shropshire, HMAS Warramunga and HMAS Arunta commenced bombarding the vicinity of Gloucester aerodrome. The objects of the bombardments were to destroy enemy installations and to prevent the enemy from reorganising counter measures to the landing. Also the enemy artillery was to be silenced. The bombardment was continued until 0720L/26 by which time over 700 round of 8" high explosive, nearly 900 rounds of 4.7" high explosive and nearly 100 rounds of 4" high explosive had been fired. There was no enemy opposition to this intense bombardment.
0625L/26, USS Nashville and USS Phoenix commenced bombarding targets on the western coastline of Borgen Bay,including targets in the vicinity of 'Yellow Beaches' where the assault landing would be made. This bombardment, with USS Bache joining in for ten minutes to fire 300 rounds of 5", continued until 0727L/26. Over 1600 rounds of 6" were fired by USS Nashville and USS Phoenix.
USS Flusser and USS Mahan intermittently bombarded 'Yellow Beaches' up to H-hour, firing a total of about 400 rounds of 5".
0700L/26, between 0700 and 0720 hours, five squadrons of B-24 bombers, from medium altitude, bombed targets in the Cape Gloucester area. As far as could be seen these bombers had no AA opposition. This was thought to be due the the effective naval bombardment of the area.
0728L/26, between 0728 and 0743 hours, four squadrons of B-25 bombers swept in from seaward and bombed and strafed the Yellow Beaches from very low altitude.
0743L/26, between 0745 and 0745 hours, rocket boats laid a creeping rocket barrage up the Yellow Beaches and from behind this barrage the main assault was made without opposition.
0750L/26, Green Beach at Tauali, had been similarly prepared by naval and air bombardment and here, too, the assault force got ashore without opposition.
Fighers on air alert were over the combat area soon after sunrise. The first fighter sortie was four flights (16 planes in total) but from 0800L/26, the air support plan allowed for 12 flights (48 planes) being continually over the combat area and other squadrons of fighters were on ground alert available on call.
0800L/26, HMAS Shropshire, which was the fighter direction shop for all fighter planes in the combat area, began tracking a large group of bogies approaching from the direction of Rabaul and it was thought that the enemy reaction was on its way. However these bogies crossed to southward over New Britain and a group of fighters sent down to southward saw the enemy planes retiring after attacking Awawe.
0830L/26, with the assault proceeding favourably, CTF 76 released Task Force 74 which then began a high speed retirement to west and south through Vitiaz Strait.
0840L/26, LST's of the third echelon beached on Yellow Beach and commenced unloading.
0900L/26, Four squadrons of heavy bombers attacked Target Ridge from medium altitude and at 0930L/26 four squadrons of attack bombers struck targets in the Gloucester-Borgen Area.
Shortly after Task Force 74 entered Vitiaz Strait, HMAS Shropshire radar detected two large groups of bogies coming in from the westward and these were reckoned to be an enemy strike from his New Guinea air bases. Additional fighters were summoned and in all 96 fighters planes were disposed to meet this attack. However at this time the radar was confused by land all round and the bogies were lost. At about the time these bogies were estimated by dead reckoning to be approaching an attacking position, Task Force 74 was in rain an temporary low overcast so that the force may have avoided detection, though it has not been ascertained exactly where these enemy groups did actually go.
0920L/26, The commander General Cape Gloucester Task Force departed USS Conyngham which then left the area for the Buna / Cape Sudest area. En-route she overtook the high speed transports of the first echelon which had already left the landing area. The LCI's of the second echelon also departed the landing area around this time, having retracted from the beach successfully.
1330L/26, The LST's of the third echelon retracted as scheduled to make room for the incoming echelon five. Echelon three had however not yet been completely unloaded. The delay in unloading had been due to the difficulty in preparing the dispersal area. The thick growth and soft ground behind the beach was the retarding factor. Approximately 100 tons of bulk and a few vehicles were returned to Cape Sudest but were later shipped back in following echelons.
1415L/25, USS Shaw, the fighter director ship in the Cape Gloucester area, picked up two large groups of enemy planes, one group bearing 010°, 65 miles and the other bearing 080°, 50 miles.
1430L/26, Task Force 74 was now south-east of Finschhaven, Task Unit 74.2.2 (four destroyers, see above) were detached to return to the Cape Gloucester area and during the night to carry out a covering patrol.
Around 1445L/26, an enemy air attack consisting of a large number of dive bombers with fighter escort and a group of high level bombers was made on our ships off Cape Gloucester. Fighter interception was made and is estimated to have shot down 56 enemy planes. However a number of dive bombers got through and attacked our ships. USS Brownson was sunk, USS Shaw was badly damaged by near misses and USS Lamson and USS Mugford were slightly damaged. USS LST-66 also sustained minor damage due to a near miss.
1530L/26, USS Lamson and USS Daly had picked up 34 and 163 survivors from the USS Brownson. These included 11 of the ships officers. While picking up the survivors USS Daly suffered some minor damage due to a heavy underwater explosion, most likely depth charges exploding on board the sinking USS Brownson.
1700L/26, A second air attack on our destroyers off Cape Gloucester developed. Approximately 50 enemy aircraft, 18 of which were torpedo carrying Bettys approached at low altitude. At least 13 were destroyed by fighters and 3 by AA gunfire from ships. No damage was sustained and it is believed that none of the enemy aircraft had been able to release torpedoes. This action ended the days air activity.
1800L/26, Echelon five (7 LST's), plus USS LST-466 from echelon three, departed Yellow Beach for Cape Sudest escorted by USS Hutchins and USS Beale. A total of about 200 tons of bulk stores were still on board. Departure was made on schedule as it was condidered to dangerous to navigate the reef during darkness.
1815L/26, Task Units 74.1.1, 74.1.2 and 74.2.1 arrived at Buna where they immediately refueled on completion of which they came short notice to proceed to sea if required.
2300L/26, the first echelon, made up of the high speed transports, USS Stringham, USS Kilty, USS Ward, USS Crosby, USS Brooks, USS Gilmer, USS Humphreys, USS Sands, USS Noa, arrived at Cape Sudest from the Cape Gloucester area.
2330L/26, USS Conyngham with CTF 76 on board, arrived at Buna from the Cape Gloucester area.
During the night of 26/27 December, Task Unit 74.2.2 carried out a covering patrol in the Cape Gloucester area without incident.
0730L/27, the sixth echelon, made up of the LST's USS LST-459, USS LST-168, USS LST-170, USS LST-171 and USS LST-458 arrived at Cape Gloucester escorted by the destroyers USS Flusser, USS Mahan, USS Reid, USS Smith and the patrol vessels USS PC-1119, USS PC-1120 and USS PC-1122.
0740L/27, Task Unit 74.2.2 which was withdrawing from night patrol, was ordered to join the seventh echelon consisting of USS Drayton, 4 LST's and 3 SC's proceeding the the Cape Gloucester area. The radar intallation on board USS Drayton was defective. The fighter direction party was transferred at sea from USS Drayton to USS Bush.
0800L/27, the second echelon, made up of the LCI(L)'s, USS LCI(L)-28, USS LCI(L)-30, USS LCI(L)-31, USS LCI(L)-34, USS LCI(L)-70, USS LCI(L)-71, USS LCI(L)-72, USS LCI(L)-73, USS LCI(L)-74, USS LCI(L)-226, USS LCI(L)-337, USS LCI(L)-338, USS LCI(L)-340, USS LCI(L)-342, USS LCI(L)-343 and USS LCI(L)-344 arrived at Cape Sudest from the Cape Gloucester area.
0830L/27, the seventh echelon, made up of the LST's USS LST-474, USS LST-467, USS LST-468, USS LST-470 and USS LST-475 and escorted by the destroyers USS Drayton, USS Bush, USS Bache, USS Ammen and USS Mullany.
0900L/27, The fourth echelon made up of 12 LCT's arrived at Cape Cretin from Cape Gloucester escorted by the patrol vessels USS PC-479, USS SC-637 and SC-699.
1000L/27, Task Unit 74.1.2 (four destroyers, see above) departed Buna to carry out a night covering patrol to the north-eastward of Cape Gloucester.
1800L/27, Task Unit 74.2.2 and USS Drayton took up patrol off the reefs. During the night USS Mullany made three depth charge attacks on a sound contact with no observed results.
1800L/27, As four destroyers of Task Force 76 had been sunk or damaged, the destroyers of Task Force 74 were now assigned for temporary escort duty with Task Force 76.
2200L/27, Echelon 5 (7 LST's) and LST-466, escorted by USS Hutchins and USS Beale arrived at Cape Sudest from the Cape Gloucester area.
0300L/28, Task Unit 74.1.2 left patrol and retired towards Cape Cretin.
0400L/28, The fifth echelon, made up of USS LST-452, USS LST-452, USS LST-22, USS LST-26, USS LST-454, USS LST-456, USS LST-457 and USS LST-465 arrived at Cape Sudest from the Cape Gloucester area escorted by USS Beale, USS Hutchins and USS Daly.
0700L/28, The seventh echelon had completed unloading and by 0830L/28, it was retiring from the Cape Gloucester area escorted by Task Unit 74.2.2 and USS Drayton.
1430L/28, The eight echelon departed Cape Sudest for the Cape Gloucester area. It was made up of the high speed transports USS Stringham, USS Kilty, USS Ward, USS Crosby, USS Brooks, USS Gilmer, USS Humphreys, USS Sands and USS Noa. They were escorted by the destroyers USS Hutchins and USS Lamson and would later be joined by USS Bush, USS Bache, USS Ammen and USS Mullany.
1600L/28, Task Unit 74.1.2 departed Cape Cretin to make a high speed dash up towards the Cape Gloucester area to repeat the night covering patrol of last night and to return to Cape Cretin afterwards.
At 1700L/28, Task Unit 74.1.2 departed Cape Cretin to proceed to the southward to join the escort of the ninth echelon that was to proceed from Cape Sudest to the Cape Gloucester area. As HMAS Warramunga and HMAS Arunta were short of fuel they arrived at Buna around 2200L/29 where they took on board 100 tons of fuel from HMAS Australia and HMAS Shropshire respectively. They departed around 2330L/28 to rejoin the other two destroyers of their Task Unit which meanwhile had joined the ninth echelon.
2100L/28, The ninth echelon, made up of six LST's; USS LST-466, USS LST-18, USS LST-66, USS LST-67, USS LST-68, USS LST-202 departed Cape Sudest for the Cape Gloucester area. USS LST-204 was unable to retract and had to proceed to Cape Gloucester with the next (tenth) echelon. They were escorted by HMAS Warramunga, HMAS Arunta, USS Ralph Talbot and USS Helm although the two Australian destroyers only joined later as they first had to fuel (see above). The ninth echelon arrived at Cape Gloucester around 0700L/30. After unloading they departed for Oro Bay around 1300L/30 still escorted by the four destroyers from Task Unit 74.1.2 which then detached after having passed Cape Ward Hunt. The destroyers of Task Unit 74.1.2 arrived at Buna around 1800L/31 minus HMAS Warramunga which arrived at 2030l/31 having trouble with salt water contamination in her boiler feed water.
2200L/28, the sixth echelon, made up of USS LST-459, USS LST-168, USS LST-170, USS LST-171, USS LST-458 and escorted by USS Flusser, USS Mahan, USS Reid, USS Smith and the patrol vessels USS PC-1119, USS PC-1120 and USS PC-1122 arrived at Cape Sudest from Cape Gloucester.
At 1700L/28, Task Unit 74.1.2 departed Cape Cretin to proceed to the southward to join the escort of the ninth echelon that was to proceed from Cape Sudest to the Cape Gloucester area. As HMAS Warramunga and HMAS Arunta were short of fuel they arrived at Buna around 2200L/29 where they took on board 100 tons of fuel from HMAS Australia and HMAS Shropshire respectively. They departed around 2330L/28 to rejoin the other two destroyers of their Task Unit which meanwhile had joined the ninth echelon.
0650L/29, the eight echelon, made up of the high speed transports USS Stringham, USS Kilty, USS Ward, USS Crosby, USS Brooks, USS Gilmer, USS Humphreys, USS Sands and USS Noa escorted by the destroyers USS Lamson, USS Bush, USS Bache, USS Ammen and USS Mullany arrived at Cape Gloucester. Unloading was completed at 0930L/29 when they departed to return to Cape Sudest where they arrived around 2300L/29. USS Gilmer had on board 50 wounded Marines.
1400L/29, the seventh echelon arrived at Buna from Cape Gloucester. Task unit 74.2.2 was still with the seventh echelon.
1 Jan 1944
HMAS Australia (Capt. H.B. Farncomb, MVO, DSO, RAN, flying the flag of Rear-Admiral V.A.C. Crutchley, VC, DSC, RN) and HMAS Shropshire (Capt. J.A. Collins, CB, RAN) proceeded from Buna to Milne Bay. (67)
21 Mar 1944
At Milne Bay, Rear-Admiral V.A.C. Crutchley, VC, DSC, RN, transferred his flag from HMAS Shropshire (Capt. J.A. Collins, CB, RAN) to HMAS Australia (Capt. E.F.V. Dechaineux, DSC, RAN). (68)
22 Mar 1944
HMAS Australia (Capt. E.F.V. Dechaineux, DSC, RAN, flying the flag of Rear-Admiral V.A.C. Crutchley, VC, DSC, RN), HMAS Shropshire (Capt. J.A. Collins, CB, RAN) and USS Nashville (Capt. H.A. Spanagel, USN) conducted exercises at / off Milne Bay. (68)
28 Mar 1944
HMAS Australia (Capt. E.F.V. Dechaineux, DSC, RAN, flying the flag of Rear-Admiral V.A.C. Crutchley, VC, DSC, RN) and HMAS Shropshire (Capt. J.A. Collins, CB, RAN) conducted exercises east of Milne Bay. (68)
31 Mar 1944
Around 0630K/31, Task Force 74, made up of the heavy cruisers HMAS Australia (Capt. E.F.V. Dechaineux, DSC, RAN, flying the flag of Rear-Admiral V.A.C. Crutchley, VC, DSC, RN), HMAS Shropshire (Capt. J.A. Collins, CB, RAN) and the destroyers HMAS Arunta (Cdr. A.E. Buchanan, RAN), HMAS Warramunga (Cdr. N.A. Mackinnon, RAN), USS Ammen (T/Cdr. H. Williams, Jr., USN) and USS Mullany (T/Cdr. B.J. Mullaney, USN) departed Milne Bay for exercises in the northern Coral Sea with the submarine USS Cero (T/Lt.Cdr. E.F. Dissette, USN).
During the day weather conditions deteriorated and the night exercises had to be cancelled and the cruisers returned to Milne Bay on 1 April 1944.
The destroyers remained out and in the end were able to conduct exercises with the submarine on 1 April before the destroyers and the submarine returned to Milne Bay late afternoon. USS Ammen proceeded to Oro Bay though arriving there around 0425K/2. (68)
6 Apr 1944
Task Force 74, made up of the heavy cruisers HMAS Australia (Capt. E.F.V. Dechaineux, DSC, RAN, flying the flag of Rear-Admiral V.A.C. Crutchley, VC, DSC, RN), HMAS Shropshire (Capt. J.A. Collins, CB, RAN) and the destroyers HMAS Arunta (Cdr. A.E. Buchanan, RAN), HMAS Warramunga (Cdr. N.A. Mackinnon, RAN), USS Ammen (T/Cdr. H. Williams, Jr., USN) and USS Mullany (T/Cdr. B.J. Mullaney, USN) conducted exercises to the east of Milne Bay. During the exercises the destroyers made a torpedo attack on the cruisers. (69)
7 Apr 1944
HMAS Australia (Capt. E.F.V. Dechaineux, DSC, RAN, flying the flag of Rear-Admiral V.A.C. Crutchley, VC, DSC, RN) and HMAS Shropshire (Capt. J.A. Collins, CB, RAN) conducted AA gunnery exercises at Milne Bay.
HMAS Arunta (Cdr. A.E. Buchanan, RAN) and USS Ammen (T/Cdr. H. Williams, Jr., USN) conducted A/S exercises at Milne Bay with USS S-42 (T/Lt.Cdr. P.E. Glenn, USN).
Around 1600K/7, Task Force 74, made up of HMAS Australia, HMAS Shropshire, HMAS Arunta, HMAS Warramunga (Cdr. N.A. Mackinnon, RAN), USS Ammen and USS Mullany (T/Cdr. B.J. Mullaney, USN) departed Milne Bay for exercises in the northern Coral Sea.
All ships returned to Milne Bay on completion of the exercises the following day. HMAS Warramunga and USS Mullany also conducted A/S exercises with USS S-42 before entering Milne Bay. (69)
14 Apr 1944
Around 1500K/14, Task Force 74, made up of the heavy cruisers HMAS Australia (Capt. E.F.V. Dechaineux, DSC, RAN, flying the flag of Rear-Admiral V.A.C. Crutchley, VC, DSC, RN), HMAS Shropshire (Capt. J.A. Collins, CB, RAN) and the destroyers HMAS Arunta (Cdr. A.E. Buchanan, RAN), HMAS Warramunga (Cdr. N.A. Mackinnon, RAN), USS Ammen (T/Cdr. H. Williams, Jr., USN) and USS Mullany (T/Cdr. B.J. Mullaney, USN) departed Milne Bay for Cape Sudest. (69)
15 Apr 1944
Around 0630K/15, Task Force 74, made up of the heavy cruisers HMAS Australia (Capt. E.F.V. Dechaineux, DSC, RAN, flying the flag of Rear-Admiral V.A.C. Crutchley, VC, DSC, RN), HMAS Shropshire (Capt. J.A. Collins, CB, RAN) and the destroyers HMAS Arunta (Cdr. A.E. Buchanan, RAN), HMAS Warramunga (Cdr. N.A. Mackinnon, RAN), USS Ammen (T/Cdr. H. Williams, Jr., USN) and USS Mullany (T/Cdr. B.J. Mullaney, USN) arrived at Cape Sudest from Milne Bay.
Shortly before arrival HMAS Warramunga conducted underway refuelling exercises connecting to HMAS Australia. (69)
18 Apr 1944
Around 0545K/18, Around 0630K/15, Task Force 74, made up of the heavy cruisers HMAS Australia (Capt. E.F.V. Dechaineux, DSC, RAN, flying the flag of Rear-Admiral V.A.C. Crutchley, VC, DSC, RN), HMAS Shropshire (Capt. J.A. Collins, CB, RAN) and the destroyers HMAS Arunta (Cdr. A.E. Buchanan, RAN), HMAS Warramunga (Cdr. N.A. Mackinnon, RAN), USS Ammen (T/Cdr. H. Williams, Jr., USN) and USS Mullany (T/Cdr. B.J. Mullaney, USN) departed Cape Sudest for Seeadler Harbour, Manus. (70)
19 Apr 1944
Around 1200K/19, Task Force 74, made up of the heavy cruisers HMAS Australia (Capt. E.F.V. Dechaineux, DSC, RAN, flying the flag of Rear-Admiral V.A.C. Crutchley, VC, DSC, RN), HMAS Shropshire (Capt. J.A. Collins, CB, RAN) and the destroyers HMAS Arunta (Cdr. A.E. Buchanan, RAN), HMAS Warramunga (Cdr. N.A. Mackinnon, RAN), USS Ammen (T/Cdr. H. Williams, Jr., USN) and USS Mullany (T/Cdr. B.J. Mullaney, USN) arrived at Seeadler Harbour, Manus from Cape Sudest.
They departed again for operations around 1730K/19.
[For more info on these operations see the event ' Operations Reckless and Persecution ' for 22 April 1944.] (70)
22 Apr 1944
Operations Reckless and Persecution.
These operations were amphibious landings at Hollandia and Aitape in New Guinea.
Forces involved.
Task Force 77 (with T/Rear-Admiral D.E. Barbey, USN in command) was the Attack Force and was made up of the following units;
Task Group 77.1 was the Western Attack Group and was made up of the following ships. The destroyer USS Swanson (T/Cdr. E.L. Robertson, Jr., USN, flying the flag of T/Rear-Admiral D.E. Barbey, USN) was the flagship of Task Force 77 (and Task Group 77.1), further ships in the Task Group were the following; amphibious transports USS Henry T. Allen (T/Capt. J. Meyer, USN), HMAS Manoora (Cdr. A.P. Cousin, RANR(S)), HMAS Kanimbla (A/Cdr. N.H. Shaw, RAN), dock landing ship USS Carter Hall (Lt.Cdr. F.J. Harris, USNR), attack cargo ship USS Triangulum (T/Cdr. F.W. Parsons, USNR), LST's USS LST-467 (Lt. M.B. Taylor, USNR, with COMLSTGR 19, T/Cdr. T.C. Green, USN, on board), USS LST-171 (Lt.Cdr. H.A. West, USNR), USS LST-220 (Lt. C.J. Goode, USNR), USS LST-245 (Lt. M.J. McCabe, USNR), USS LST-468 (Lt. I.K. Stevenson, USNR), USS LST-470 (Lt. D.J. Guthridge, USNR) and USS LST-475 (Lt. M.S. Whitsett, USNR), LCI(L)'s USS LCI(L)-71 (?, with Lt.Cdr. J.P. Hurndall, USNR on board), USS LCI(L)-72 (Lt.(jg) S.Z. Kepner, USNR), USS LCI(L)-74 (Lt.(jg) R.J. Liechti, USNR), USS LCI(L)-340 (Lt.(jg) H.F. Eckenrode, USNR), USS LCI(L)-343 (Lt.(jg) C.T. Roberts, USNR) and USS LCI(L)-344 (Lt.(jg) H.W. Griswold, USNR), USS LCI(L)-361 (Lt.(jg) A.J. Hawkes, USNR), USS LCI(L)-362 (Lt. J.R. Sawtell, USNR), USS LCI(L)-363 (Lt. R.E. Sargent, USNR), USS LCI(L)-364 (Lt.(jg) L.D. Sloane, USNR), USS LCI(L)-429 (Lt. R.V. Hughes, USNR), USS LCI(L)-430 (Lt. P.C. Hill, Jr., USNR), USS LCI(L)-431 (Lt.(jg) F.M. Slatinshek, USNR), USS LCI(L)-447 (Lt. J.C. Craig, USNR), USS LCI(L)-448 (Lt.(jg) R.H. Flowers, USNR), destroyers USS Hobby (T/Cdr. G.W. Pressey, USN, with T/Capt. COMDESDIV 38, W.S. Veeder, USN on board), USS Grayson (T/Cdr. W.V. Pratt, 2nd, USN), USS Wilkes (T/Cdr. F. Wolsieffer, USN), USS Nicholson (T/Cdr. W.W. Vanous, USN), USS Gillespie (T/Cdr. J.S. Fahy, USN), USS Kalk (T/Cdr. H.D. Fuller, USN), patrol vessels USS SC-736 (Lt.(jg) F.A. Marsteller, USNR), USS SC-738 (Lt. J.S. Munroe, USNR), landing craft rocket USS LCI(G)-31 (Lt.(jg) T.J. Morrissey, USNR), minesweepers USS YMS-8 (Lt. F.L. Comley, USNR), USS YMS-10 (Lt.(jg) H.H. Goodman, USNR) and the tug HMAS Reserve (T/Lt. D. Morrison, RANR(S)).
Task Group 77.2 was the Central Attack Group and was made up of the following ships. The destroyer USS Reid (T/Cdr. S.A. McCornock, USN, flying the flag of T/Rear-Admiral R.A. Fechteler, USN) was the flagship of Task Group 77.2), further ships in the Task Group were the following; amphibious transport HMAS Westralia (Cdr. A.V. Knight, RD, RANR(S)), dock landing ship USS Gunston Hall (Cdr. D.E. Collins, USNR), attack cargo Ganymede (Lt.Cdr. G.H. Melichar, USNR), high speed transports USS Humphreys (T/Cdr. F.D. Schwartz, USN), USS Brooks (Lt.Cdr. C.V. Allen, USNR), USS Gilmer (Cdr. J.S. Horner, USNR), USS Sands (Lt.Cdr. L.C. Brogger, Jr., USNR), USS Herbert (T/Cdr. J.N. Ferguson, Jr., USN), LST's USS LST-466 (Lt. R.E. McCarthy, USNR, with COMLSTFLOT 7, T/Capt. R.M. Scruggs, USN on board), USS LST-118 (Lt. C.W. Lundberg, USNR), USS LST-454 (Lt. E.R. Swanton, USNR), USS LST-457 (Lt. W.P. Sullivan, USNR), USS LST-458 (Lt. F.W. Hinrichs, USNR), USS LST-463 (Lt. A.W. McWorter, USNR), USS LST-465 (Lt.Cdr. R.T. Murphy, USNR), LCI(L)'s USS LCI(L)-28 (Lt.(jg) N. Molyneaux, USNR, with COMLCIFLOT 7, T/Cdr. H.F. McGee, USN, on board), USS LCI(L)-25 (Lt.(jg) W.R. Maliek, USNR), USS LCI(L)-26 (Lt. H.J. Adams, Jr., USNR), USS LCI(L)-27 (Lt.(jg) H.G. Hibbard, USNR), USS LCI(L)-29 (Lt. T.R. Hopkins, USNR), USS LCI(L)-30 (Lt. C.B. Faunce, Jr., USNR), USS LCI(L)-224 (Lt.(jg) P.O. Olafsson, USNR), USS LCI(L)-225 (Lt.(jg) W.S. Ogilvy, USNR), USS LCI(L)-226 (Lt.(jg) O.L. Miles, USNR), USS LCI(L)-227 (Lt.(jg) J.J. McNeilly, USNR), USS LCI(L)-228 (Lt.(jg) W.A. Steiger, USNR), USS LCI(L)-230 (?), USS LCI(L)-337 (Lt.(jg) M.D. Skelton, USNR), USS LCI(L)-338 (Lt.(jg) C.M. Goodman, Jr., USNR), USS LCI(L)-342 (Lt.(jg) R.A. Smith, USNR), USS LCI(L)-432 (Lt. M.D. Coppersmith, USNR), destroyers USS Stevenson (T/Cdr. F.E. Wilson, USN, with COMDESRON 19, T/Capt. R.F. Stout, USN on board), USS Stockton (T/Cdr. W.W. Stark, Jr., USN), USS Thorn (T/Cdr. E. Brumby, USN), USS Welles (T/Cdr. D.M. Coffee, USN), USS Radford (T/Capt. G.E. Griggs, USN), USS Taylor T/Cdr. N.J.F. Frank, Jr., USN), USS Roe (T/Cdr. F.S. Stich, USN), high speed minesweepers USS Hogan ( T/Lt.Cdr. W.H. Sublette, USN), USS Long (T/Lt.Cdr. R.V. Wheeler, Jr., USN), patrol vessels, USS SC-703 (Lt.(jg) R.M. Baird, USNR), USS SC-734 (Lt. R.B. MacLean, USNR), USS LCI(G)-34 (Lt.(jg) J.F. Keefe, USNR), USS LCI(G)-73 (Lt.(jg) N.M. Taylor, USNR), minesweepers USS YMS-46 (Lt.(jg) H.J. Topping, USNR), USS YMS-47 (Lt.(jg) A.W. Busbee, USNR) and the tug USS Sonoma (Lt.(jg). G.I. Nelson, USN).
Task Group 77.3 was the Eastern Attack Group and was made up of the following ships. The destroyer USS La Valette (T/Cdr. W. Thompson, USN, flying the flag of T/Rear-Admiral A.G. Noble, USN) was the flagship of Task Group 77.3 which was further made up of the high speed transports USS Kilty (Lt. L.G. Benson, USNR, with COMTRANSDIV 22, T/Cdr. D.L. Mattie, USN, on board), USS Talbot (Lt.Cdr. C.C. Morgan, USNR), USS Dent (Lt.Cdr. R.A. Wilhelm, USNR), USS Schley (Lt.Cdr. E.T. Farley, USNR), USS Ward (Lt.Cdr. F.W. Lemly, USNR), USS Crosby (Lt.Cdr. W.E. Sims, USNR), USS Dickerson (Lt.Cdr. J.R. Cain, Jr., USNR), USS Kane (Lt. F.N. Christiansen, USNR), USS Noa (Lt.Cdr. H.W. Boud, USNR), dock landing ship USS Epping Forest (Cdr. L. Martin, USNR), attack cargo ship USS Etamin (Lt.Cdr. G.W. Stedman, Jr., USCGR), LST's USS LST-452 (Lt. G.W. Miller, USNR, with COMLSTGR20, Lt.Cdr. D.M. Baker, USNR on board), USS LST-38 (Lt. W.T. Roberts, Jr., USNR), USS LST-122 (Lt. S.C. Pirie, USNR), USS LST-221 (Lt. J.H. Church, USNR), USS LST-241 (Lt. A.N. Firestone, USNR), USS LST-270 (Lt. O.W. Barber, USN), USS LST-456 (Lt. G.W. Prue, USN), destroyers USS Nicholas (T/Cdr. R.T.S. Keith, USN, with COMDESRON 21, T/Capt. F.X. McInerney, USN on board), USS Jenkins (T/Cdr. M. Hall, Jr., USN), USS O'Bannon (T/Cdr. R.W. Smith, USN), USS Hopewell (T/Cdr. C.C. Shute, USN), high speed minesweepers USS Perry (Lt.Cdr. I.G. Stubbart, USN), USS Hamilton (T/Cdr. R.R. Sampson, USN), patrol vessels USS SC-637 (?), USS SC 648 (?), USS SC-742 (Lt. R.H. Blake, USNR), USS SC-981 (Lt.(jg) R.A. Campbell, USNR), minesweepers YMS-48 (Lt. R.C. Lynch, USNR), YMS-51 (Lt. F.P. Allen, Jr., USNR) and the tug USS Chetco (Lt.(jg) R.E. Gill, USN).
Task Group 77.4 was the First Reinforcement Group and was made up of the following Units. Task Unit 74.4.1 was the Western Unit under T/Capt. E.M. Thompson, USN, and was made up of the following ships; attack cargo ship USS Virgo (Cdr. C.H. McLaughlin, USNR), LST's, USS LST-18 (Lt. C.W. Radke, USCG), USS LST-22 (?), USS LST-26 (?), USS LST-66 (Lt.(jg) W.H. McGowan, USCG), USS LST-67 (?), USS LST-68 (?), USS LST-227 (Lt. J. Molnar, USNR), destroyers USS Stevens (T/Cdr. W.M. Rakow, USN, with COMDESRON 25, T/Capt. E.M. Thompson, USN on board), USS Harrison (T/Cdr. C.M. Dalton, USN) and the frigate USS Coronado (Cdr. N.W. Sprow, USCG). Task Unit 74.4.2 was the Central Unit under T/Cdr. J.J. Greytak, USN, and was made up of the following ships; LST's USS LST-459 (Lt. N. Waggener, USNR), USS LST-41 (Lt. W.B. Dundon, Jr., USNR), USS LST-276 (Lt. P.J. Bergeaux, USNR), USS LST-476 (Lt. C.A. Boyer, USNR), USS LST-479 (Lt. D.J. Guthridge, USNR), destroyers USS McKee (T/Cdr. J.J. Greytak, USN), USS John Rodgers (T/Cdr. H.O. Parish, USN) and the frigate USS San Pedro (Lt.Cdr. C.O. Ashley, USCG). Task Unit 74.4.3 was the Eastern Unit under T/Capt. H.O. Larson, USN, and was made up of the following ships; attack cargo USS Bootes (Lt.Cdr. H.P. Bacon, USNR), LST's USS LST-469 (Lt. L.E. Green, USNR), USS LST-181 (Lt. R.J. Wilson, USNR), USS LST-474 (Lt. R.W. Langworthy, USNR), USS LST-478 (Lt.(jg) J.C. McCormick, Jr., USNR), USS LST-481 (Lt. G. McGuire, USN), USS LST-482 (Lt. G.T. Wharton, USNR), destroyers USS Fletcher (T/Cdr. J.L. Foster, USN, with COMDESDIV 42, T/Capt. H.O. Larson, USN), USS Murray (T/Cdr. P.R. Anderson, USN) and the frigates USS Long Beach (Lt.Cdr. T.R. Midtlyng, USCG) and USS Glendale (Cdr. H.J. Doebler, USCG).
Task Group 77.5 was the Second Reinforcement Group and was made up of the following Units. Task Unit 77.5.1 was the Western Unit and was made up of the following ships; amphibious transports USS Zeilin (T/Cdr. T.B. Fitzpatrick, USN), USS Windsor (Capt. D.C. Goodward, USNR), LST's USS LST-168 (Lt. H. Twiford, USCG), USS LST-170 (Lt. T.N. Kelly, USCGR), USS LST-202 (?), USS LST-204 (?), USS LST-206 (Lt. C.O. Opperman, USCG), USS LST-269 (Lt. V.T. Finch, USNR), USS LST-447 (Lt. T. Peckelder, USNR), destroyers USS Sigsbee (T/Capt. B. van Meter Russell, USN), USS Dashiell (T/Cdr. E.A. Barham, USN) and the destroyer escorts USS Lovelace (Cdr. R.D. de Kay, Jr., USNR) and USS Manning (Lt.Cdr. J.I. Mingay, USNR). Task Unit 77.5.2 was the Central Unit and was made up of the following ships; LST's USS LST-395 (Lt. A.C. Forbes, USNR), USS LST-339 (Lt. J.J. Croft, USNR), USS LST-397 (Lt. W.R. Hitch, USNR), USS LST-460 (Lt.(jg) H.E. Robinson, USNR), USS LST-472 (Lt. W.O. Tally, USN) and the destroyers USS Ringgold (T/Lt.Cdr. W.B. Christie, USN) and USS Schroeder (T/Cdr. J.T. Bowers, Jr., USN). Task Unit 77.5.3 was the Reserve Unit and was made up of the following ships; amphibious transports USS Harry Lee (T/Cdr. J.G. Pomeroy, USN), USS Ormsby (Capt. L. Frisco, USNR) and amphibious cargo ship USS Centaurus (Capt. G.E. McCabe, USCG).
Cover for the landings was provided by ships from Task Forces 74, 75 and 78.
Task Force 74, under Rear-Admiral V.A.C. Crutchley, VC, DSC, RN, was made up of the heavy cruisers HMAS Australia (Capt. E.F.V. Dechaineux, DSC, RAN, flying the flag of Rear-Admiral V.A.C. Crutchley, VC, DSC, RN), HMAS Shropshire (Capt. J.A. Collins, CB, RAN) and the destroyers HMAS Arunta (Cdr. A.E. Buchanan, RAN), HMAS Warramunga (Cdr. N.A. Mackinnon, RAN), USS Ammen (T/Cdr. H. Williams, Jr., USN) and USS Mullany (T/Cdr. B.J. Mullaney, USN).
Task Force 75, under Rear-Admiral R.S. Berkey, USN, was made up of the light cruisers USS Phoenix (T/Capt. J.H. Duncan, USN, flying the flag of COMCRUDIV 15, Rear-Admiral R.S. Berkey, USN), USS Nashville (Capt. H.A. Spanagel, USN), USS Boise (Capt. J.S. Roberts, USNN) and the destroyers USS Hutchins (T/Cdr. C.B. Laning, USN, with COMDESRON 24, T/Capt. K.M. McManes, USN, on board), USS Bache (T/Lt.Cdr. R.C. Morton, USN), USS Beale (T/Capt. J.B. Cochran, USN), USS Daly (T/Cdr. R.G. Visser, USN), USS Abner Read (T/Cdr. T.B. Hutchins, 3rd, USN, with COMDESDIV 48, T/Capt. J.B. McLean, USN) and USS Bush (T/Cdr. T.A. Smith, USN).
Task Force 78, under Rear-Admiral R.E. Davison, USN, was the air cover force and was made up of the following Task Units; Task Unit 78.1.1 was made up of the escort carriers USS Sangamon (T/Capt. M.E. Browder, USN, with COMCARDIV 22, Rear-Admiral V.H Ragsdale, USN, on board), USS Suwanee (T/Capt. W.D. Johnson, USN), USS Chenango (T/Capt. D. Ketcham, USN) and USS Santee (T/Capt. H.F. Fick, USN). Task Unit 78.1.2 was their escort made up of the destroyers USS Morris (T/Cdr. G.L. Caswell, USNR, with COMDESRON 2, T/Capt. E.A. Solomons, USN, on board), USS Hughes (T/Cdr. E.B. Rittenhouse, USN), USS Mustin (T/Cdr. M.M. Riker, USN), USS Ellet (T/Cdr. E.C. Rider, USN), USS Lansdowne (T/Cdr. W.S. Maddox, USN, with COMDESDIV 24, T/Capt. J.L. Melgaard, USN, on board), USS Lardner (T/Cdr. J.D. Parker, USN) and USS Black (T/Cdr. E.R. King, Jr., USN). Task Unit 78.2.1 was made up of the escort carriers USS Manila Bay (T/Capt. B.L. Braun, USN, with COMCARDIV 24, Rear-Admiral R.E. Davison, USN, on board), USS Coral Sea (T/Capt. H.W. Taylor, Jr., USN), USS Corregidor (T/Capt. R.L. Bowman, USN) and USS Natoma Bay (T/Capt. H.L. Meadow, USN). Task Unit 78.2.2 was their escort made up of the destroyers USS Erben (T/Cdr. M. Slayton, USN, with COMDESRON 48, T/Capt. J.T. Bottom, Jr., USN), USS Walker (T/Cdr. H.E. Townsend, USN), USS Hale (T/Cdr. D.W. Wilson, USN), USS Abbot (T/Cdr. M.E. Dornin, USN), USS Bullard (T/Cdr. B.W. Freund, USN, with COMDESDIV 96, T/Capt. C.E. Carroll, USN), USS Kidd (T/Cdr. A.B. Roby, USN) and USS Chauncey (T/Cdr. L.C. Conwell, USN).
Chronology of the passage towards the operations area.
1000K/16, Echelon R-1, Group B, made up of USS LCI(L)-71, USS LCI(L)-72, USS LCI(L)-74, USS LCI(L)-340, USS LCI(L)-343, USS LCI(L)-344, USS LCI(L)-361, USS LCI(L)-362, USS LCI(L)-363, USS LCI(L)-364, USS LCI(L)-429, USS LCI(L)-430, USS LCI(L)-431, USS LCI(L)-447, USS LCI(L)-448, USS LCI(G)-31, USS SC-736, USS SC-738 departed Goodenough Island for the operations area via Seeadler Harbour. USS Gillespie and USS Kalk were to join off Cape Sudest.
0400K/17, Echelon R-1, Group C, made up of USS LST-479, USS LST-171, USS LST-220, USS LST-245, USS LST-468, USS LST-470 and USS LST-475 departed Goodenough Island for Cape Sudest where USS Ganymede and USS YMS 8 and USS YMS 10 were to join and subsequently proceed to the operations area.
1000K/17, Echelon R-1, Group E, made up of USS LCI(L)-28, USS LCI(L)-25, USS LCI(L)-26, USS LCI(L)-27, USS LCI(L)-29, USS LCI(L)-30, USS LCI(L)-224, USS LCI(L)-225, USS LCI(L)-226, USS LCI(L)-227, USS LCI(L)-228, USS LCI(L)-230, USS LCI(L)-337, USS LCI(L)-338, USS LCI(L)-342, USS LCI(L)-432, USS LCI(G)-34, USS LCI(G)-73 departed Cape Cretin for the operations area via Seeadler Harbour. They were escorted by USS Stockton, USS SC-637, USS SC-648, USS SC-703, USS SC-742, USS SC-743 and USS SC-981.
1000K/17, Echelon R-1, Group A, made up of USS Henry T. Allen, HMAS Manoona, HMAS Kanimbla, USS Carter Hall departed Goodenough Island for the operations area. They were escorted by USS Swanston and USS Hobby. USS Grayson was to join off Cape Sudest.
2100K/17, USS Ganymede and HMAS Reserve departed Cape Sudest to join Echelon R-1, Group C. They were escorted by USS Wilkes and USS Nicholson.
0001K/18, USS Grayson departed Cape Sudest to join Echelon R-1, Group A.
0700K/18, Echelon R-2, Western Attack Group, made up of USS Virgo, USS LST-18, USS LST-22, USS LST-26, USS LST-66, USS LST-67, USS LST-68, USS LST-227 departed Goodenough Island for the operations area. Their escort, USS Stevens, USS Harrison and USS Coronado were to join off Cape Sudest.
1200K/18, Echelon R-1, Group F, made up of USS Triangulum, USS LST-466, USS LST-118, USS LST-454, USS LST-457, USS LST-458, USS LST-463, USS LST-465, USS Sonoma, USS Hogan, USS Long, USS YMS-46, USS YMS-47, USS Stevenson, USS Taylor and USS Roe departed Cape Cretin for the operations area.
1300K/18, Echelon R-1, Group H, made up of USS Etamin, USS LST-452, USS LST-38, USS LST-122, USS LST-221, USS LST-241, USS LST-270, USS LST-456, USS Chetco, USS SC-637, USS SC-648, USS SC-742, USS SC-981, USS YMS-48, USS YMS-51, USS Perry, USS Hamilton, USS Nicholas and USS O'Bannon departed Cape Cretin for the operations area.
1400K/18, Echelon R-1, Group E, arrived at Seeadler Harbour from Cape Cretin.
1430K/18, Part of Task Force 75, USS Phoenix, USS Boise, USS Hutchins, USS Beale and USS Daly departed Cape Sudest for the operations area.
1500K/18, Echelon R-1, Group B, arrived at Seeadler Harbour from Goodenough Island.
1800K/18, Echelon R-1, Group D, made up of HMAS Australia, USS Gunston Hall, USS Humphreys, USS Brooks, USS Gilmer, USS Sands and USS Herbert departed Cape Cretin for the operations area. They were escorted by USS Reid, USS Welles and USS Radford.
1900K/18, Echelon R-1, Group G, made up of USS Epping Forest, USS Kilty, USS Talbot, USS Dent, USS Schley, USS Ward, USS Crosby, USS Dickerson, USS Kane, USS Noa departed Cape Cretin for the operations area. They were escorted by USS La Vallete and USS Hopewell.
2200K/18, USS Stevens, USS Harrison and USS Coronado departed Cape Sudest to join Echelon R-2, Western Attack Group at sea.
0700K/19, USS Jenkins departed Seeadler Harbour to escort the submarine USS Dace (T/Cdr. B.D. Claggett, USN) northwards and then join Echelon R-1, Group H on completion of this duty.
0700K/19, Echelon R-3, Western Attack Group, made up of USS Zeilin, USS Windsor, USS LST-168, USS LST-170, USS LST-202, USS LST-204, USS LST-206, USS LST-269, USS LST-447 departed Goodenough Island for the operations area. They are to be joined off Cape Sudest by USS Sigsbee, USS Dashiell, USS Lovelace and USS Manning.
1100K/19, USS Nashville, USS Abner Read and USS Bache departed Cape Cretin for Borgen Bay, New Britain where they arrived around 1715K/19. They departed from there for the operations area around 1950K/19. On board USS Nashville was General MacArthur and his staff.
1300K/19, Echelon R-2, Hollandia and Aitape Groups, made up of USS LST-459, USS LST-41, USS LST-276, USS LST-476, USS LST-479, USS LST-469, USS LST-181, USS LST-474, USS LST-478, USS LST-481, USS LST-482, USS Harry Lee, USS Ormsby, USS Centaurus and USS Bootes departed Cape Cretin for the operations area. They were escorted by USS McKee, USS John Rodgers, USS Fletcher, USS Murray, USS San Pedro, USS Long Beach and USS Glendale.
1730K/19, Task Force 74, made up of HMAS Australia, HMAS Shropshire, HMAS Arunta, HMAS Warramunga, USS Ammen and USS Mullany departed Seeadler Harbour to provide cover for the landing forces and bombardment duties in the operations area.
1800K/19, Echelons R-1 Group B and Group E (see above) departed Seeadler Harbour for the operations area.
2345K/19, USS Sigsbee, USS Dashiell, USS Lovelace and USS Manning departed Cape Sudest to join Echelon R-3, Western Attack Group at sea.
0700K/20, Groups A, B, C, D, E, F, G and H (of Echelon R-1) all made rendezvous to the north of the Admiralty Islands and then continued on towards the operations area.
1300K/20, Echelon R-3, Central Attack Unit, made up of USS LST-395, USS LST-339, USS LST-397, USS LST-460, USS LST-472, USS Schroeder and USS Ringgold departed Cape Cretin for the operations area.
1730K/21, The Eastern Attack Group parted company with the other two Attack Groups and proceeded towards Aitape without incident.
1800K/21, The Western Attack Group and Central Attack Group parted company with each other and proceeded without incident towards Tanahmerah Bay and Humboldt Bay respectively.
Chronology of the actual landing operations on 22 April 1944.
Western Area, Tanahmerah Bay.
0500K/22, The Western Attack Group arrived in the transport area according to schedule and commenced lowering of boats and disembarking troops.
0600K/22, The naval bombardment of the two 8" cruisers (HMAS Australia and HMAS Shropshire and six destroyers () commenced until 0645K/22. All ships stood well in to insure good observation. 600 rounds of 8" and 1500 rounds of 5" and 4.7" were fired without response. The air bombardment was cancelled owing to the absence of any indication of the presence of the enemy.
0700K/22, Landings at Red Beach 1 and 2 were made according to schedule. No opposition was encountered although small parties of Japanese were found in the hills behind Red Beach 2. Landings of troops and supplies continued on this day as scheduled and without enemy air or naval reaction.
Central Area, Humboldt Bay.
0500K/22, The Central Attack Group arrived in the transport area according to schedule and troops were disemraked rapidly and the landing craft stood toward the beach as scheduled.
0600K/22, The naval bombardment was conducted according to plan, three light cruisers (USS Phoenix, USS Nashville and USS Boise) and six destroyers ( USS Hutchins, USS Bache, USS Beale, USS Daly, USS Abner Read and USS Bush) delivered intense fire against the assigned targets until 0645K/22.
0645K/22, Naval aircraft delivered effective bombardment and conducted strafing missions on Beaches White 1 and 2.
0700K/22, Assault waves hit the beaches and quickly secured both sides of the entrance to Jautifa Bay. The landing came as a complete surprise and the Japanese abandoned their beach defences, rifle pits and weapons at the commencement of the naval bombardment. Sporadic resistance was encountered later in the day but the assault force secured the heights overlooking Challenger Cove, the tracks between Hollandia and Pim, Leimok Hill and Pim itself by nightfall. Unloading of LST's and transports progressed favourably despite the congested beach area. No enemy reaction was made to the Allied operations.
Eastern Area, Aitape.
0100K/22, The high speed minesweepers proceeded ahead of the Eastern Attack Group to sweep the transport area. The YMS minesweepers were slow in leaving formation and due to rain squalls, did not arrive in the transport area in sufficient time to complete sweeping operations before the arrival of the transport group. The DMS's were able to make one sweep before the transports arrived in the area.
0500K/22, The Attack Group arrived in the transport area as scheduled and the transports commenced lowering their boats and disembarking troops. As soon as loaded, the landing craft from the high speed transports formed on the SC's which were used as control vessels, and proceeded towards the beach.
0600K/22, The naval bombardment commenced and continued until 0630K/22, at which time the naval air delivered a bombardment on previously assigned targets, followed by a strafing attack on the beach until 0640K/22.
0645K/22, Two SC's, fitted with rockets and stationed on either flank on the landing craft approaching the beach, delivered their fire as the landing craft approached the beach and landed. Due to the difficulty in identifying the proper beach, the landing was made about 800 yards to the eastward of Blue Beach 1 at a small village called Wapil. The landing was made without oppostiion and only slight opposition developed later. It is believed that the landing was a complete surprise as breakfast was found on the stoves cooking and in several huts clothes were left by the bunks were Japanese left hurriedly. No enemy air or naval reaction was encountered in the initial landings.
Further movements on 22 April 1944.
0900K/22, USS Schley, USS Ward, USS Kane and USS Noa departed Aitape to effect rendezvous with Echelon R-2 and join as escorts.
0900K/22, Return Group I, USS Carter Hall, USS Gunston Hall, USS Humphreys, USS Brooks, USS Gilmer, USS Sands and USS Herbert departed the operations area for Cape Cretin.
0900K/22, Return Group M, USS Epping Forest, USS Kilty, USS Talbot, USS Dent, USS Crosby and USS Dickerson departed Aitape for Cape Sudest. (USS Epping Forest was to part company at Cape Cretin).
0930K/22, Return Group J, made up of 15 LCI's from Red Beaches and 16 LCI's from White Beaches made rendezvous and set course to proceed to Cape Cretin.
1600K/22, Return Group K, USS Henry T. Allen, HMAS Kanimbla, HMAS Manoora, HMAS Westralia having completed unloading at Tanahmerah Bay and Humboldt Bay departed for Cape Sudest escorted by USS Nicholson, USS Gillespie, USS Welles, USS Hogan and USS Long.
1800K/22, Task Forces 74 and 75 were released from their close support mission and reported to the Commander 7th Fleet. Task Force 74 joined Task Unit 78.2 the following morning while Task Force 75 left the operations area.
1900K/22, Return Group N, made up of 7 LST's and 2 SC's departed Aitape for Cape Cretin escorted by USS O'Bannon, USS Hopewell, USS Stembel, USS Hamilton and USS Perry.
2000K/22, Return Group L, made up of 6 LST's from Red Beach and 6 LST's from White Beach, and USS Sonoma departed the operations area for Cape Cretin. The LST's from Red Beach were to continue to Cape Sudest. They were escorted by USS Kalk, USS Hobby, USS Radford, USS Stevenson and USS Stockton.
23 April 1944.
All land forces continued consolidation of their respective areas encountering only slight enemy opposition. Allied casualties were slight.
0430K/23, The Commander Eastern Attack Group rendezvoused with the Reserve Group transporting elements of the Aitape Landing Force scheduled to land on Tumleo and Seleo Island and also Korako. The landings on these two islands were made according to schedule. The landing craft from 4 APD's were sent to USS Ormsby for the troops that were to land in the assault waves, eight LCP's going to each island. No opposition was encountered on landing and only slight opposition develiped at Seleo. Several Japanese were killed and a few natives were captured. No Allied casualties were suffered.
0700K/23, Echelon R-2 arrived in the Aitape-Humboldt Bay-Tanahmerah Bay area as scheduled and commenced unloading.
1500K/23, USS Phoenix, USS Boise, USS Hutchins, USS Beale and USS Daly arrived at Seeadler Harbour from the operations area.
1900K/23, Return Group O, made up of 7 LST's from Tanahmerah Bay and 6 LST's from Humboldt Bay had completed unloading and departed for Cape Cretin escorted by USS Stevens, USS Harrison, USS Taylor, USS San Pedro and USS Coronado.
1930K/23, Return Group P, made up of USS Harry Lee, USS Ormsby and USS Centaurus departed Aitape for Cape Cretin. They were escorted by USS Fletcher, USS Jenkins, USS Long Beach and USS Glendale. USS Jenkins later sank an enemy barge to the east of Hollandia, killing nine Japanese.
1940K/23, a single enemy aircraft attacked White Beach 1 at Humboldt Bay. A fire was started in the dump area. The result was that LST's were unable to beach at this point due to the lage fire which lasted for several day amongst our supplies.
24 April 1944.
Hollandia village was captured and patrols were now working towards the enemy airfields. Aitape village was also captured as was Tumleo Island.
0700K/24, Echelon R-3, Western and Central Units arrived at Humboldt Bay and commenced unloading which was completed around 1930K/24 and the Echelon, joined by USS Virgo, USS Ganymede, USS YMS-8 and USS YMS-10, then left for Cape Cretin escorted by USS Grayson, USS John Rodgers, USS Taylor and USS McKee.
2045K/24, USS Schroeder, on patrol 20 nautical miles north of Humboldt Bay was attacked by twelve enemy torpedo aircraft but she sustained no damage.
[Operations continued in the Hollandia area but will be dealth with on individual ships pages from the 25th.]
Operations in the area continued but will not be further listed here.
23 Apr 1944
Around 0730K/23, Task Force 74, made up of heavy cruisers HMAS Australia (Capt. E.F.V. Dechaineux, DSC, RAN, flying the flag of Rear-Admiral V.A.C. Crutchley, VC, DSC, RN), HMAS Shropshire (Capt. J.A. Collins, CB, RAN) and the destroyers HMAS Arunta (Cdr. A.E. Buchanan, RAN), HMAS Warramunga (Cdr. N.A. Mackinnon, RAN), USS Ammen (T/Cdr. H. Williams, Jr., USN) and USS Mullany (T/Cdr. B.J. Mullaney, USN) made rendezvous with Task Group 78.2 made up of the escort carriers USS Manila Bay (T/Capt. B.L. Braun, USN, with COMCARDIV 24, Rear-Admiral R.E. Davison, USN, on board), USS Coral Sea (T/Capt. H.W. Taylor, Jr., USN), USS Corregidor (T/Capt. R.L. Bowman, USN) and USS Natoma Bay (T/Capt. H.L. Meadow, USN) and the destroyers USS Erben (T/Cdr. M. Slayton, USN, with COMDESRON 48, T/Capt. J.T. Bottom, Jr., USN), USS Walker (T/Cdr. H.E. Townsend, USN), USS Hale (T/Cdr. D.W. Wilson, USN), USS Abbot (T/Cdr. M.E. Dornin, USN), USS Bullard (T/Cdr. B.W. Freund, USN, with COMDESDIV 96, T/Capt. C.E. Carroll, USN), USS Kidd (T/Cdr. A.B. Roby, USN) and USS Chauncey (T/Cdr. L.C. Conwell, USN).
They remained in company until they all arrived at Seeadler Harbour in the morning of the 28th.
On the 24th the destroyers were fuelled by the bigger ships; HMAS Australia fuelled HMAS Warramunga and HMS Arunta, USS Corregidor fuelled USS Ammen and USS Mullany. USS Natoma Bay fuelled USS Hale , USS Abbot and USS Chauncey, USS Manila Bay fuelled USS Walker and USS Erben, USS Coral Sea fuelled USS Bullard and USS Kidd. (69)
29 Apr 1944
Between 0600K/29 and 0700K/29, Task Group 78.2 made up of the escort carriers USS Manila Bay (T/Capt. B.L. Braun, USN, with COMCARDIV 24, Rear-Admiral R.E. Davison, USN, on board), USS Coral Sea (T/Capt. H.W. Taylor, Jr., USN) and USS Corregidor (T/Capt. R.L. Bowman, USN) and the destroyers USS Erben (T/Cdr. M. Slayton, USN, with COMDESRON 48, T/Capt. J.T. Bottom, Jr., USN), USS Walker (T/Cdr. H.E. Townsend, USN), USS Hale (T/Cdr. D.W. Wilson, USN), USS Abbot (T/Cdr. M.E. Dornin, USN), USS Bullard (T/Cdr. B.W. Freund, USN, with COMDESDIV 96, T/Capt. C.E. Carroll, USN), USS Kidd (T/Cdr. A.B. Roby, USN) and USS Chauncey (T/Cdr. L.C. Conwell, USN) and Task Force 74, made up of heavy cruisers HMAS Australia (Capt. E.F.V. Dechaineux, DSC, RAN, flying the flag of Rear-Admiral V.A.C. Crutchley, VC, DSC, RN), HMAS Shropshire (Capt. J.A. Collins, CB, RAN) and the destroyers HMAS Arunta (Cdr. A.E. Buchanan, RAN), HMAS Warramunga (Cdr. N.A. Mackinnon, RAN), USS Ammen (T/Cdr. H. Williams, Jr., USN) and USS Mullany (T/Cdr. B.J. Mullaney, USN) departed Seeadler Bay for the operations area to the north of Hollandia.
Around 1430K/2, USS Bullard, USS Kidd and USS Chauncey were detached to join Task Group 78.1 and Task Force 75 (these were the other carrier / cruiser Cover Group).
Around 1800K/2, Task Group 78.2 was joined by the destroyers USS Lansdowne (T/Cdr. W.S. Maddox, USN, with COMDESDIV 24, T/Capt. J.L. Melgaard, USN, on board), USS Lardner (T/Cdr. J.D. Parker, USN) and USS Ellet (T/Cdr. E.C. Rider, USN) which in turn had parted company with Task Group 78.1.
At 2000K/2, Task Group 78.2 and Task Force 74 set course to return to Seeadler Harbour where they arrived around 0700K/4. (71)
10 May 1944
During the forenoon, HMAS Shropshire (Capt. H.A. Showers, RAN), HMAS Arunta (Cdr. A.E. Buchanan, RAN) and HMAS Warramunga (Cdr. N.A. Mackinnon, RAN) conducted AA gunnery exercises off Seeadler Harbour.
In the afternoon HMAS Australia (Capt. E.F.V. Dechaineux, DSC, RAN, flying the flag of Rear-Admiral V.A.C. Crutchley, VC, DSC, RN), USS Ammen (T/Cdr. H. Williams, Jr., USN) and USS Mullany (T/Cdr. B.J. Mullaney, USN) also conducted AA exercises off Seeadler Harbour. (72)
13 May 1944
HMAS Australia (Capt. E.F.V. Dechaineux, DSC, RAN, flying the flag of Rear-Admiral V.A.C. Crutchley, VC, DSC, RN), HMAS Shropshire (Capt. H.A. Showers, RAN), HMAS Arunta (Cdr. A.E. Buchanan, RAN), HMAS Warramunga (Cdr. N.A. Mackinnon, RAN), USS Ammen (T/Cdr. J.H. Brown, USN) and USS Mullany (T/Cdr. B.J. Mullaney, USN) conducted exercises off Seeadler Harbour. During the exercises a crewmember of USS Mullany was killed by a shell splinter. (72)
17 May 1944
Operation Straightline.
This operation was an amphibious landing Arara, northern New Guinea and also on Wadke Island.
Forces involved. Task Group 77.2 was the Attack Group under T/Rear-Admiral A.G. Noble, USN. Task Unit 77.2.1 was made up of the flagship was the destroyer USS Reid (T/Cdr. S.A. McCornock, USN, flying the flag of T/Rear-Admiral A.G. Noble, USN). A second destroyer was also part of this Task Unit as relief flagship, this was the USS Wilkes (T/Cdr. F. Wolsieffer, USN). Task Unit 77.2.2 was made up of the amphibious transports USS Henry T. Allen (T/Capt. H.B. Brumbaugh, USN) and HMAS Manoora (Cdr. A.P. Cousin, RANR(S)). Task Unit 77.2.3 was the LCI Group under T/Cdr. H.F. McGee, USN, and was made up of USS LCI(L)-28 (Lt.(jg) N. Molyneaux, USNR, with T/Cdr. H.F. McGee, USN on board), USS LCI(L)-25 (Lt.(jg) W.R. Maliek, USNR), USS LCI(L)-26 (Lt. H.J. Adams, Jr., USNR), USS LCI(L)-27 (Lt.(jg) H.G. Hibbard, USNR), USS LCI(L)-29 (Lt. T.R. Hopkins, USNR), USS LCI(L)-30 (Lt. C.B. Faunce, Jr., USNR), USS LCI(L)-71 (?, with Lt.Cdr. J.P. Hurndall, USNR on board), USS LCI(L)-72 (Lt.(jg) S.Z. Kepner, USNR), USS LCI(L)-74 (Lt.(jg) R.J. Liechti, USNR), USS LCI(L)-224 (Lt.(jg) P.O. Olafsson, USNR), USS LCI(L)-338 (Lt.(jg) C.M. Goodman, Jr., USNR), USS LCI(L)-340 (Lt.(jg) H.F. Eckenrode, USNR) and USS LCI(L)-342 (Lt.(jg) R.A. Smith, USNR). Task Unit 77.2.4 was the LST Group under T/Capt. R.M. Scruggs, USN, and was made up of USS LST-466 (Lt. R.E. McCarthy, USNR, with COMLSTFLOT 7, T/Capt. R.M. Scruggs, USN on board), USS LST-170 (Lt. T.N. Kelly, USCGR), USS LST-181 (Lt. R.J. Wilson, USNR, with Lt.Cdr. A. Schlott, USNR on board), USS LST-202 (?), USS LST-245 (Lt. M.J. McCabe, USNR), USS LST-456 (Lt. G.W. Prue, USN), USS LST-457 (Lt. W.P. Sullivan, USNR) and USS LST-458 (Lt. F.W. Hinrichs, USNR). Task Unit 77.2.5 was Fire Support Group A under Rear-Admiral V.A.C. Crutchley, VC, DSC, RN, and was made up from ships of Task Force 74, the heavy cruisers HMAS Australia (Capt. E.F.V. Dechaineux, DSC, RAN, flying the flag of Rear-Admiral V.A.C. Crutchley, VC, DSC, RN), HMAS Shropshire (Capt. H.A. Showers, RAN) and the destroyers HMAS Arunta (Cdr. A.E. Buchanan, RAN), HMAS Warramunga (Cdr. N.A. Mackinnon, RAN), USS Ammen (T/Cdr. J.H. Brown, USN) and USS Mullany (T/Cdr. B.J. Mullaney, USN). Task Unit 77.2.6 was Fire Support Group B under Rear-Admiral R.S. Berkey, USN, and was made up from ships of Task Force 75, the light cruisers USS Phoenix (T/Capt. J.H. Duncan, USN, flying the flag of COMCRUDIV 15, Rear-Admiral R.S. Berkey, USN), USS Nashville (T/Capt. C.E. Coney, USN), USS Boise (Capt. J.S. Roberts, USN) and the destroyers USS Hutchins (T/Cdr. C.B. Laning, USN, with COMDESRON 24, T/Capt. K.M. McManes, USN, on board), USS Bache (T/Cdr. R.C. Morton, USN), USS Beale (T/Capt. J.B. Cochran, USN), USS Daly (T/Cdr. R.G. Visser, USN), USS Abner Read (T/Cdr. T.B. Hutchins, 3rd, USN, with COMDESDIV 48, T/Capt. J.B. McLean, USN) and USS Trathen (T/Cdr. J.R. Millett, USN). This force was further divided into three Fire Support Units. 77.2.61 was made up of USS Phoenix, USS Boise, USS Daly and USS Bache. 77.2.62 was made up of USS Hutchins and USS Beale. 77.2.62 was made up of USS Nashville, USS Abner Read and USS Trathen. Task Unit 77.2.7 was Fire Support Group C under T/Capt. R.F. Stout, USN, and was made up of the destroyers USS Stevenson (T/Cdr. F.E. Wilson, USN, with COMDESRON 19, T/Capt. R.F. Stout, USN on board), USS Gillespie (T/Cdr. J.S. Fahy, USN), USS Hobby (T/Cdr. G.W. Pressey, USN, with T/Capt. COMDESDIV 38, W.S. Veeder, USN on board), USS Kalk (T/Cdr. H.D. Fuller, USN), USS Stockton (T/Cdr. W.W. Stark, Jr., USN), USS Grayson (T/Cdr. W.V. Pratt, 2nd, USN), USS Wilkes, USS Nicholson (T/Cdr. W.W. Vanous, USN), USS Russell (T/Cdr. L.R. Miller, USN), USS Roe (T/Cdr. F.S. Stich, USN). This force was further divided into four Fire Support Units. 77.2.71 was made up of USS Hobby and USS Kalk. 77.2.72 was made up of USS Gillespie and USS Stockton. 77.2.73 was made up of USS Stevenson and USS Russell. 77.2.74 was made up of USS Wilkes, USS Nicholson, USS Roe and USS Grayson. Task Unit 77.2.8 was the Beachmaster Unit. Task Unit 77.2.9 was the Special Service Group. This force was further divided into three Units. 77.2.91 was the Control Unit and was made up of the patrol vessels USS SC-703 (Lt.(jg) R.M. Baird, USNR), USS SC-699 (Lt.(jg) J.W. Foristel, USNR), USS SC-734 (Lt. R.B. MacLean, USNR) and USS SC-736 (Lt.(jg) F.A. Marsteller, USNR). 77.2.92 was the Rocket Unit and was made up of LCI(R)'s, USS LCI(R)-31 (Lt.(jg) T.J. Morrissey, USNR), USS LCI(R)-34 (Lt.(jg) J.F. Keefe, USNR) and USS LCI(R)-73 (Lt.(jg) N.M. Taylor, USNR). 77.2.93 was the Minesweeping and Salvage Unit and was made up of the munesweepers USS YMS-8 (Lt. F.L. Comley, USNR), USS YMS-46 (Lt.(jg) H.J. Topping, USNR), USS YMS-47 (Lt.(jg) A.W. Busbee, USNR), USS YMS-51 (Lt. F.P. Allen, Jr., USNR) and the tug USS Sonoma (Lt.(jg). G.I. Nelson, USN).
Chronology of the passage towards the operations area.
1500K/15, Task Force 74 (Task Unit 77.2.5) and Task Force 75 (Task Unit 77.2.6) departed Seeadler Harbour for the operations area.
1900K/16, Echelon S-1, Section 1, which was made up of USS LCI(L)-28, USS LCI(L)-25, USS LCI(L)-26, USS LCI(L)-26, USS LCI(L)-29, USS LCI(L)-30, USS LCI(L)-71, USS LCI(L)-72, USS LCI(L)-74, USS LCI(L)-224, USS LCI(L)-338, USS LCI(L)-340 and USS LCI(L)-342, Echelon S-1, Section 2, which was made up of USS Henry T. Allen and HMAS Manoora and Echelon S-3, which was made up of USS LCI(R)-31, USS LCI(R)-34, USS LCI(R)-73, USS SC-699, USS SC-703, USS SC-734 and USS SC-736 departed Hollandia for the operations area. They were escorted by the destroyers USS Reid, USS Russell, USS Gillespie, USS Hobby, USS Kalk, USS Stockton and the destroyer escorts USS James E. Craig (Lt.Cdr. E.F. Andrews, USNR, with COMCORTDIV 37, T/Cdr. M.W. Firth, USN, on board), USS Manning (Lt.Cdr. J.I. Mingay, USNR) and USS Eichenberger (T/Lt.Cdr. N. Harrell, USN).
1900K/16, Echelon S-2, which was made up of USS LST-466, USS LST-170, USS LST-181, USS LST-202, USS LST-245, USS LST-456, USS LST-457, USS LST-458 and USS Sonoma departed Tanahmerah Bay for the operations area. They were escorted by the destroyers USS Stevenson, USS Grayson, USS Wilkes, USS Nicholson and USS Roe.
All echelons arrived in the operations area around 0515K/17.
Chronology of the actual landing operations near Arara on 17 April 1944.
0600K/17, The naval bombardment was commenced by the ships of Task Forces 74 and 75. These also bombarded Wadke Island. Several fires were started ashore by the bombardment and off Wadke several Japanese barges were sunk. No enemy reaction followed on the bombardment.
On completion of the bombardments, around 0700K/17, the troops from the two amphibious transports went in and landed according to plan. They were followed by waves of troops from the LCI(L)'s.
Already at 0630K/17, having launched their boats, USS Henry T. Allen and HMAS Manoora departed the area escorted by USS James E. Craig, USS Manning and USS Eichenberger.
0835K/17, The first LST was beached. By now all LCI(L)'s had completed unloading and commenced to return to Hollandia where they arrived around 2200K/17.
1143K/17, troops were landed on Insoemanai Island (off Wadke) without enemy opposition.
1200K/17, Task Force 75 was released from the operation. They arrived at Humboldt Bay around 1745K/17.
2200K/17, Three of the LST's of Echelon S-2 had completed unloading and departed for Hollandia escorted by USS Stevenson, USS Stockton and USS Russell.
0130K/18, The remaining five LST's of Echelon S-2 had completed unloading and departed for Hollandia escorted by USS Kalk, USS Hobby and USS Gillespie.
Chronology of the landing operations on Wadke Island on 18 May 1944.
1700K/17, Echelon S-4, made up of the LST's USS LST-18 (Lt. C.W. Radke, USCG), USS LST-67 (?), USS LST-206 (Lt. C.O. Opperman, USCG) and USS LST-465 (Lt.Cdr. R.T. Murphy, USNR) departed Humboldt Bay for Wadke. They were escorted by the destroyers USS Morris (T/Cdr. G.L. Caswell, USNR, with COMDESRON 2, T/Capt. E.A. Solomons, USN, on board), USS Hughes (T/Cdr. E.B. Rittenhouse, USN), USS Mustin (T/Cdr. M.M. Riker, USN) and the destroyer escorts USS Lovelace (Cdr. R.D. de Kay, Jr., USNR), USS Neuendorf (T/Cdr. J.N. McDonald, Jr., USN) and USS Whitehurst (T/Lt.Cdr. J.R. Gray, USN).
0900K/18, Echelon S-4 arrived off Wadke, and troops were then landed on Wadke covered by gunfire from the LCI(R)'s and USS Wilkes and USS Roe. USS LCI(R)-31 and USS LCI(R)-34 were both damaged by enemy fire and sustained 1 dead and 5 wounded and 1 dead and 3 wounded respectively. On the island the troops encountered stiff Japanese resistance. Early in the afternoon Allied troops had captured the air strip but enemy resistance remained strong.
[Later, follow up echelons proceeded to the Arara / Wadke area but these will be dealt with seperately.]
18 May 1944
HMAS Australia (Capt. E.F.V. Dechaineux, DSC, RAN, flying the flag of Rear-Admiral V.A.C. Crutchley, VC, DSC, RN), HMAS Shropshire (Capt. H.A. Showers, RAN), HMAS Arunta (Cdr. A.E. Buchanan, RAN), HMAS Warramunga (Cdr. N.A. Mackinnon, RAN), USS Ammen (T/Cdr. J.H. Brown, USN) and USS Mullany (T/Cdr. B.J. Mullaney, USN) were patrolling to the north-east of Wadke Island to provide cover for the ongoing amphibious operations in the Arare / Wadke area.
Late in the morning / early in the afternoon, HMAS Arunta and HMAS Warramunga were topped off by HMAS Shropshire and HMAS Australia respectively.
During the night of 20/21 May 1944, Task Force 74 patrolled near Liki Island to guard the Wadke area from attack from Japanese warships reported to be in the Halmahera area but no enemy was encountered.
Around 0700K/21, Task Force 74 was relieved on patrol by Task Force 75. Task Force 74 then set course for Hollandia arrived there around 1230K/21. (72)
12 Jul 1944
Around 1000K/12, Task Force 74, made up of HMAS Australia (Capt. E.F.V. Dechaineux, DSC, RAN, flying the flag of Commodore J.A. Collins, CB, RAN), HMAS Shropshire (Capt. H.A. Showers, RAN), HMAS Arunta (Cdr. A.E. Buchanan, RAN), HMAS Warramunga (Cdr. N.A. Mackinnon, RAN), USS Ammen (T/Cdr. J.H. Brown, USN) and USS Bache (T/Cdr. R.C. Morton, USN) departed Seeadler Harbour for Aitape. (73)
13 Jul 1944
Around 0700K/13, Task Force 74, made up of HMAS Australia (Capt. E.F.V. Dechaineux, DSC, RAN, flying the flag of Commodore J.A. Collins, CB, RAN), HMAS Shropshire (Capt. H.A. Showers, RAN), HMAS Arunta (Cdr. A.E. Buchanan, RAN), HMAS Warramunga (Cdr. N.A. Mackinnon, RAN), USS Ammen (T/Cdr. J.H. Brown, USN) and USS Bache (T/Cdr. R.C. Morton, USN) arrived at Aitape from Seeadler Harbour. (73)
14 Jul 1944
Between 0500K/14 and 0630K/14, Task Force 74, made up of the heavy cruisers HMAS Australia (Capt. E.F.V. Dechaineux, DSC, RAN, flying the flag of Commodore J.A. Collins, CB, RAN), HMAS Shropshire (Capt. H.A. Showers, RAN) and the destroyers HMAS Arunta (Cdr. A.E. Buchanan, RAN), HMAS Warramunga (Cdr. N.A. Mackinnon, RAN), USS Ammen (T/Cdr. J.H. Brown, USN) and USS Bache (T/Cdr. R.C. Morton, USN) departed Aitape for bombardment duties.
From 0800K/14, bombardments commenced. HMAS Australia and HMAS Warramunga bombarded targets near Yakamul. HMAS Arunta bombarded targets near Marubian. USS Bache bombarded targets near Matupu. HMAS Shropshire and USS Ammen bombarded targets near Sowam.
Air spotting had been available for all ships and in all cases all areas were reported to have been very well covered.
On completion of the bombardments HMAS Australia and HMAS Warramunga remained in the area on standy for the Army if required for bombardment duties. The other ships returned to Aitape.
During the afternoon HMAS Australia answered a call from the Army and opened fire on an enemy troop concentration near Charov. Spotting was difficult and after 20 rounds of 8" HMAS Australia ceased fire.
HMAS Australia and HMAS Warramunga returned to Aitape before dark.
Ammunition expenditure was as follows; HMAS Australia, 100 rounds of 8". HMAS Shropshire, 66 rounds of 8". HMAS Arunta, 201 rounds of 4.7". HMAS Warramunga, 201 rounds of 4.7". HMAS Ammen, 173 rounds of 5". HMAS Bache, 225 rounds of 5". (73)
17 Jul 1944
Around 1135K/17, HMAS Shropshire (Capt. H.A. Showers, RAN) and USS Bache (T/Cdr. R.C. Morton, USN) departed Aitape to bombard an enemy headquarters and troop concentrations near Niap.
Around 1200K/17, HMAS Australia (Capt. E.F.V. Dechaineux, DSC, RAN, flying the flag of Commodore J.A. Collins, CB, RAN) and HMAS Warramunga (Cdr. N.A. Mackinnon, RAN) departed Aitape to bombard enemy troop concentrations near Marubian.
HMAS Shropshire opened fire on her target at 1421K/17 and ceased fire at 1427K/17. She had been assisted by an aircraft for spotting duties. HMAS Shropshire and USS Bache returned to Aitape around 1700K/17.
HMAS Australia also destroyed her target around the same time and then returned to Aitape with HMAS Warramunga. (74)
20 Jul 1944
Around 0630K/20, HMAS Australia (Capt. E.F.V. Dechaineux, DSC, RAN, flying the flag of Commodore J.A. Collins, CB, RAN) and HMAS Shropshire (Capt. H.A. Showers, RAN) departed Aitape to bombard enemy targets in the Yakamul area. They were joined by HMAS Arunta (Cdr. A.E. Buchanan, RAN) and HMAS Warramunga (Cdr. N.A. Mackinnon, RAN) which had already been at sea.
Around 0800K/20, HMAS Australia and HMAS Shropshire opened fire on their assigned targets. HMAS Australia expended 120 round of 8" while HMAS Shropshire expended 92 rounds of 8".
On completion of the bombardment they returned to Aitape. (73)
22 Jul 1944
At Aitape, Commodore J.A. Collins, CB, RAN, transferred his flag from HMAS Australia (Capt. E.F.V. Dechaineux, DSC, RAN) to HMAS Shropshire (Capt. H.A. Showers, RAN).
Around 1300K/22, HMAS Australia and HMAS Warramunga (Cdr. N.A. Mackinnon, RAN) departed Aitape for Sydney where they were to refit. (73)
3 Sep 1944
At Seeadler Harbour, Commodore J.A. Collins, CB, RAN, transferred his flag from HMAS Shropshire (Capt. H.A. Showers, RAN) to HMAS Australia (Capt. E.F.V. Dechaineux, DSC, RAN). (75)
10 Sep 1944
Around 0630I/10, Task Force 74, made up of the heavy cruisers HMAS Australia (Capt. E.F.V. Dechaineux, DSC, RAN, flying the flag of Commodore J.A. Collins, CB, RAN), HMAS Shropshire (Capt. H.A. Showers, RAN) and the destroyers HMAS Arunta (Cdr. A.E. Buchanan, RAN) and HMAS Warramunga (Cdr. N.A. Mackinnon, RAN) as well as Task Force 75 made up of the light cruisers USS Phoenix (T/Capt. J.H. Duncan, USN, flying the flag of COMCRUDIV 15, Rear-Admiral R.S. Berkey, USN), USS Nashville (T/Capt. C.E. Coney, USN), USS Boise (Capt. J.S. Roberts, USN) and the destroyers USS Hutchins (T/Cdr. C.B. Laning, USN, with COMDESRON 24, T/Capt. K.M. McManes, USN, on board), USS Bache (T/Cdr. R.C. Morton, USN), USS Beale (T/Cdr. D.M. Coffee, USN), USS Daly (T/Cdr. R.G. Visser, USN), USS Abner Read (T/Cdr. T.B. Hutchins, 3rd, USN, with COMDESDIV 48, T/Capt. J.B. McLean, USN), USS Ammen (T/Cdr. J.H. Brown, USN), USS Mullany (T/Cdr. B.J. Mullaney, USN) and USS Bush (T/Cdr. R.E. Westholm, USN) departed Seeadler Harbour, Manus for Humboldt Bay where they arrived around 0700I/11. (76)
15 Sep 1944
Operation Tradewind.
This operation was an amphibious landing on Morotai.
Forces involved.
Task Force 77. The force flagship was the Amphibious Force Command Ship USS Wasatch (T/Capt. A.M. Granum, USN, flying the flag of T/Rear-Admiral D.E. Barbey, USN. Reserve flagship was the destroyer USS Russell (T/Lt.Cdr. J.E. Wicks, Jr., USN).
Task Group 77.1 was the Escort Carrier Group under T/R.Adm. T.L. Sprague, USN. It was made up of the following Task Units. Task Unit 77.1.1 was made up of the escort carriers USS Sangamon (T/Capt. M.E. Browder, USN, flying the flag of COMCARDIV 22, T/R.Adm. T.L. Sprague, USN), USS Suwanee (T/Capt. W.D. Johnson, USN), USS Chenango (T/Capt. G. van Deurs, USN) and USS Santee (T/Capt. R.E. Blick, USN). Task Unit 77.1.2 was made up of the escort carriers USS Fanshaw Bay (T/Capt. D.P. Johnson, USNflying the flag of, COMCARDIV 25, T/R.Adm. C.A.F. Sprague, USN) and USS Midway / St. Lo (T/Capt. F.J. McKenna, USN). Task Unit 77.1.3 was made up of the destroyer escorts USS Edmonds (T/Cdr. C.S. Barker, Jr., USN, with COMCORTDIV 63, T/Cdr. J.V. Bewick, USN, on board), USS Richard S. Bull (T/Lt.Cdr. A.W. Gardes, Jr., USN), USS Richard M. Rowell (T/Cdr. H.A. Barnard, Jr., USN), USS Eversole (T/Lt.Cdr. G.E. Marix, USN), USS Dennis (Lt.Cdr. S. Hansen, USNR), USS Shelton (Lt.Cdr. L.G. Salomon, USNR), USS John C. Butler (T/Lt.Cdr. J.E. Pace, USN) and USS Raymond (Lt.Cdr. A.F. Beyer, Jr., USNR).
Task Force 77.2 was the Cover and Bombardment Force under T/Rear-Admiral R.S. Berkey, USN. It was made up of the following Task Units. Task Unit 77.2.1 was made up of the light cruisers USS Phoenix (T/Capt. J.H. Duncan, USN, flying the flag of COMCRUDIV 15, Rear-Admiral R.S. Berkey, USN), USS Boise (Capt. J.S. Roberts, USN) and the destroyers USS Hutchins (T/Cdr. C.B. Laning, USN, with COMDESRON 24, T/Capt. K.M. McManes, USN, on board), USS Bache (T/Cdr. R.C. Morton, USN), USS Beale (T/Cdr. D.M. Coffee, USN) and USS Daly (T/Cdr. R.G. Visser, USN). Task Unit 77.2.2 was made up of the heavy cruisers HMAS Australia (Capt. E.F.V. Dechaineux, DSC, RAN, flying the flag of Commodore J.A. Collins, CB, RAN), HMAS Shropshire (Capt. H.A. Showers, RAN) and the destroyers HMAS Arunta (Cdr. A.E. Buchanan, RAN) and HMAS Warramunga (Cdr. N.A. Mackinnon, RAN), USS Ammen (T/Cdr. J.H. Brown, USN) and USS Mullany (T/Cdr. B.J. Mullaney, USN). Task Unit 77.2.3 was made up of the light cruiser USS Nashville (T/Capt. C.E. Coney, USN) and the destroyers USS Abner Read (T/Cdr. T.B. Hutchins, 3rd, USN, with COMDESDIV 48, T/Capt. J.B. McLean, USN) and USS Bush (T/Cdr. R.E. Westholm, USN).
Task Force 77.3 was the Attack Force. Task Group 77.3.1 was the Attack Force for White Beach under T/Rear-Admiral D.E. Barbey, USN, with USS Wasatch as flagship and was made up of the following Task Units. Task Group 77.3.11 was made up of the destroyers USS Morris (T/Cdr. G.L. Caswell, USNR, with COMDESRON 2, T/Capt. E.A. Solomons, USN, on board), USS Mustin ( T/Lt.Cdr. J.G. Hughes, USN), USS Russell, USS John Rodgers (T/Cdr. J.G. Franklin, USN) and USS McKee (T/Cdr. R.B. Allen, USN). Task Group 77.3.12 was made up of the amphibious transport HMAS Kanimbla (Cdr. A.V. Bunyan, RANR(S)). Task Group 77.3.13 was made up of the high speed transports USS Ward (Lt.Cdr. F.W. Lemly, USNR), USS Schley (Lt.Cdr. E.T. Farley, USNR), USS Kilty (Lt. L.G. Benson, USNR), USS Crosby (Lt.Cdr. W.E. Sims, USNR) and USS Herbert (T/Cdr. J.N. Ferguson, Jr., USN). Task Group 77.3.14 was made up of the LCI(L)'s, USS LCI(L)-28 (Lt.(jg) W.T. Witt, USNR, with COMLCIFLOT 7, T/Cdr. H.F. McGee, USN, on board), USS LCI(L)-25 (Lt.(jg) G.W. Connelly, USNR), USS LCI(L)-29 (Lt. J.F. McNamara, USNR), USS LCI(L)-30 (Lt.(jg) L.E. Larson, USNR), USS LCI(L)-224 (Lt.(jg) W.K. Bohn, USNR), USS LCI(L)-225 (Lt.(jg) W.S. Ogilvy, USNR), USS LCI(L)-226 (Lt.(jg) W.L. Harned, USNR), USS LCI(L)-361 (Lt.(jg) A.J. Hawkes, USNR), USS LCI(L)-430 (Lt. P.C. Hill, Jr., USNR) and USS LCI(L)-432 (Lt. M.D. Coppersmith, USNR). Task Group 77.3.15 was made up of the LST's, USS LST-470 (Lt. D.J. Guthridge, USNR, with COMLSTGR20, Cdr. D.M. Baker, USNR on board), USS LST-245 (Lt. M.J. McCabe, USNR), USS LST-459 (Lt. N. Waggener, USNR) and USS LST-474 (Lt.(jg) H.T. Ross, USNR). Task Group 77.3.16 was made up of the LCT's, USS LCT-947, USS LCT-939, USS LCT-940 and USS LCT-941. Task Group 77.3.17 was made up of the patrol vessels USS PC-1119 (Lt. J.E. Martin, Jr., USNR) and USS PC-1134 (Lt.(jg). W.B. Marshall, USNR). Task Group 77.3.18 was made up of the LCI(G)'s, USS LCI(G)-68 (Lt.(jg) J.D. Devaney, USNR), USS LCI(G)-70 (Lt. R.M. Jordan, USNR) and LCI(R)'s USS LCI(R)-72 (Lt.(jg) J.F. Dray, USNR) and USS LCI(R)-73 (Lt.(jg) N.M. Taylor, USNR). Task Group 77.3.19 was made up of the tug USS Sonoma (Lt. W.R. Wurzler, USNR) and USS LCI(D)-227 (Lt.(jg) A.S. Eskind, USNR) [D = Demolition] (). Task Group 77.3.2 was the Attack Force for Red Beach under T/Rear-Admiral R.A. Fechteler, USN, with USS Hughes (T/Cdr. E.B. Rittenhouse, USN, flying the flag of T/Rear-Admiral R.A. Fechteler, USN) as flagship and was made up of the following Task Units. Task Group 77.3.21 was made up of the destroyers USS Fletcher (T/Cdr. J.L. Foster, USN, with COMDESDIV 42, T/Capt. A.E. Jarrell, USN on board), USS Radford (T/Cdr. G.L. Caswell, USN), USS Jenkins (T/Cdr. M. Hall, Jr., USN), USS La Valette (T/Cdr. W. Thompson, USN) and USS Stack (T/Cdr. R.E. Wheeler, USN). Task Group 77.3.22 was made up of the amphibious transport HMAS Manoora (Cdr. A.P. Cousin, RANR(S)). Task Group 77.3.23 was made up of the LCI(L)'s, USS LCI(L)-546 (Lt.(jg) W.B. Campbell, USNR, with, COMLCIFLOT 8, T/Cdr. F.B.C. Martin, USN, on board), i>USS LCI(L)-543 (Lt.(jg) L.S. Mosley, USNR), USS LCI(L)-544 (Lt.(jg) L.V. Sternberg, USNR), USS LCI(L)-545 (Lt.(jg) T.B. King, USNR), USS LCI(L)-547 (Lt.(jg) J.S. Peacock, USNR), USS LCI(L)-577 (Lt.(jg) E.J. Morgan, USNR), USS LCI(L)-578 (Lt.(jg) W.D. Rounds, USNR), USS LCI(L)-579 (Lt.(jg) J. Wood, USN), USS LCI(L)-663 (Lt.(jg) F.B. Stimson, Jr., USNR), USS LCI(L)-744 (Lt.(jg) J.B. Vallely, USNR), LCI(L)-746 (Lt.(jg) E.H. Chittenden, USNR), USS LCI(L)-747 (Lt. R.M. Burnes, USNR), USS LCI(L)-748 (Lt.(jg) D.R. Hassell, USNR), USS LCI(L)-750 (Lt.(jg) S.A.R. White, USNR), USS LCI(L)-958 (Lt.(jg) W.R. McCracken, USNR), USS LCI(L)-962 (Lt.(jg) R.L. Steele, USNR), USS LCI(L)-964 (Lt.(jg) H.R. dePue, USNR), USS LCI(L)-965 (Lt.(jg) A.T. Wellman, USNR), USS 967 (Lt.(jg) H.M. Piper, Jr., USNR), USS 968 (Lt.(jg) B. Shaw, USNR), USS 969 (Lt.(jg) J.W. Clement, USNR), USS 971 (Lt.(jg) V. Muse, Jr., USNR), USS 976 (Lt.(jg) W.C. Lawtom, USNR), USS 977 (Lt.(jg) J.T. Morgan, Jr., USNR), USS 978 (Lt.(jg) P. Tackett, USNR), USS 979 (Lt.(jg) M.J. Fleischman, USNR), USS 981 (Lt.(jg) T.J. Bailey, USNR), USS 1014 (Lt.Cdr. R.W. Moncure, USNR) and USS 1015 (Lt. G.Y. Harry, USNR). Task Group 77.3.24 was made up of the LST's, USS LST-466 (Lt. R.E. McCarthy, USNR), with COMLSTFLOT 7, T/Capt. R.M. Scruggs, USN on board), USS LST-181 (Lt. R.J. Wilson, USNR), USS LST-452 (Lt. G.W. Morris, USNR), USS LST-456 (Lt. G.B. Libby, USNR), USS LST-462 (Lt. W.D. Gregory, USNR), USS LST-467 (Lt. M.B. Taylor, USNR), USS LST-468 (Lt.(jg) L.H. Bellis, USNR) and USS LST-472 (Lt. W.O. Tally, USN). Task Group 77.3.25 was made up of the LCT's, USS LCT-948, USS LCT-942, USS LCT-943, USS LCT-949, USS LCT-950, USS LCT-951, USS LCT-952 and USS LCT-953. Task Group 77.3.26 was made up of the Landing Ship Dock USS Carter Hall (Lt.Cdr. F.J. Harris, USNR). Task Group 77.3.27 was made up of the patrol vessels USS PC-1120 (Lt. H.T. Smith, Jr., USNR), USS PC-1122 (Lt. L.C. Hall, USNR), USS PC-1133 (Lt. J.C. Chandler, USNR) and USS PC-476 (Lt. D. Knapp, USNR). Task Group 77.3.28 was made up of the LCI(G)'s, USS LCI(G)-69 (Lt.(jg) H.R. Roesti, USNR, with Lt.Cdr. A.M. Holmes, USNR, on board), USS LCI(G)-23 (Lt.(jg) M.L. Russell, USNR), USS LCI(G)-64 (Lt.(jg) F.G. Love, Jr., USNR), USS LCI(G)-65 (Lt.(jg) C.J. Macaluso, USNR) and LCI(R)'s USS LCI(R)-31 (Lt.(jg) L.J. Haidet, USNR) and USS LCI(R)-34 (Lt.(jg) R.J. Sponsler, USNR). Task Group 77.3.29 was made up of the minesweepers USS YMS-8 (Lt.(jg) E.S. Conway, USNR), USS YMS-9 (Lt.(jg) B.F. Hildes, USNR), USS YMS-46 (Lt. H.J. Topping, USNR) and USS YMS-51 (Lt.(jg) W.F. Montgomery., USNR).
Chronology of the passage towards the operations area.
1000I/10, Task Group 77.1, the Carrier Cover Group, (see above), departed Seeadler Harbour for the operations area.
1300I/11, Echelon M-1, made up of all Task Units of Task Groups 77.3.1 and 77.3.2 (see above) departed Maffin Bay for the operations area.
2300I/11, Task Units 77.2.1 and 77.2.2 (see above) departed Humboldt Bay for the operations area.
1000I/12, Task Unit 77.2.3 departed Humboldt Bay for the operations area. On board USS Nashville General MacArthur and staff is embarked.
Chronology of the initial landing operations in the operations area.
0630I/15, The order ' Deploy ' was given for the landings which were to commence at 0830I/15 (H-hour). The LCT's which had been towed to the operations area by LST's had just been cut loose and were now proceeding on their own. YMS minesweepers commenced sweeping the landing area.
0700I/15, between around 0700 and 0830 hours the ships from Task Force 77.2 bombarded their selected targets near the landing area. Carrier aircraft from Task Force 77.1 conducted fighter and A/S patrols and were also available to attack land targets. Following the bombardment the ships of Task Force 77.2 remained in the area to provide cover for the operation. They were released from the operation at 1800I/16.
0830I/15, H-hour, Landing operations commenced.
0900I/15, USS Carter Hall departed the operations area for Mios Woendi. She was escorted by USS Herbert and USS Crosby. All three ships had completed unloading.
1030I/15, Almost all LCI(L)'s, having completed unloading, departed the operations area for Hollandia. They were escorted by USS Ward, USS Schley and USS Kilty.
2000I/15, Five LST's and four LCI(L)'s, having completed unloading, departed the operations area for Cape Sansapor. They were escorted by the destroyers USS Morris and USS Jenkins.
1800I/15, HMAS Kanimbla and USS Manoora departed the operations area for Hollandia. They were escorted by the destroyer USS Stevens and the patrol vessel USS PC-476.
1700I/16, The remaining seven LST's, having completed unloading departed Morotai for Cape Sansopor. They were escorted by USS Anderson and USS Stack.
More echelons transporting troops and supplies arrived at Morotai during the next days. [These will not be dealth with here.]
18 Sep 1944
Around 0715I/18, Task Force 77.2 (Task Force 75), made up of the heavy cruisers HMAS Australia (Capt. E.F.V. Dechaineux, DSC, RAN, flying the flag of Commodore J.A. Collins, CB, RAN), HMAS Shropshire (Capt. H.A. Showers, RAN), light cruisers USS Phoenix (T/Capt. J.H. Duncan, USN, flying the flag of COMCRUDIV 15, Rear-Admiral R.S. Berkey, USN), USS Nashville (T/Capt. C.E. Coney, USN), USS Boise (Capt. J.S. Roberts, USN) and the destroyers USS Hutchins (T/Cdr. C.B. Laning, USN, with COMDESRON 24, T/Capt. K.M. McManes, USN, on board), USS Bache (T/Cdr. R.C. Morton, USN), USS Beale (T/Cdr. D.M. Coffee, USN), USS Daly (T/Cdr. R.G. Visser, USN), USS Abner Read (T/Cdr. T.B. Hutchins, 3rd, USN, with COMDESDIV 48, T/Capt. J.B. McLean, USN), USS Bush (T/Cdr. R.E. Westholm, USN), USS Ammen (T/Cdr. J.H. Brown, USN), USS Mullany (T/Cdr. B.J. Mullaney, USN), HMAS Arunta (Cdr. A.E. Buchanan, RAN) and HMAS Warramunga (Cdr. N.A. Mackinnon, RAN) arrived at Mios Woendi from operations in the Morotai area. (76)
27 Sep 1944
0700I/27, Task Force 75, made up of the heavy cruisers HMAS Australia (Capt. E.F.V. Dechaineux, DSC, RAN, flying the flag of Commodore J.A. Collins, CB, RAN), HMAS Shropshire (Capt. C.A.G. Nichols, MVO, RN), light cruisers USS Phoenix (T/Capt. J.H. Duncan, USN, flying the flag of COMCRUDIV 15, Rear-Admiral R.S. Berkey, USN), USS Nashville (T/Capt. C.E. Coney, USN), USS Boise (Capt. J.S. Roberts, USN) and the destroyers USS Hutchins (T/Cdr. C.B. Laning, USN, with COMDESRON 24, T/Capt. K.M. McManes, USN, on board), USS Bache (T/Cdr. R.C. Morton, USN), USS Beale (T/Cdr. D.M. Coffee, USN), USS Daly (T/Cdr. R.G. Visser, USN), USS Abner Read (T/Cdr. T.B. Hutchins, 3rd, USN, with COMDESDIV 48, T/Capt. J.B. McLean, USN), USS Bush (T/Cdr. R.E. Westholm, USN), USS Ammen (T/Cdr. J.H. Brown, USN), USS Mullany (T/Cdr. A.O. Momm, USN), HMAS Arunta (Cdr. A.E. Buchanan, RAN) and HMAS Warramunga (Cdr. N.A. Mackinnon, RAN) arrived at Mios Woendi from operations in the Morotai area. (76)
3 Oct 1944
HMAS Australia (Capt. E.F.V. Dechaineux, DSC, RAN, flying the flag of Commodore J.A. Collins, CB, RAN), USS Daly (T/Cdr. R.G. Visser, USN) and USS Mullany (T/Cdr. A.O. Momm, USN) conducted exercises off Manus. (77)
11 Oct 1944
1700I/11, Task Forces 74 and 75, made up of the heavy cruisers HMAS Australia (Capt. E.F.V. Dechaineux, DSC, RAN, flying the flag of Commodore J.A. Collins, CB, RAN), HMAS Shropshire (Capt. C.A.G. Nichols, MVO, RN), the light cruisers USS Phoenix (T/Capt. J.H. Duncan, USN, flying the flag of COMCRUDIV 15, Rear-Admiral R.S. Berkey, USN), USS Nashville (T/Capt. C.E. Coney, USN), USS Boise (Capt. J.S. Roberts, USN) and the destroyers USS Hutchins (T/Cdr. C.B. Laning, USN, with COMDESRON 24, T/Capt. K.M. McManes, USN, on board), HMAS Arunta (Cdr. A.E. Buchanan, RAN) and HMAS Warramunga (Lt.Cdr. J.M. Alliston, DSC, RN) departed Seeadler Harbour, Manus for Humboldt Bay.
Most of the destroyers of Task Forces 74 and 75 had been delayed in sailing. They departed later to overtake and join at sea which they did in the following order; USS Bache (T/Cdr. R.C. Morton, USN), USS Mullany (T/Cdr. A.O. Momm, USN) and USS Bush (T/Cdr. R.E. Westholm, USN) joined around 1830I/11. USS Ammen (T/Cdr. J.H. Brown, USN) joined around 2115I/11. USS Daly (T/Cdr. R.G. Visser, USN) joined around 2200I/11. USS Beale (T/Cdr. D.M. Coffee, USN) joined around 0045I/12. USS Killen (T/Cdr. H.G. Corey, USN) and finally USS Abner Read (T/Cdr. A.M. Purdy, USN, with COMDESDIV 48, T/Capt. J.B. McLean, USN) joined around 0800I/12.
Task Forces 74 and 75 arrived at Humboldt Bay around 1220I/12. (77)
Sources
- Report of proceedings of HMA Squadron
- Report of proceedings of HMAS Adelaide for October 1939
- Report of proceedings of HMAS Adelaide for October 1939 + Report of proceedings of HMAS Australia for October 1939
- Report of proceedings of HMA Squadron + Report of proceedings of HMAS Adelaide for November 1939
- Report of proceedings of HMA Squadron + Report of proceedings of HMS Adelaide for November 1939
- Report of proceedings of HMA Squadron + Report of proceedings of HMAS Australia for November 1939
- Report of proceedings of HMA Squadron + Report of proceedings of HMAS Sydney for 1 to 18 December 1939
- Report of proceedings of HMA Squadron + Report of proceedings of HMAS Australia for December 1939
- ADM 199/382
- Report of proceedings of HMA Squadron + Report of proceedings of HMAS Adelaide for February 1940
- Report of proceedings of HMA Squadron + Report of proceedings of HMAS Australia for February 1940 + Report of proceedings of HMAS Australia for March 1940
- Report of proceedings of HMA Squadron + Report of proceedings of HMAS Adelaide for March 1940
- Report of proceedings of HMA Squadron + Report of proceedings of HMAS Adelaide for April 1940
- Report of proceedings of HMA Squadron + Report of proceedings of HMAS Australia for April 1940
- ADM 234/318
- Report of proceedings of HMAS Australia for June 1940
- Report of proceedings of HMAS Australia for July 1940
- ADM 53/112037 + ADM 53/109179 + ADM 199/381
- ADM 53/111860 + ADM 199/381
- ADM 53/112010 + ADM 53/113292 + ADM 199/388
- ADM 53/112010 + ADM 53/113292 + ADM 199/361 + ADM 199/388
- ADM 199/388
- ADM 53/112905
- ADM 53/112905 + ADM 199/388
- ADM 53/112905 + ADM 199/361 + Report of proceedings of HMAS Australia for August 1940
- ADM 53/111437 + ADM 53/111438 + Reports of proceedings of HMAS Australia for September and October 1940
- ADM 199/392
- ADM 199/379
- ADM 199/408
- ADM 53/114220 + ADM 53/114405
- ADM 53/114220 + ADM 53/114405 + ADM 199/408
- ADM 199/383 + Report of proceedings of HMA Squadron for March 1941
- Report of proceedings of HMA Squadron for March 1941
- Report of proceedings of HMA Squadron for April 1941
- Report of proceedings of HMAS Adelaide for May 1941 + Report of proceedings of HMAS Australia for May 1941
- Report of proceedings of HMAS Adelaide for June 1941 + Report of proceedings of HMAS Australia for June 1941
- ADM 199/
- ADM 53/114374 + Report of proceedings of HMAS Australia for August 1941
- ADM 53/114374 + ADM 199/402 + Report of proceedings of HMAS Australia for August 1941
- Report of proceedings of HMAS Canberra for December 1941 + Report of proceedings of HMAS Perth for December 1941
- Report of proceedings of HMAS Perth for December 1941
- Report of proceedings of HMA Squadron + Report of proceedings of HMAS Perth for January 1942
- Report of proceedings of HMAS Hobart for April 1942
- Report of proceedings of HMAS Hobart for June 1942
- Report of proceedings of HMAS Canberra for June 1942 + Report of proceedings of HMAS Hobart for June 1942
- Report of proceedings of HMAS Canberra for June 1942
- Report of proceedings of HMAS canberra for June 1942 + Report of proceedings of HMAS Hobart for June 1942
- Report of proceedings of HMAS Hobart for July 1942 + War diary of USS Chicago for July 1942 + War diary of USS Henley for July 1942 + War diary of USS Salt Lake City for July 1942
- Report of proceedings of HMAS Hobart for July 1942 + War diary of USS Chicago for July 1942 + War diary of USS Salt Lake City for July 1942
- Report of proceedings of Task Force 44
- Report of proceedings of HMAS Hobart for October 1942
- Report of proceedings of HMAS Hobart for March 1943 + War diary of USS Phoenix for March 1943
- Report of proceedings of HMAS Hobart for March 1943 + War diary of USS Phoenix for March 1943 + War diary of USS Mugford for March 1943
- Report of proceedings of HMAS Hobart for April 1943 + War diary COMDESRON 4 for April 1943
- Report of proceedings of HMAS Hobart for May 1943 + War Diary of USS Perkins for May 1943
- Report of proceedings of HMAS Hobart for June 1943 + Report of proceedings of HMAS Hobart for May 1943 + War Diary of USS Perkins for May 1943 + War Diary of USS Perkins for June 1943
- Report of proceedings of HMAS Hobart for June 1943 + Report of proceedings of Task Force 74 for June 1943 + War Diary of USS Perkins for June 1943
- Report of proceedings of HMAS Hobart for June 1943 + Report of proceedings of Task Force 74 for June 1943
- Report of proceedings of HMAS Hobart for June 1943 + Report of proceedings of HMAS Hobart for July 1943 + Report of proceedings of Task Force 74 for June 1943 + Report of proceedings of Task Force 74 for July 1943
- Report of proceedings of HMAS Hobart for July 1943 + Report of proceedings of Task Force 74 for July 1943
- Report of proceedings of HMAS Vendetta for August 1943
- Report of proceedings of HMAS Vendetta for August 1941
- Report of proceedings of Task Force 74 for November 1943
- Report of proceedings of Task Force 74 for November 1943 + Report of COMDESRON 4 for November 1943
- Report of proceedings of Task Force 74 for December 1943 + Report of COMDESRON 4 for December 1943
- Report of proceedings of Task Force 74 for December 1943
- Report of proceedings of Task Force 74 for January 1944
- Report of proceedings of Task Force 74 for March 1944
- Report of proceedings of Task Force 74 for April 1944
- Report of proceedings of HMAS Warramunga for April 1944
- Report of proceedings of Task Force 74 for April 1944 + Report of proceedings of Task Force 74 for May 1944
- Report of proceedings of Task Force 74 for May 1944
- Report of proceedings of Task Force 74 for July 1944
- Report of proceedings of Task Force 74 for July 1944 + Report of proceedings of HMAS Warramuna for July 1944 + War diary of USS Bache for July 1944
- Report of proceedings of HMAS Shropshire for September 1944
- War diary of COMCRUDIV 15 for September 1944
- War diary of COMCRUDIV 15 for October 1944
ADM numbers indicate documents at the British National Archives at Kew, London.