
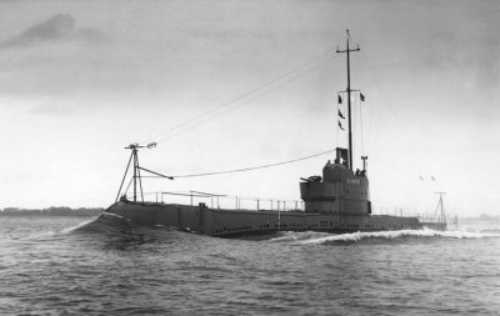
| Navy | The Royal Navy |
| Type | Submarine |
| Class | O |
| Pennant | N 35 |
| Mod | Odin Group |
| Built by | William Beardmore & Co. (Dalmuir, Scotland) |
| Ordered | 21 Dec 1926 |
| Laid down | 14 Apr 1927 |
| Launched | 11 Dec 1928 |
| Commissioned | 14 Jun 1930 |
| Lost | 8 May 1942 |
| Loss position | 35° 55'N, 14° 35'E |
| History | HMS Olympus (Lt.Cdr. Herbert George Dymott, RN) was mined and sunk off Malta in approximate position 35º55'N, 14º35'E. She had just left Malta on passage to Gibraltar with personnel including many of the crews of the sunken submarines HMS Pandora, HMS P 36 and HMS P 39. There were only 9 survivors out of 98 aboard. They had to swim 7 miles back to Malta. 89 crew and passengers were lost with the ship. The wreck of HMS Olympus was discovered in late 2011. |
Commands listed for HMS Olympus (N 35)
Please note that we're still working on this section
and that we only list Commanding Officers for the duration of the Second World War.
| Commander | From | To | |
| 1 | Cdr. Hugh Valentine King, RN | 15 Sep 1937 | 25 Jan 1940 |
| 2 | Lt.Cdr. Herbert George Dymott, RN | 25 Jan 1940 | 20 Aug 1941 |
| 3 | Lt.Cdr. Francis Nelson Blois Johnson, RNR | 20 Aug 1941 | 4 Sep 1941 |
| 4 | Lt.Cdr. Herbert George Dymott, RN | 4 Sep 1941 | 8 May 1942 (+) |
You can help improve our commands section
Click here to Submit events/comments/updates for this vessel.
Please use this if you spot mistakes or want to improve this ships page.
Notable events involving Olympus include:
The history of HMS Olympus as compiled on this page is extracted from the patrol reports and logbooks of this submarine.
This page was last updated in July 2017.
31 Aug 1939
HMS Olympus (Cdr. H.V. King, RN) departed Singapore for her 1st war patrol. She was ordered to patrol in the Malacca Strait.
For the daily positions of HMS Olympus during this patrol see the map below.
(1)
6 Sep 1939
HMS Olympus (Cdr. H.V. King, RN) ended her 1st war patrol at Singapore. (2)
19 Sep 1939
HMS Olympus (Cdr. H.V. King, RN) departed Singapore for her 2nd war patrol. She was ordered to patrol in the Sunda Strait.
For the daily positions of HMS Olympus during this patrol see the map below.
(2)
10 Oct 1939
HMS Olympus (Cdr. H.V. King, RN) ended her 2nd war patrol at Singapore. (3)
24 Oct 1939
HMS Olympus (Cdr. H.V. King, RN) departed Singapore for Colombo.
For the daily positions of HMS Olympus during this passage see the map below.
(3)
30 Oct 1939
HMS Olympus (Cdr. H.V. King, RN) arrived at Colombo. (3)
3 Nov 1939
HMS Olympus (Cdr. H.V. King, RN) is docked at Colombo. (4)
12 Nov 1939
HMS Olympus (Cdr. H.V. King, RN) is undocked. (4)
17 Nov 1939
HMS Olympus (Cdr. H.V. King, RN) departed Colombo for her 3rd war patrol. She was ordered to patrol in the Indian Ocean.
For the daily positions of HMS Olympus during this patrol see the map below.
(4)
28 Nov 1939
HMS Olympus (Cdr. H.V. King, RN) arrived at Diego Suarez. She departed to continue her patrol later the same day. (4)
6 Dec 1939
HMS Olympus (Cdr. H.V. King, RN) arrived at Diego Suarez. (5)
10 Dec 1939
HMS Olympus (Cdr. H.V. King, RN) departed Diego Suarez to continue her patrol. (5)
29 Dec 1939
HMS Olympus (Cdr. H.V. King, RN) arrived at Durban, South Africa ending her 3rd war patrol. (5)
8 Jan 1940
HMS Olympus (Cdr. H.V. King, RN) departed Durban, South Africa for her 4th war patrol. She was ordered to patrol in the Indian Ocean.
For the daily positions of HMS Olympus during this patrol see the map below.
(6)
14 Jan 1940
HMS Olympus (Cdr. H.V. King, RN) made a short call at Mauritius. (6)
22 Jan 1940
HMS Olympus (Cdr. H.V. King, RN) ended her 4th war patrol at Colombo. (6)
29 Jan 1940
HMS Olympus (Lt.Cdr. H.G. Dymott, RN) departed Colombo for her 5th war patrol. She was ordered to patrol off the Maldives.
For the daily positions of HMS Olympus during this patrol see the map below.
(6)
4 Feb 1940
HMS Olympus (Lt.Cdr. H.G. Dymott, RN) ended her 5th war patrol at Colombo. (7)
8 Feb 1940
HMS Olympus (Lt.Cdr. H.G. Dymott, RN) is docked at Colombo. (7)
10 Feb 1940
HMS Olympus (Lt.Cdr. H.G. Dymott, RN) is undocked. (7)
22 Feb 1940
HMS Olympus (Lt.Cdr. H.G. Dymott, RN) conducted exercises off Colombo. These included a practice attack on the Australian light cruiser HMAS Hobart (Capt. H.L. Howden, RAN) on her return from escort duties. (7)
23 Feb 1940
HMS Olympus (Lt.Cdr. H.G. Dymott, RN) conducted exercises off Colombo together with HMS Widnes (Lt.Cdr. R.B. Chandler, RN). (7)
28 Feb 1940
HMS Olympus (Lt.Cdr. H.G. Dymott, RN) departed Colombo for her 6th war patrol. She was ordered to patrol off the Chagos Archipaligo and the Maldives.
For the daily position of HMS Olympus during this patrol see the map below.
(7)
27 Mar 1940
HMS Olympus (Lt.Cdr. H.G. Dymott, RN) ended her 6th war patrol at Colombo. (8)
4 Apr 1940
HMS Olympus (Lt.Cdr. H.G. Dymott, RN) conducted exercises off Colombo together with HMIS Ramdas (Lt.Cdr. M.H.St.L. Nott, RIN). (9)
16 Apr 1940
HMS Olympus (Lt.Cdr. H.G. Dymott, RN) departed Colombo for Aden. HMS Olympus was to proceed to Malta and join the Mediterranean Fleet.
For the daily positions of HMS Olympus during the passage from Colombo to Malta see the map below.
(9)
24 Apr 1940
HMS Olympus (Lt.Cdr. H.G. Dymott, RN) arrived at Aden. (9)
26 Apr 1940
HMS Olympus (Lt.Cdr. H.G. Dymott, RN) departed Aden for Port Said. (9)
1 May 1940
HMS Olympus (Lt.Cdr. H.G. Dymott, RN) arrived at Port Said. (10)
2 May 1940
HMS Olympus (Lt.Cdr. H.G. Dymott, RN) departed Port Said for Malta. (10)
7 May 1940
HMS Olympus (Lt.Cdr. H.G. Dymott, RN) arrived at Malta. (10)
9 May 1940
HMS Olympus (Lt.Cdr. H.G. Dymott, RN) is taken in hand for refit at Malta. (10)
18 May 1940
HMS Olympus (Lt.Cdr. H.G. Dymott, RN) is docked at Malta. (10)
29 May 1940
HMS Olympus (Lt.Cdr. H.G. Dymott, RN) is undocked. (10)
5 Jun 1940
HMS Olympus (Lt.Cdr. H.G. Dymott, RN) is docked at Malta. (11)
7 Jul 1940
At 0915 hours (zone -2), HMS Olympus (Lt.Cdr. H.G. Dymott, RN), was bombed and damaged by Italian aircraft while in dock in Malta. Repairs and refit were delayed and were only completed on 29 November 1940. (12)
9 Sep 1940
At 1225 hours (zone -2), HMS Olympus (Lt.Cdr. H.G. Dymott, RN), was again bombed and damaged by Italian aircraft while in dock in Malta. She sustained some minor damage. (13)
18 Oct 1940
HMS Olympus (Lt.Cdr. H.G. Dymott, RN) was undocked. (14)
11 Nov 1940
HMS Olympus (Lt.Cdr. H.G. Dymott, RN) is docked at Malta. (15)
14 Nov 1940
HMS Olympus (Lt.Cdr. H.G. Dymott, RN) is undocked. (15)
26 Nov 1940
HMS Olympus (Lt.Cdr. H.G. Dymott, RN) conducted a basin dive at Malta. (15)
14 Dec 1940
During the night of 14/15 December 1940, HMS Olympus (Lt.Cdr. H.G. Dymott, RN), conducted trials and exercises off Malta. (16)
16 Dec 1940
HMS Olympus (Lt.Cdr. H.G. Dymott, RN) departed Malta for a few days of exercises south of Malta.
For the daily positions of HMS Olympus during these exercises see the map below.
19 Dec 1940
Having completed her exercise programme, HMS Olympus (Lt.Cdr. H.G. Dymott, RN), returned to Malta. (16)
22 Dec 1940
HMS Olympus (Lt.Cdr. H.G. Dymott, RN) departed Malta for Gibraltar.
For the daily positions of HMS Olympus during this passage see the map below.
(16)
29 Dec 1940
HMS Olympus (Lt.Cdr. H.G. Dymott, RN) arrived at Gibraltar. (16)
2 Jan 1941
HMS Olympus (Lt.Cdr. H.G. Dymott, RN) departed Gibraltar for her 7th war patrol. She is ordered to patrol off the Azores.
For the daily positions of HMS Olympus during this patrol see the map below.
(17)
26 Jan 1941
HMS Olympus (Lt.Cdr. H.G. Dymott, RN) is ordered to patrol off Brest, France. (17)
29 Jan 1941
HMS Olympus (Lt.Cdr. H.G. Dymott, RN) ended her 7th war patrol at Portsmouth. At Portsmouth she was docked around mid-February for repairs. (17)
23 Feb 1941
HMS Olympus (Lt.Cdr. H.G. Dymott, RN) departed Portsmouth for Dartmouth.
24 Feb 1941
HMS Olympus (Lt.Cdr. H.G. Dymott, RN) arrived at Dartmouth for a short work-up period and A/S exercises.
28 Feb 1941
HMS Olympus (Lt.Cdr. H.G. Dymott, RN) departed Dartmouth for Gibraltar.
As no log is available for this period no map can be displayed.
7 Mar 1941
HMS Olympus (Lt.Cdr. H.G. Dymott, RN) arrived at Gibraltar.
14 Mar 1941
HMS Olympus (Lt.Cdr. H.G. Dymott, RN) departed Gibraltar for her 8th war patrol. She was to provide escort for convoys HG 56 / OG 56.
As no log is available for this period no map can be displayed.
15 Mar 1941
Convoy HG 56.
This convoy departed Gibraltar on 15 March 1941 and arrived in U.K. waters on 1 April 1941.
On departure from Gibraltar the convoy was made up of the following merchant vessels; Ary Lensen (British, 3214 GRT, built 1930), Aymeric (British, 5196 GRT, built 1919), Baron Haig (British, 3391 GRT, built 1926), Baron Nairn (British, 3164 GRT, built 1925), Baron Pentland (British, 3410 GRT, built 1927), Bruce M. (British, 1887 GRT, built 1927), Crane (British, 785 GRT, built 1937), Cressado (British, 1228 GRT, built 1913), Dayrose (British, 4113 GRT, built 1928), Fanefjeld (Norwegian, 1354 GRT, built 1920), Fendris (British, 1018 GRT, built 1925), Lech (Polish, 1568 GRT, built 19341927), Lissa (British, 1511 GRT, built 1927), Magne (Swedish, 3103 GRT, built 1912), Margareta (British, 1173 GRT, built 1904), Ocean Coast (British, 1173 GRT, built 1935), Philipp M. (British, 2085 GRT, built 1924), Procris (British, 1033 GRT, built 1924), Rhineland (British, 1381 GRT, built 1922), Rimfakse (Norwegian, 1334 GRT, built 1921), Thurso (British, 2436 GRT, built 1919), Treminnard (British, 4964 GRT, built 1922), Ulea (British, 1574 GRT, built 1936), Uskside (British, 2708 GRT, built 1937) and Wallonia (Swedish, 1435 GRT, built 1919).
[It is possible some of these ships did not sail from Freetown but joined the convoy at sea.]
On departure from Gibraltar the convoy was escorted by the destroyer HMS Velox (Lt.Cdr. E.G. Roper, DSC, RN), sloop HMS Folkestone (Lt.Cdr. C.F.H. Churchill, RN), corvettes HMS Geranium (T/Lt. A. Foxall, RNR), HMS Verbena (Lt.Cdr. D.A. Rayner, DSC, RNVR) and the submarine HMS Olympus (Lt.Cdr. H.G. Dymott, RN).
HMS Velox, HMS Geranium and HMS Verbena parted company on 16 March to return to Gibraltar.
The light cruiser HMS Kenya (Capt. M.M. Denny, CB, RN, flying the flag of Rear-Admiral H.M. Burrough, CB, RN) joined the convoy around 0900Z/23.
At 1600Z/24, HMS Olympus parted company with the convoy and proceeded to join convoy OG 56.
Around 1130Z/25, the armed boarding vessel HMS Corinthian (A/Cdr. E.J.R. Pollitt, RNR) joined the convoy.
Around 0800Z/27, the destroyer HMS Legion (Cdr. R.F. Jessel, RN), Léopard (Lt.Cdr. J. Evenou) and Piorun (Cdr. E.J.S. Plawski) joined the convoy.
Around 1000Z/27, the corvettes HMS Arabis (Lt.Cdr. J.P. Stewart, RNR), HMS Mallow (Lt.Cdr. W.B. Piggott, RNR) and HMS Violet (Lt.Cdr. K.M. Nicholson, RNR) joined the convoy.
Around 1700Z/27, the destroyers HMS Watchman (Lt.Cdr. E.C.L. Day, RN), HMS Sardonyx (Lt.Cdr. R.B.S. Tennant, RN), HMS Scimitar (Lt. R.D. Franks, OBE, RN), HMS Burwell (Lt.Cdr. S.R.J. Woods, RNR), sloop HMS Fleetwood (Cdr. R.W. Moir, RN), A/S trawlers HMS Northern Gem (Skr.Lt. W.J.V. Mullender, DSC, RNR), HMS Northern Wave (T/Lt. W.G. Pardoe-Matthews, RNR) and rescue ship Zaafaran (1559 GRT, built 1921) joined.
Around 0930A/29, the destroyer HMS Broadwater (Lt.Cdr. W.M.L. Astwood, RN) joined the convoy.
2 Apr 1941
HMS Olympus (Lt.Cdr. H.G. Dymott, RN) ended her 8th war patrol at Gibraltar.
3 Apr 1941
HMS Olympus (Lt.Cdr. H.G. Dymott, RN) departed Gibraltar for her 9th war patrol. She was ordered to patrol off Oran as it is thought that the Vichy-French battleship Dunkerque might be leaving that port.
As no log is available for this period no map can be displayed.
5 Apr 1941
Her patrol off Oran is cancelled, HMS Olympus (Lt.Cdr. H.G. Dymott, RN) is ordered to proceed to Malta.
9 Apr 1941
HMS Olympus (Lt.Cdr. H.G. Dymott, RN) arrived at Malta. She arrived at Malta with many defects.
21 May 1941
HMS Olympus (Lt.Cdr. H.G. Dymott, RN) departed Malta for Gibraltar.
As no log is available for this period no map can be displayed.
28 May 1941
HMS Olympus (Lt.Cdr. H.G. Dymott, RN) arrived at Gibraltar.
14 Jun 1941
HMS Olympus (Lt.Cdr. H.G. Dymott, RN) departed Gibraltar for her 10th war patrol. She was to provide escort for convoys HG 65 / OG 65.
As no log is available for this period no map can be displayed.
28 Jun 1941
HMS Olympus (Lt.Cdr. H.G. Dymott, RN) ended her 10th war at Gibraltar.
4 Jul 1941
HMS Olympus (Lt.Cdr. H.G. Dymott, RN) is docked at Gibraltar. (18)
11 Jul 1941
HMS Olympus (Lt.Cdr. H.G. Dymott, RN) is undocked. (18)
15 Jul 1941
HMS Olympus (Lt.Cdr. H.G. Dymott, RN) conducted exercises off Gibraltar. (18)
16 Jul 1941
HMS Olympus (Lt.Cdr. H.G. Dymott, RN) departed Gibraltar for her 11th war patrol (2nd in the Mediterranean). She was ordered to patrol in the Tyrrhenian Sea.
For the daily and attack positions of HMS Olympus during this patrol see the map below.
(17)
21 Jul 1941
HMS Olympus (Lt.Cdr. H.G. Dymott, RN) twice attacked an Italian convoy with a single torpedo in the central Tyrrhenian Sea. Both torpedoes missed.
The convoy attacked was made up of the Italian merchants Pallade (1152 GRT, built 1899) and Vincenzina (1579 GRT, built 1889). They were escorted by the Armed Merchant Cruiser Città di Palermo (5413 GRT, built 1930) and were en-route from Naples to Cagliari.
(All times are zone -1) 1327 hours - In position 39°53'N, 11°49'E sighted the masts and upperworks of a ship. On closing sighted that this was an armed merchant cruiser with two 2000 - 3000 ton freighters in convoy. Started attack. The convoy was on a steady course from Naples to Cagliary.
1358 hours - Fired one torpedo from 6000 yards. It missed.
1423 hours - Fired another torpedo from 5500 yards. This torpedo also missed. (17)
21 Jul 1941
Operation Substance, convoys to and from Malta
Passage through the Straits of Gibraltar of the eastbound convoy and sailing from Gibraltar of the remaining ships involved in the operation.
Around 0130B/21 convoy WS 9C passed the Straits of Gibraltar. The convoy at that moment consisted of six merchant ships; City of Pretoria (8049 GRT, built 1937), Deucalion (7516 GRT, built 1930), Durham (10893 GRT, built 1934), Melbourne Star (11076 GRT, built 1936), Port Chalmers (8535 GRT, built 1933) and Sydney Star (11095 GRT, built 1936).
At the time they passed through the Straits they were escorted by HMS Nelson (Capt. T.H. Troubridge, RN), HMS Edinburgh (Capt. H.W. Faulkner, RN, flying the flag of Rear-Admiral E.N. Syfret, RN), HMS Manxman (Capt. R.K. Dickson, RN), HMS Lightning (Cdr. R.G. Stewart, RN), HMAS Nestor (Cdr. A.S. Rosenthal, RAN), HMS Avon Vale (Lt.Cdr. P.A.R. Withers, RN), HMS Eridge (Lt.Cdr. W.F.N. Gregory-Smith, RN) and HMS Farndale (Cdr. S.H. Carlill, RN).
HMS Manchester (Capt. H. Drew, DSC, RN), HMS Arethusa (Capt. A.C. Chapman, RN), HMS Cossack (Capt. E.L. Berthon, DSC and Bar, RN), HMS Maori (Cdr. R.E. Courage, DSO, DSC and Bar, RN), HMS Sikh (Cdr. G.H. Stokes, RN) departed Gibraltar around 0200B/21 escorting troopship Leinster (4302 GRT, built 1937) which was to join the convoy. However Leinster grounded while leaving Gibraltar and had to left behind. The small fleet tanker RFA Brown Ranger (3417 GRT, built 1941, master D.B.C. Ralph) left Gibraltar around the same time escorted by the destroyer HMS Beverley (Lt.Cdr. J. Grant, RN).
About one hour later, around 0300B/21, HMS Renown (Rear-Admiral R.R. McGrigor, RN, flying the flag of Vice-Admiral J.F. Somerville, KCB, DSO, RN), HMS Ark Royal (Capt. L.E.H. Maund, RN), HMS Hermione (Capt. G.N. Oliver, RN), HMS Faulknor (Capt. A.F. de Salis, RN), HMS Fearless (Cdr. A.F. Pugsley, RN), HMS Firedrake (Lt.Cdr. S.H. Norris, DSO, DSC, RN), HMS Foresight (Cdr. J.S.C. Salter, RN), HMS Forester (Lt.Cdr. E.B. Tancock, DSC and Bar, RN), HMS Foxhound (Cdr. G.H. Peters, DSC, RN), HMS Fury (Lt.Cdr. T.C. Robinson, RN) and HMS Duncan (Lt.Cdr. A.N. Rowell, RN) departed Gibraltar to give convoy for the convoy during the passage to Malta.
At sea the forces were redistributed; Force H, the cover force HMS Renown, HMS Nelson, HMS Ark Royal, HMS Hermione, HMS Faulknor, HMS Foresight, HMS Forester, HMS Fury, HMS Lightning and HMS Duncan.
Force X, the close escort for the convoy HMS Edinburgh, HMS Manchester, HMS Arethusa, HMS Manxman, HMS Cossack, HMS Maori, HMS Sikh, HMAS Nestor, HMS Fearless, HMS Firedrake, HMS Foxhound, HMS Avon Vale, HMS Eridge and HMS Farndale.
Plan for the operation
Force H was to cover the convoy until it reached the narrows between Sicily and Tunisia. Force X was to escort the convoy all the way to Malta. Ships of Force X also had troops for Malta on board that had been taken to Gibraltar by troopship Pasteur. On 23 July 1941, the day the eastbound convoy would reach ‘the narrows’ five empty transports and two tankers would depart Malta for Gibraltar (Convoy MG 1) The seven empty transports were; Group 1 (speed 17 knots) HMS Breconshire (9776 GRT, built 1939), Talabot (6798 GRT, built 1936),
Group 2 (speed 14 knots) Thermopylae (6655 GRT, built 1930), Amerika (10218 GRT, built 1930),
Group 3 (speed 12 knots) Settler (6202 GRT, built 1939), Tanker Svenor (7616 GRT, built 1931) and Tanker Hoegh Hood (9351 GRT, built 1936) These were escorted by the destroyer HMS Encounter (Lt.Cdr. E.V.St J. Morgan, RN) which had been repairing and refitting at Malta.
Through intelligence it was known that the Italian Navy had five battleships operational (three of them at Taranto) and about ten cruisers divided between Taranto, Palermo and Messina. The Italian Air Force had about 50 torpedo planes and 150 bombers (30 of which were dive bombers) stationed in Sardinia and Sicily, roughly half of each type on both islands.
The Royal Air Force was able to be of more help than during the previous convoy trip from Gibraltar to Malta last January. Aircraft from Gibraltar conducted A/S patrols for the fleet during the first two days of the passage to the east. Also patrols were flown between Sardinia and the coast of Africa, while aircraft from Malta conducted reconnaissance between Sardinia and Sicily, besides watching the Italian ports. Malta would also provide fighter escort for Force X and the convoy after Force H would part with them and HMS Ark Royal could no longer provide fighter cover for them.
During the operation eight submarines (HMS Olympus (Lt.Cdr. H.G. Dymott, RN), HMS Unique (Lt. A.F. Collett, RN), HMS Upholder (Lt.Cdr. M.D. Wanklyn, RN), HMS Upright (Lt. J.S. Wraith, DSC, RN), HMS Urge (Lt. E.P. Tomkinson, RN), HMS Utmost (Lt.Cdr. R.D. Cayley, DSO, RN), HMS P 32 (Lt. D.A.B. Abdy, RN) and HrMs O 21 (Lt.Cdr. J.F. van Dulm, RNN)) were on patrol to report and attack Italian warships that might be sailed to intercept the convoy.
The passage East, 22 July 1941
On 22 July the destroyers from Force X oiled from the Brown Ranger two at a time. A task that took about 10 hours. Having completed the oiling of the destroyers the Brown Ranger and her escort returned to Gibraltar. An Italian aircraft had reported Force H in the morning but the convoy and Force X, at that moment about 100 nautical miles to the south-westward, appeared not to have been sighed. At 2317B/22 the Italian submarine Diaspro missed HMS Renown with torpedoes. HMAS Nestor sighted the torpedo tracks and was able to warn HMS Renown which was then able to avoid the torpedoes by doing an emergency turn to port.
The passage East and attacks by the Italian Air Force, 23 July 1941
Force H rejoined the convoy around 0800B/23 as the British were now approaching the danger area. Shadowing aircraft had already reported the position of the fleet that morning and heavy air attacks soon followed.
The first came at 0945 hours, a well times combination of nine high level bombers and six or seven torpedo planes approaching from the north-east. HMS Ark Royal had eleven fighters up, which met the bombers about 20 miles from the fleet. They managed to down two of the nine bombers but unfortunately three Fulmars were shot down by the enemy. The other seven bombers came on working round the head of the screen of destroyers to attack the convoy from the starboard beam at a height of 10000 feet. Their bombs fell harmlessly amongst the leading ships as they altered course to avoid the attack. The torpedo planes however were more successful. They came from ahead out of the sun, flying low, and as the destroyers opened fire they divided into groups of two or three and to attack the convoy on both sides. Two aircraft attacked HMS Fearless, stationed ahead in the screen, dropping their torpedoes at ranges of 1500 and 800 yards from a height of 70 feet. The destroyer avoided the first torpedo, but was hit by the second, set on fire, and completely disabled. Other aircraft went to press on their attacks on the convoy itself. One of them, dropping its torpedo between two merchant vessels hit HMS Manchester as she was turning to regain her station after avoiding two torpedoes fired earlier. She reversed helm once more but to no avail. During the attacks three enemy torpedo bombers were shot down by AA fire from the ships.
HMS Manchester was badly damaged and could only use one engine out of four. At first she could steam only 8 knots. She was ordered to make for Gibraltar with HMS Avon Vale as escort. That evening, further to the westward, they were attacked again by three enemy torpedo planes but their AA gunfire kept the enemy at a distance. Both ships successfully reached Gibraltar on the 26th.
At 1010B/23 five more bombers tried to attack the convoy crossing this time from north to south. Fighters from HMS Ark Royal forced them to drop their bombs from great height and mostly outside the screen.
At 1645B/23 five more torpedo planes led by a seaplane came in from the northward. Three Fulmars caught them about 20 miles away. They managed to shoot down two planes and drove the remainder away.
Soon afterwards the fleet arrived off the entrance to the Skerki Channel. There HMS Hermione was transferred to Force X to take the place of HMS Manchester. Six destroyers were assigned to Force H and eight to Force X. At 1713 hours Vice-Admiral Somerville hauled round to the westward. HMS Ark Royal kept her Fulmars up until RAF Beaufighters had arrived from Malta to take over.
The convoy was attacked again around 1900B/23. Four torpedo planes arrived from the eastward, flying low and and working round from ahead to the starboard side of the convoy. They approached in pairs in line abreast. They kept HMS Sikh (on the starboard bow of the screen) between them and their target until nearly the moment for attack, thereby hampering the AA fire from the other ships. They dropped their torpedoes from long range from a height of 50 feet and nearly hit HMS Hermione, sternmost ship in the starboard column. To avoid the attack each column of the convoy turned 90° outwards and all warships opened barrage fire from all guns that would bear. The barrage however fell short but it caused the Italians to drop their torpedoes early. Also one of the enemy was possibly shot down.
This attack scattered the convoy and it took some time to reform. At 1945B/23 about seven bombers appeared from ahead at a height of about 14000 feet to attack the convoy from the port side. The convoy altered 40° to port together and the escort opened up a controlled fire with some hesitation as the Italian aircraft looked a lot like Beaufighters. The bombing was extremely accurate. Several bombs fell near HMS Edinburgh which was leading the port column, and a near miss abreast a boiler room disabled HMS Firedrake which had been sweeping ahead of the convoy. She could no longer steam so Rear-Admiral Syfret ordered her back to Gibraltar in tow of HMS Eridge. They had an anxious passage, being shadowed by aircraft continuously during daylight hours, but were not again attacked. On the 25th HMS Firedrake managed to lit one boiler so the tow was slipped. Both destroyers entered Gibraltar harbour on the 27th.
Soon after leaving the Skerki Channel in the evening of the 23th the convoy hauled up to the north-east towards the coast of Sicily. This was to lessen the danger of mines. The Italians did not shadow the convoy after the attack at 1945 hours and missed this alteration of course which they clearly did not expect. Around 2100 hours, as it was getting dark, enemy aircraft were seen searching along its old line of advance. During the evening the convoy sighted flares several times about 20 miles to the south.
Continued passage to the east and enemy attacks, 24 July 1941
Between 0250 and 0315 hours the convoy was however attacked by the Italian MAS boats MAS 532 and MAS 533. The managed to torpedo and damaged the Sydney Star. HMAS Nestor went alongside and took off almost 500 soldiers. Sydney Star was however able to continue her passage as staggler escorted initially by HMAS Nestor. Admiral Syfret however sent back HMS Hermione. At 1000B/24 eight German dive bombers and two high level bombers attacked. Their bombs fell close the escorting ships. HMS Hermione shot down one dive bomber. The three ships arrived at Malta early in the afternoon.
The main body of the convoy meanwhile continued on its way unhindered after the attacks of the motor torpedo boats except for an attempt by three torpedo planes around 0700 hours. They dropped their torpedoes at a safe distance when fired on by the destroyers in the screen ahead. According to the orders Rear-Admiral Syfret was to leave the convoy now, if there was no threat from Italian surface forces, and go on to Malta with the cruisers and some of the destroyers. They were to land the passengers and stores, complete with fuel and return to Force H as soon as possible. The remaining destroyers were to accompany the transports to Malta. They too were to join Force H as soon as possible. Rear-Admiral Syfret felt easy about the surface danger as all Italian ships were reported in harbour the day before, but he was anxious about the threat to the convoy from the air. He decided to go ahead with the cruiser but leave all destroyers with the convoy so at 0745B/24, HMS Edinburgh, HMS Arethusa and HMS Manxman left the convoy and pressed ahead at high speed to Malta where they arrived at noon the same day. The transports and the destroyers arrived about four hours later. They had been attacked only once by a torpedo plane since the cruisers separated.
Return passage of the warships of force X to make rendez-vous with Force H.
In the evening HMS Edinburgh, HMS Arethusa, HMS Hermione and HMS Manxman sailed together followed by five destroyers; HMS Cossack, HMS Maori, HMS Sikh, HMAS Nestor, HMS Foxhound, later the same evening. The destroyers overtook the cruisers in the morning of the 25th. The sixth destroyer, HMS Farndale, had to be left at Malta due to defects (condenser problems). All ships made rendez-vous with Force H to the north-west of Galita Island at 0800B/25.
Movements of Force H after it parted from the convoy.
After parting with the convoy in the evening of the 23rd, Vice-Admiral Somerville had taken force H westward at 18 knots until the afternoon of the 24th going as far west as 03°30’E. He then turned back to meet Admiral Syfret, also sending from HMS Ark Royal six Swordfish aircraft which left her in position 37°42’N, 07°17’E at 1000B/25. After their junction Forces H and X made the best of way towards Gibraltar. Fighter patrols of HMS Ark Royal shot down a shadowing aircraft soon after the fleet had shaped course to the westward, losing a Fulmar in doing so. However another aircraft had meanwhile reported the fleet.
High level bombers appeared from the east and torpedo bombers from the north at 1100 hours. HMS Ark Royal at that moment had four fighters in the air and sent up six more. They prevented the bombing attack shooting down three aircraft out of eight at a cost of two Fulmars, while the ships watched the enemy jettison their bombs 15 miles away. The torpedo attack came to nothing too for the enemy gave up the attempt and retired while still several miles from the fleet. Two days later, on the 27th, the fleet reached Gibraltar.
The movements of the seven empty ships coming from Malta.
Six of the transports / tankers left Malta for Gibraltar in the morning of the 23rd, escorted by HMS Encounter. The seventh ship, tanker Svenor grounded while leaving harbour and was held up for some hours. At dusk, when a few miles from Pantelleria, the six ships devided into pairs according to their speed. HMS Encounter initially escorted the middle pair but joined the leading ships in the evening of the 24th when past the Galita Bank.
Italian aircraft, both high level bombers and torpedo planes, attacked all these ships on the 24th to the southward of Sardinia. They made their first attempt on the second pair of transports and HMS Encounter. Four torpedo planes attacked at 1230B/24 and four bombers at 1250B/24. No ships were hit though the bombs fell close. Next came the turn for the leading pair, which were attacked further westwards by two bombers that came singly at 1330B/24 and 1400B/24. The second plane nearly hit HMS Breconshire. Finally when the third pair of ships reached about the same position in the evening they were attacked by torpedo planes and the Hoegh Hood was damaged but she managed to arrive at Gibraltar only a few hours after her consort on the 27th. The last ship, the one that had been delayed at Malta, arrived on the 28th. (19)
23 Jul 1941
HMS Olympus (Lt.Cdr. H.G. Dymott, RN) attacked a large passenger ship south-east of Ischia Island. No hits were obtained.
Lt.Cdr Dymott thought her had attacked a large liner of the Conte Grande-class but this was not the case. The ship attacked was most likely Città di Trieste (4658 GRT, built 1915) which reported being missed by torpedoes at 1425 hours (Italian time) while off Ischia.
(All times are zone -1) 1327 hours - Fired two torpedoes (four were intended but two torpedo tubes misfired but of the torpedoes fired only one was heard to run) at a large passenger vessel escorted by a small sloop. Range was 3000 yards. Attack position was to the south-east of Ischia Island (146° - Ischia - 2.5 nautical miles). No hits were obtained. (17)
28 Jul 1941
HMS Olympus (Lt.Cdr. H.G. Dymott, RN) torpedoed and sank the Italian merchant Monteponi (742 GRT, built 1917) about 10 nautical miles north of Cape Comino, Sardinia, Italy in position 40°40'N, 09°50'E.
(All times are zone -1) 1055 hours - Sighted a small merchant ship. Started attack.
1155 hours - Fired one torpedo from 900 yards. It hit. The ship was seen to sink in about 40 seconds. (17)
29 Jul 1941
At 1130 hours (zone -1), in position 39°04'N 09°38'E, HMS Olympus (Lt.Cdr. H.G. Dymott, RN) is damaged by a near miss from an Italian aircraft east of Cavoli Island (off the south-east corner of Sardinia) while trying to attack an enemy convoy. Lt.Cdr. Dymott is forced to abandon his patrol and return to Gibraltar where the submarine arrived on 2 August. (17)
2 Aug 1941
HMS Olympus (Lt.Cdr. H.G. Dymott, RN) ended her 11th war patrol (2nd in the Mediterranean) at Gibraltar. At Gibraltar repairs to the damage were undertaken including the removal of the battery for repairs to it. (17)
23 Oct 1941
HMS Olympus (Lt.Cdr. H.G. Dymott, RN) conducted trials and exercises off Gibraltar. (20)
24 Oct 1941
HMS Olympus (Lt.Cdr. H.G. Dymott, RN) conducted exercises off Gibraltar. (20)
27 Oct 1941
HMS Olympus (Lt.Cdr. H.G. Dymott, RN) conducted exercises off Gibraltar. (20)
28 Oct 1941
HMS Olympus (Lt.Cdr. H.G. Dymott, RN) conducted exercises off Gibraltar. (20)
30 Oct 1941
HMS Olympus (Lt.Cdr. H.G. Dymott, RN) departed Gibraltar for her 12th war patrol (3rd in the Mediterranean). She was ordered to patrol off southern France near the Spanish - French border.
For the daily and attack positions of HMS Olympus during this patrol see the map below.
(17)
9 Nov 1941
HMS Olympus (Lt.Cdr. H.G. Dymott, RN) attacks the Italian merchant Mauro Croce (1049 GRT, built 1898) with gunfire and later with a torpedo near the border between Spain and France. The target escapes without damage.
(All times are zone -1) 0325 hours - Off Rosas Bay sighted a darkened ship buring dimmed navigation lights bearing 190°, range 5 nautical miles. Closed to investigate.
0415 hours - The ship was identified as being our target, the Mauro Croce. Started shadowing her.
0545 hours - Closed up the gun crews and made ready the torpedo tubes.
0600 hours - Called Mauro Croce and ordered her to stop.
0605 hours - Having received no reply fired a shot across her bows.
0610 hours - Opened fire from 2500 yards. Fired 12 rounds but obtained no hits.
0615 hours - By now Mauro Croce was possibly in Spanisch waters. Ceased fire.
0617 hours - In position 130°, Cape Bear, 5 nautical miles, fired one torpedo from 1600 yards. It missed.
0642 hours - Dived as it was getting light. (17)
12 Nov 1941
HMS Olympus (Lt.Cdr. H.G. Dymott, RN) ended her 12th war patrol (3rd in the Mediterranean) at Gibraltar.
The commanding officer of the 8th Submarine Flotilla (Capt. G.A.W. Voelcker, RN) was ' not impressed ' by the failed attack on Mauro Crose. (17)
23 Nov 1941
HMS Olympus (Lt.Cdr. H.G. Dymott, RN) conducted A/S exercises off Gibraltar together with 19th Destroyer Flotilla. (21)
24 Nov 1941
HMS Olympus (Lt.Cdr. H.G. Dymott, RN) departed Gibraltar for her 1st storage trip to Malta.
For the daily positions of HMS Olympus during this storage trip see the map below.
(21)
30 Nov 1941
HMS Olympus (Lt.Cdr. H.G. Dymott, RN) arrived at Malta. (21)
3 Dec 1941
HMS Olympus (Lt.Cdr. H.G. Dymott, RN) departed Malta for the return trip to Gibraltar. (21)
10 Dec 1941
HMS Olympus (Lt.Cdr. H.G. Dymott, RN) arrived at Gibraltar. (22)
15 Dec 1941
HMS Olympus (Lt.Cdr. H.G. Dymott, RN) departed Gibraltar for her 2nd storage trip to Malta.
For the daily positions of HMS Olympus during this storage trip see the map below.
(17)
21 Dec 1941
HMS Olympus (Lt.Cdr. H.G. Dymott, RN) arrived at Malta. (17)
26 Dec 1941
HMS Olympus (Lt.Cdr. H.G. Dymott, RN) departed Malta for the return trip to Gibraltar. (17)
2 Jan 1942
HMS Olympus (Lt.Cdr. H.G. Dymott, RN) arrived at Gibraltar. Olympus returned to Gibraltar with engine defects that required about three weeks to repair. (17)
6 Feb 1942
HMS Olympus (Lt.Cdr. H.G. Dymott, RN) conducted A/S exercises off Gibraltar with HMS Boadicea (Cdr. H.P. Henderson, RN) and HMS Convolvulus (T/Lt. R.C. Connell, RNR) and later with HMS Wivern (Cdr. M.D.C. Meyrick, RN) and HMS Coltsfoot (T/Lt. the Hon. W.K. Rous, RNVR). (23)
7 Feb 1942
HMS Olympus (Lt.Cdr. H.G. Dymott, RN) conducted exercises off Gibraltar. (23)
12 Feb 1942
HMS Olympus (Lt.Cdr. H.G. Dymott, RN) departed Gibraltar for her 3rd storage trip to Malta.
For the daily positions of HMS Olympus during this storage trip see the map below.
(23)
20 Feb 1942
HMS Olympus (Lt.Cdr. H.G. Dymott, RN) arrived at Malta. (23)
22 Feb 1942
HMS Olympus (Lt.Cdr. H.G. Dymott, RN) departed Malta for the return trip to Gibraltar. (23)
1 Mar 1942
HMS Olympus (Lt.Cdr. H.G. Dymott, RN) arrived at Gibraltar. (24)
4 Mar 1942
HMS Olympus (Lt.Cdr. H.G. Dymott, RN) is docked in No.2 Graving Dock at Gibraltar. (24)
7 Mar 1942
HMS Olympus (Lt.Cdr. H.G. Dymott, RN) is undocked. (24)
12 Mar 1942
HMS Olympus (Lt.Cdr. H.G. Dymott, RN) departed Gibraltar for her 4th storage trip to Malta.
For the daily positions of HMS Olympus during this storage trip see the map below.
(17)
20 Mar 1942
HMS Olympus (Lt.Cdr. H.G. Dymott, RN) arrived at Malta. (17)
22 Mar 1942
HMS Olympus (Lt.Cdr. H.G. Dymott, RN) departed Malta for the return trip to Gibraltar. (17)
29 Mar 1942
HMS Olympus (Lt.Cdr. H.G. Dymott, RN) arrived at Gibraltar. (17)
25 Apr 1942
HMS Olympus (Lt.Cdr. H.G. Dymott, RN) departed Gibraltar for her 5th storage trip to Malta. (25)
3 May 1942
HMS Olympus (Lt.Cdr. H.G. Dymott, RN) arrived at Malta. (25)
8 May 1942
HMS Olympus (Lt.Cdr. H.G. Dymott, RN) departed Malta for the return trip to Gibraltar. She was mined and sunk shortly after her departure. (26)
Sources
- ADM 173/15825
- ADM 173/15826
- ADM 173/15827
- ADM 173/15828
- ADM 173/15829
- ADM 173/16355
- ADM 173/16356
- ADM 173/16357
- ADM 173/16358
- ADM 173/16359
- ADM 173/16360
- ADM 173/16361
- ADM 173/16363
- ADM 173/16364
- ADM 173/16365
- ADM 173/16366
- ADM 199/1831
- ADM 173/16827
- ADM 53/114626 + ADM 234/335
- ADM 173/16830
- ADM 173/16831
- ADM 173/16832
- ADM 173/17319
- ADM 173/17320
- ADM 199/2564
- ADM 199/1217
ADM numbers indicate documents at the British National Archives at Kew, London.