
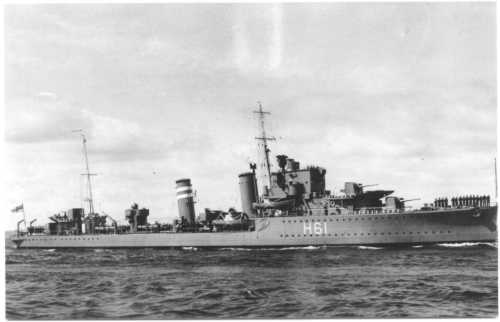
| Navy | The Royal Navy |
| Type | Destroyer |
| Class | E |
| Pennant | H 61 |
| Built by | Swan Hunter and Wigham Richardson Ltd. (Wallsend-on-Tyne, U.K.): Wallsend |
| Ordered | 1 Nov 1932 |
| Laid down | 23 Mar 1933 |
| Launched | 29 May 1934 |
| Commissioned | 31 Oct 1934 |
| End service | 3 Jun 1943 |
| History | HMS Express was transferred to the Royal Canadian Navy as HMCS Gatineau on 3 June 1943. Scrapped at Vancouver in 1956. |
| Career notes | Became the Canadian destroyer Gatineau |
Commands listed for HMS Express (H 61)
Please note that we're still working on this section
and that we only list Commanding Officers for the duration of the Second World War.
| Commander | From | To | ||
| 1 | Cdr. Jack Grant Bickford, RN | 25 Aug 1939 | 1 Sep 1940 | |
| 2 | Lt.Cdr. David Hugh Maitland-Makgill-Crichton, DSC, RN | 1 Sep 1940 | late 1940 | |
| 3 | Lt.Cdr. Francis Jack Cartwright, RN | 22 Jul 1941 | 3 Jun 1943 | |
You can help improve our commands section
Click here to Submit events/comments/updates for this vessel.
Please use this if you spot mistakes or want to improve this ships page.
Notable events involving Express include:
22 Sep 1939
Operation SK.
To conduct an operation against German shipping off the Norwegian coast the light cruiser HMS Aurora (Capt. G.B. Middleton, RN, flying the flag of Rear-Admiral R.H.C. Hallifax, RN) and the destroyers HMS Tartar (Capt. G.H. Warner, DSC, RN), HMS Punjabi (Cdr. J.T. Lean, RN), HMS Eskimo (Cdr. St. J.A. Micklethwait, RN) and HMS Bedouin (Cdr. J.A. McCoy, RN) departed Scapa Flow around 0700A/22 as well as the light cruisers HMS Southampton (Capt. F.W.H. Jeans, CVO, RN, flying the flag of Vice-Admiral G.F.B. Edward-Collins, CB, KCVO, RN), HMS Sheffield (Capt. E. de F. Renouf, CVO, RN), HMS Glasgow (Capt. F.H. Pegram, RN) and the destroyers HMS Jervis (Capt. P.J. Mack, RN), HMS Javelin (Cdr. A.F. Pugsley, RN) and HMS Jupiter (Lt.Cdr. D.B. Wyburd, RN) which had departed Rosyth around 0415A/22. HMS Jersey (Lt.Cdr. A.M. McKillop, RN), coming from the Chatham Dockyard, joined at sea.
To provide cover for this operation two forces were deployed from Scapa Flow. One force was made up of the battlecruisers HMS Hood (Capt. I.G. Glennie, RN, flying the flag of Rear-Admiral W.J. Whitworth, CB, DSO, RN), HMS Repulse (Capt. E.J. Spooner, DSO, RN) and the destroyers HMS Fame (Cdr. P.N. Walter, RN), HMS Firedrake (Lt.Cdr. S.H. Norris, RN), HMS Foresight (Lt.Cdr. G.T. Lambert, RN) and HMS Fortune (Cdr. E.A. Gibbs, RN). They had departed Scapa Flow around 1000A/22.
The other force was made up of the battleships HMS Nelson (Capt. G.J.A. Miles, RN, flying the flag of Admiral J.M. Forbes, KCB, DSO, RN), HMS Rodney (Capt. E.N. Syfret, RN), aircraft carrier HMS Ark Royal (Capt. A.J. Power, RN, flying the flag of Vice-Admiral L.V. Wells, CB, DSO, RN) and the destroyers HMS Faulknor (Capt. C.S. Daniel, RN), HMS Fearless (Cdr. K.L. Harkness, RN), HMS Foxhound (Lt.Cdr. P.H. Hadow, RN), HMS Somali (Capt. R.S.G. Nicholson, DSC, RN), HMS Mashona (Cdr. P.V. McLaughlin, RN) and HMS Matabele (Cdr. G.K. Whitmy-Smith, RN). Later the destroyers HMS Forester (Lt.Cdr. E.B. Tancock, RN), HMS Fury (Cdr. G.F. Burghard, RN), HMS Esk (Lt.Cdr. R.J.H. Couch, RN) and HMS Express (Cdr. J.G. Bickford, RN) joined at sea. They had departed Scapa Flow around 1030A/22.
The raid was abandoned when HMS Javelin and HMS Jersey collided in position 57°09'N, 03°08'W at 2038A/22.
All forces returned to their port of departure on 23 September but not before HMS Hood reported an explosion at 1330A/23. The destroyers HMS Firedrake and HMS Fortune were detached to investigate but no contact was obtained. In fact this was indeed an attack by a German submarine; U-24 which reported to have made a failed torpedo attack at 1328A/23 on HMS Hood and two escorting destroyers.
23 Sep 1939
Around 2330/23, HMS Royal Sovereign (Capt. L.V. Morgan, CBE, MVO, DSC, RN) departed Scapa Flow for Portsmouth. She was escorted by the destoyers HMS Esk (Lt.Cdr. R.J.H. Couch, RN) and HMS Express (Cdr. J.G. Bickford, RN).
They arrived at Portsmouth around 1200/26. HMS Royal Sovereign was to be taken in hand for refit and modernisation at the Royal Dockyard. This was however cancelled and it was decided to give the ship a short refit only to make her fit for further service as in her current state she was deemed unfit for service. This refit however was to take place at the Devonport Dockyard at Plymouth. (1)
13 Mar 1940
On or around 13 March 1940 German U-boat U-44 hit a mine in the barrage Field No. 7 laid by the British destroyers HMS Express (Cdr. J.G. Bickford, DSC, RN) HMS Esk (Lt.Cdr. R.J.H. Couch, RN), HMS Icarus (Cdr. C.D. Maud, DSC, RN) and HMS Impulsive (Lt.Cdr. W.S. Thomas, RN) on 3 March 1940.
6 Apr 1940
On 6 April 1940 German U-boat U-1 hit a mine in the barrage Field No. 7 laid by the British destroyers HMS Express (Cdr. J.G. Bickford, DSC, RN) HMS Esk (Lt.Cdr. R.J.H. Couch, RN), HMS Icarus (Cdr. C.D. Maud, DSC, RN) and HMS Impulsive (Lt.Cdr. W.S. Thomas, RN) on 3 March 1940.
9 May 1940
The mine laying destroyers HMS Express (Cdr. J.G. Bickford, DSC, RN), HMS Esk (Lt.Cdr. R.J.H. Couch, RN) and HMS Intrepid (Cdr. R.G. Gordon, RN) lay 180 mines in known German swept channels in operation XMG.
29 May 1940
HMS Jaguar (Lt.Cdr. J.F.W. Hine RN) is damaged in a German air attack when she was inside Dunkirk harbour alongside the east mole. During the attack she was alongside HMS Grenade (Cdr. R.C. Boyle, RN) which was also bombed and finally sank outside the harbour due to the damage sustained.
The troops which were on board HMS Jaguar had to be transferred to other ships. She then made off for Dover being towed by HMS Express (Cdr. J.G. Bickford, DSC, RN) for part of the way.
She was finally towed into Dover by a tug.
2 Aug 1940
On or around 2 August 1940 German U-boat U-25 hit a mine in the barrage Field No. 7 laid by the British destroyers HMS Express (Cdr. J.G. Bickford, DSC, RN) HMS Esk (Lt.Cdr. R.J.H. Couch, RN), HMS Icarus (Cdr. C.D. Maud, DSC, RN) and HMS Impulsive (Lt.Cdr. W.S. Thomas, RN) on 3 March 1940.
31 Aug 1940
Operation CBX 5.
On 31 August 1940, a group of destroyers sailed from Immingham on a mine laying mission to the north-west of the Dutch island of Vlieland.
The minelaying destroyers were from the 20th Destroyer Flotilla, these were; HMS Express (Capt. J.G. Bickford, DSO, DSC, RN), HMS Esk (Lt.Cdr. R.J.H. Couch, DSC, RN), HMS Icarus (Cdr. C.D. Maud, DSC, RN), HMS Intrepid (Cdr. R.C. Gordon, RN) and HMS Ivanhoe (Cdr. P.H. Hadow, RN). The minelayers were escorted by three destroyers of the 5th Destroyer Flotilla, these were; HMS Jupiter (Cdr. D.B. Wyburd, RN, with Capt. L.F.A.V.N. Mountbatten, GCVO, RN = Capt.(D.5) on board), HMS Kelvin (Cdr. J.H. Allison, DSO, RN) and HMS Vortigern (Lt.Cdr. R.S. Howlett, RN).
The mines were to be laid within an area enclosed by lines joining positions; A) 53°25.0'N, 04°45.0'E. B) 53°22.6'N, 04°52.2'E. C) 53°25.2'N, 04°54.4'E. D) 53°27.6'N, 04°47.0'E.
At 2250A/31, aerial reconnaissance reported a large number of German ships to the north of the Dutch island of Terschelling proceeding westwards. The destroyers of the 20th Destroyer Flotilla were ordered to jettison their mines and intercept, believing wrongly that the German ships were part of an invasion force.
At 2307A/31, HMS Express struck a mine in position 53°25'N, 03°48'E. She was badly damaged but did not sink. HMS Esk went to her assistance and hit mine at 2325A/31, she sank immediately. HMS Ivanhoe also went to her assistance and hit a mine at 0051A/1. She was badly damaged, but she was able to proceed for a while.
HMS Jupiter, HMS Kelvin and HMS Vortiger were behind the minelaying destroyers providing cover for the operation. HMS Jupiter and HMS Kelvin went to the aid of the damaged destroyers while HMS Vortigern remained behind to mark the gap in the minefield for their return.
The escort destroyers, HMS Garth (Lt.Cdr. E.H. Dyke, RN) and HMS Hambledon (Cdr. S.H. Carlill, RN), which were on patrol off the coast near Harwich were also ordered to assist.
The minesweepers HMS Leda (Lt.Cdr. H. Unwin, DSC, RN) and HMS Saltash (Lt.Cdr. T.R. Fowke, RN), motor torpedo boats HMS MTB 14, HMS MTB 15, HMS MTB 16, HMS MTB 17, HMS MTB 29, HMS MTB 30, HMS MTB 31 and the tugs HMS St. Cyrus, Irishman, Norman, Wheeldon were also ordered to go the assistance of the crippled ships.
Around 0800A/1, most of the crew of HMS Ivanhoe abandoned ship and boarded MTB 14, MTB 16, MTB 17. Thirty of the crew remained onboard trying to save the ship.
At 0941A/1, HMS Express was taken in tow by HMS Kelvin, but when the towing line fouled HMS Kelvin'spropeller the tow was taken over by HMS Jupiter until it was passed over to the tug HMS St. Cyrus. Close cover for the towing group was provided by HMS Vortigern and HMS Hambledon. HMS Jupiter and HMS Kelvin formed a strike group in case German warships would arrive on the scene. HMS Express was towed to Hull where she arrived on 2 September 1940 and was out of action for around a year.
At 1415A/1, the remaining crew of HMS Ivanhoe had to board MTB 15 as HMS Ivanhoe was rapidly sinking.
Later that afternoon a British aircraft reported that HMS Ivanhoe was still afloat. HMS Kelvin, HMS Garth and MTB 30 were ordered to search for her. At 1619A/1, HMS Garth spotted HMS Ivanhoe while it was being attacked by a German aircraft. HMS Kelvin also arrived on the scene and she sank the wreck of HMS Ivanhoe at 1700A/1 with a torpedo.
Meanwhile the light cruisers HMS Galatea (Capt. B.B. Schofield, RN, flying the flag of Rear-Admiral A.T.B. Curteis, CB, RN), HMS Aurora (Capt. L.H.K. Hamilton, DSO, RN) and HMS Cardiff (Capt. P.K. Enright, RN) had departed the Humber around 0130/1, to make rendez-vous with HMS Jupiter, HMS Kelvin and HMS Vortigern after the minelaying mission. As the minelaying mission was cancelled the cruisers returned to Immingham and while doing so HMS Galatea struck a mine off the Cleaner Shoal Buoy near the Humber light vessel. Damage was however only minor. The cruisers arrived at Immingham around 0800A/1.
9 Oct 1941
HMS Prince of Wales (Capt. J.C. Leach, MVO, RN) conducted exercises off Scapa Flow. She was escorted by HMS Express (Lt.Cdr. F.J. Cartwright, RN) and HMS Oribi (Lt.Cdr. J.E.H. McBeath, DSO, RN). (2)
23 Oct 1941
HMS Prince of Wales (Capt. J.C. Leach, MVO, RN) departed Scapa Flow for Greenock. She was escorted by HMS Electra (Cdr. C.W. May, RN) and HMS Express (Lt.Cdr. F.J. Cartwright, RN). (2)
25 Oct 1941
Shortly after 1300 hours, HMS Prince of Wales (Capt. J.C. Leach, MVO, RN), departed Greenock for the Far East. She was escorted by HMS Electra (Cdr. C.W. May, RN), HMS Express (Lt.Cdr. F.J. Cartwright, RN) and HMS Hesperus (Lt.Cdr. A.A. Tait, RN). (2)
28 Oct 1941
HMS Prince of Wales (Capt. J.C. Leach, MVO, RN) and her destroyer screen were joined by the destroyer HMS Legion (Cdr. R.F. Jessel, RN), coming from Ponta Delgada, Azores, around 1500 hours.
At 1630 hours, HMS Electra (Cdr. C.W. May, RN) and HMS Express (Lt.Cdr. F.J. Cartwright, RN) left the destroyer screen to refuel at Ponta Delgada. They rejoined the destroyer screen at 1900/29 after which HMS Hesperus (Lt.Cdr. A.A. Tait, RN) and HMS Legion left the screen. (2)
5 Nov 1941
HMS Prince of Wales (Capt. J.C. Leach, MVO, RN), and her escorting destroyers, HMS Electra (Cdr. C.W. May, RN) and HMS Express (Lt.Cdr. F.J. Cartwright, RN), arrive at Freetown. (3)
6 Nov 1941
HMS Prince of Wales (Capt. J.C. Leach, MVO, RN), and her escorting destroyers, HMS Electra (Cdr. C.W. May, RN) and HMS Express (Lt.Cdr. F.J. Cartwright, RN), departed Freetown for Capetown, South Africa. (3)
16 Nov 1941
HMS Prince of Wales (Capt. J.C. Leach, MVO, RN), and her escorting destroyers, HMS Electra (Cdr. C.W. May, RN) and HMS Express (Lt.Cdr. F.J. Cartwright, RN), arrive at Capetown.
While at Capetown seven single 20mm Oerlikon AA guns were added by the Simonstown Royal Dockyard. (3)
18 Nov 1941
HMS Prince of Wales (Capt. J.C. Leach, MVO, RN), and her escorting destroyers, HMS Electra (Cdr. C.W. May, RN) and HMS Express (Lt.Cdr. F.J. Cartwright, RN), departed Capetown for Colombo, Ceylon. (3)
24 Nov 1941
HMS Prince of Wales (Capt. J.C. Leach, MVO, RN) and her two escorting destroyers, HMS Electra (Cdr. C.W. May, RN) and HMS Express (Lt.Cdr. F.J. Cartwright, RN), made a short stop at Mauritius. (3)
28 Nov 1941
HMS Prince of Wales (Capt. J.C. Leach, MVO, RN), and her escorting destroyers, HMS Electra (Cdr. C.W. May, RN) and HMS Express (Lt.Cdr. F.J. Cartwright, RN), arrive at Colombo. (3)
29 Nov 1941
HMS Prince of Wales (Capt. J.C. Leach, MVO, RN), and her escorting destroyers, HMS Electra (Cdr. C.W. May, RN), HMS Encounter (Lt.Cdr. E.V.St J. Morgan, RN), HMS Express (Lt.Cdr. F.J. Cartwright, RN) and HMS Jupiter (Lt.Cdr. N.V.J.P. Thew, RN), departed Colombo for Singapore. At sea they made rendez-vous with HMS Repulse (Capt. Sir W.G. Tennant, CB, MVO, RN) which had departed Trincomalee also on that day. (3)
2 Dec 1941
HMS Prince of Wales (Capt. J.C. Leach, MVO, RN), HMS Repulse (Capt. Sir W.G. Tennant, CB, MVO, RN) and their escorting destroyers, HMS Electra (Cdr. C.W. May, RN), HMS Encounter (Lt.Cdr. E.V.St J. Morgan, RN), HMS Express and HMS Jupiter (Lt.Cdr. N.V.J.P. Thew, RN) arrive at Singapore.
At Singapore HMS Prince of Wales, HMS Encounter and HMS Jupiter were immediately taken in hand for some much needed repairs. (4)
8 Dec 1941
Sinking of the Prince of Wales and the Repulse
Movements of Force Z, 8 to 10 December 1941
At 1735 hours, Force Z, made up of HMS Prince of Wales (Capt. J.C. Leach, MVO, RN, flying the flag of A/Admiral T.S.V. Phillips, KCB, RN), HMS Repulse (Capt. Sir W.G. Tennant, CB, MVO, RN) escorted by the British destroyers HMS Electra (Cdr. C.W. May, RN), HMS Express (Lt.Cdr. F.J. Cartwright, RN), HMS Tenedos (Lt. R. Dyer, RN) and the Australian destroyer HMAS Vampire (Cdr. W.T.A. Moran, RAN) departed Singapore for a raid against Japanese landing forces that were reported off the east coast of Malaya. Course was shaped to the east-north-east to pass east of the Anambas Islands in order to avoid possible minefields.
At 0125/9 an important signal was received from the Chief of Staff who had remained in Singapore, which confirmed that the air reconaissance asked for had been arranged, but it also stated that owning to the current military situation fighter protection off Singora the next day would not be possible. It also added that the Japanese had large bomber forces based in Southern Indo-China and possibly in Siam and that a requist had been made to the US General MacArthur to attack the Indo-China airfields with longe range bombers from the Philippines as soon as possible. Finally the signal stated that the airfield at Kota Bharu airfield had been evacuated and that we seemed to be 'loosing grip' in the other northern airfields due to enemy action.
A/Admiral Phillips decided, to carry on with the operation provided that he was not being sighted by enemy aircraft during 9 December. At 0400 hours course was therefore altered to the northward.
At 0620/9, HMAS Vampire reported an aircraft. It was sighted for a few seconds by one lookout only and as the weather was favourable for evasion, with frequent rain squalls and low cloud, the squadron held its course to the northward.
Between 1700 and 1830 hours, however, the weather cleared and three Japanese reconnaissance aircraft were sighted from the Prince of Wales at 1740 hours. This meant that all hopes of surprise had been lost, and a heavy scale air attack off Singora had to be anticipated. Under these cirumstances the Commander-in-Chief that the risk was unjustifiable and that the strike against the enemy landing fleet at Singora had to be given up.
At 1825/9, HMS Tenedos, which was by now getting low on fuel was detached to Singapore. She was also ordered to transmit a signal at 0800/10 to the Chief of Staff requisting additional destroyers to meet Force Z off the Anambas Islands at dawn on the 11th. The remainder of the squadron then altered course to the north-westward at 1850 hours and to the westward towards Singora at 1930 hours. The squadron continued to the westward until 2015 hours when A/Admiral Phillips finally decided to abandon the operation and return to Singapore at high speed.
At 2335/9, a signal was received mentioning a landing by the Japanese at Kuantan, this was over 150 miles to the southward of Kota Bharu and it seemed unlikely that the enemy would expect Force Z, last located on a northerly course and making for Singora, to be as far south by daylight. Kuantan was a key military position of great importance, it was not far off the return track to Singapore and was 400 miles from the Japanese airfields in French Indo-China. On these grounds A/Admiral Phillips decided to alter course for Kuantan at 0052/10 and increase speed to 25 knots.
Japanese reaction during 9/10 December.
Bad weather had precluded air search by shore base aircraft on 9 December but that afternoon the British squadron had been sighted by the submarine I-65. This report reached the 22nd Air Flotilla, based near Saigon, Indo-China at about 1600 hours. Aircraft then took off for a night attack but the British force was not found and all aircraft returned to their base around midnight.
In the meantime Force Z had been located by aircraft from the heavy cruiser Kumano and light cruiser Kinu and Admiral Kondo who was moving south from Hainan with the battlefleet (battleships Kongo, Haruna, heavy cruisers Atago, Takao and destroyers Arashi, Hagikaze, Nowaki, Maikaze, Ikazuchi, Inazuma, Asashio, Oshio, Michishio and Arashio), decided to keep in touch with Force Z by aircraft and submarine during the night and to attack at dawn with all available aircraft. He also ordered Vice-Admiral Ozawa's forces (heavy cruiser Chokai and destroyer Sagiri) and Rear-Admiral Kurita's forces (heavy cruisers Kumano, Mikuma, Mogami, Suzuya and destroyers Fubuki, Hatsuyuki and Shirayuki to join his flag at 0230/10 south of Pulau Condore, when he would move with his whole fleet to the southward on the flank of A/Admiral Phillips probable line of retreat.
The shadowing aircraft however lost touch with Force Z during the night owning to rain squalls however at 0221/10 the Japanese submarine I-58 sighted Force Z on a southerly course and attacked HMS Repulse with five torpedoes which all missed. She then surfaced and followed at 16 knots but lost contact at 0305 hours.
On receipt of the enemy report from the I-58 at about 0315 hours it was clear that Force Z was out of reach of the fleet which then set course for Camranh Bay at 0645/10. All was then dependend on aircraft and submarines.
At Saigon, twelve aircraft armed with two 60kg bombs took off at 0600/10 to conduct a sector search. About one hour later a striking force made up of 84 aircraft (30 bombers and 54 torpedo planes) took off and was ordered to the estimated position of the enemy task force. The force was organised in flights of of about 9 planes. The general plan was to attack continuously, stating with a bombing attack from about 8000 feet. All attacks were to be controlled by the flight leaders according to the way in which the situation developed. As will be seen the attacks were carried out almost exactly as planned.
The flights proceeded independently to the south along the 105th meridian. Nothing was seen of Force Z during this southerly run and after sighting Singapore they turned to the northward, a course which was to lead them straight to their quarry, which was sighted by a land based reconnaissance aircraft at 1026/10.
Loss of the Prince of Wales and Repulse.
In the meantime Force Z had been closing the shore at 25 knots and at dawn on 10 December was about 60 nautical miles east-north-east of Kuantan. The sun had just risen when HMS Repulse reported an aircraft which was not identified (Capt. Tennant later stated that it was Japanese). The force continued to the westward. HMS Prince of Wales launched a Walrus aircraft which arrived of Kuantan at 0800 hours. No enemy forces were sighted. HMS Express was then ordered to investigate and reported 'complete peace' and rejoined the force at 0845 hours. The Commander-in-Chief then decided to investigate a tug towing some barges which had been sighted at extreme visibility during the run in. Course was then altered to the northward and later to the eastward for this purpose.
It was during this run to the eastward that Force Z was attacked by successive waves of Japanese bomber and torpedo aircraft which eventually sank both capital ships.
Shortly after 1000/10 reports of hostile aircraft were received from the destroyer Tenedos, then being bombed 140 nautical miles to the south-east. At 1020 hours a shadowing aircraft was sighted from the Prince of Wales and the first degree of readiness was assumed. Soon afterwards an enemy aircraft was picked up by the radar of HMS Repulse.
At 1100 hours course was altered to 135°. A few minutes later nine enemy aircraft were seen approaching from the starboard bow, flying at about 10000 feet. All ships, except HMAS Vampire, which was outranged, opened fire. The enemy concentrated the high level bombing attack onHMS Repulse. One bomb fell just clear to starboard, seven very close to port, and one hit the port hangar, bursting on the armour below the marines mess deck at 1122 hours. This caused a fire on the catapult deck and fractured a steam pipe. No damage was done to the engine or boiler rooms and the fire was rapidly got under control.
Twenty minutes later nine torpedo bombers attacked from the port bow. They had been seen to cross from starboard to port at extreme range, and after making use of cloud on the port beam to do a series of turns together, attacked in waves of two or three in line abreast. The attack was very well executed and the enemy was in no way disturbed by gunfire from Force Z. HMS Repulse alter course right away to starboard and escaped unhurt. HMS Prince of Wales however altered course to port and it was thought at that time that she had avoided all torpedoes fired at her except one which hit the port side aft, approximately abreast of 'P 3' and 'P 4' 5.25" gun turrets, but it now seems probable that she was actually hit simultaneously by another torpedo abaft 'Y' turret. The consequences of this attack were disastrous. 'B' engine room, 'Y' boiler room, the port diesel engine room and 'Y' action machinery room were flooded. Both propeller shafts stopped and speed dropped to 15 knots. The steering gear was damaged and the ship was never again under complete control. Within a few minutes she assumed a list of 13° to port and increased her trim by the stern, till by 1220 hours the port side of the quarter deck was awash. All the 5.25" armament, except turret 'S 1', was put out of action either due to the list or failure of power.
As they crossed the line of advance after dropping their torpedoes, two of the enemy aircraft were hit. One crashed into the sea on the starboard beam.
At 1156 hours HMS Repulse was attacked by another group of nine torpedo bombers. These came in from her port side. Repulse altered course towards them and succeeded in combing a large number of torpedo tracks. Almost simultaneously a high level bombing attack developed, again concentrated on HMS Repulse. The ship was manoeuvering at high speed, being actually under helm when the bombs fell at 1158 hours and escaped untouched. There was one near miss to starboard and the remainder fell just clear to port.
Owing to independent avoiding action, HMS Prince of Wales and HMS Repulse had opened some distance apart. Captain Tennant, who was uncertain what signals the Prince of Wales had made, himself made an emergency W/T report 'enemy aircraft bombing' at 1158 hours and after the second high level bombing attack, he informed the Commander-in-Chief by visual that HMS Repulse had so far avoided all torpedoes and that damage from the bomb which had hit her was under control. He also asked him whether the flagship's wireless was still in action, in case he wished any reports made by HMS Repulse. At 1210 hours the Prince of Wales hoisted 'not under control' balls and Captain Tennant closed her, reducing to 20 knots to see if he could be of any assistance. In the meantime another attack was developing. About eight aircraft were sighted low on the horizon on the starboard bow of the Repulse. When about three miles distant they split into two formations. The right-hand one attacked the Repulse from the starboard side, dropping their torpedoes at about 2500 yards range.
Captain Tennant, foreseeing this, had already started to swing the ship to starboard, and anticipated no difficulty in combing their tracks. The left hand formation was appartently making straight for the Prince of Wales, at that time abaft of the Repulse's port beam, but suddenly turned straight at the latter and dropped torpedoes when about 2000 yards on her port beam. No avoiding action was possible as any large alteration of course would have incurred a hit from the torpedoes whose tracks were already being combed, and one torpedo hit amidships on the port side. This Repulse stood well and she continued to manoeuvre at 25 knots.
Almost at the same time HMS Prince of Wales was attacked from her starboard side. She seemed incapable of taking avoiding action, and sustained two hits at 1223 hours, and a further two a minute and a half later. The first two of these hits were forward of the breakwater and just before the bridge, the others aft, near 'Y' turret and abreast of 'B' turret. The immediate effect was to reduce the list to 3° to port, the starboard outer propeller shaft stopped and speed dropped to about eight knots. One of the attacking aircraft was shot down.
Fresh waves of torpedo bombers then attacked HMS Repulse from several directions. She shot down two at 1226 hours but a torpedo hit jammed her stearing gear, and, though she could still steam at well over 20 knots, almost immediately afterwards three torpedoes hit her abreast the superstructure, two simultaneously on the port side and one on the starboard side. She turned sharply 90° to starboard, listing heavily to port. This brought her fine on the Prince of Wales' quarter, steering a parralel course. Captain Tennant knew that the end was at hand, and at once gave the order for everyone to come on deck and cast loose the Carley floats. HMS Repulse hung for at least a minute and a half to two minutes with a list of 60° to 70° to port and then rolled over at 1233 hours.
During these attacks HMS Express had been screening the flagship's starboard bow, and HMAS Vampire on her port bow, while HMS Electra, which had been detached to pick up a man who had fallen overboard from the Prince of Wales at 1205 hours, was between the two capital ships. HMAS Vampire and HMS Electra now at once closed HMS Repulse by order of the Commander-in-Chief and they succeeded in rescuing 42 out of 69 officers (including Captain Tennant) and 754 out of 1240 ratings.
The Prince of Wales meanwhile had been heading north, her speed reduced to eight knots. Just after Repulse had capsized nine high level bombers were seen passing from port to starboard, and then ten minutes later a high level bombing attack developed from ahead. At 1244 hours a bomb hit near 'S 3' turret wrecking the port crane and canteen flat, and causing a fire. It failed however to pierce the armoured deck. The remainder of the bombs missed narrowly aft, falling on both sides of the ship.
At 1250 hours a signal was sent to Singapore requisting all available tugs, but by this time the ship was clearly doomed and a few minutes later HMS Express went alongside the starboard quarter, and the disembarkation of wounded and men not required to fight the ship commenced. Carley floats were launched and the gripes cast off the boom boats. By 1310 hours the ship was settling rapidly, listing steeply to port and orders were passed to inflate lifebelts and abandon ship. At 1320 hours HMS Prince of Wales heeled over sharply, turned turtle and sank.
Skilfully handled, HMS Express had remained alongside until the last possible moment and had to go full speed astern to clear herself, sustaining damage from a projection on the hull of the battleship, possibly the bilge keel, as she heeled over. The next three quarters of an hour was spent in rescue work, at the end of which time she was completely full and at 1415 hours course was set for Singapore. All the remaining survivors for whom she had no room were then on rafts or in boats, from where they were subsequently picked up by HMS Electra and HMAS Vampire. A total of 90 officers out of 110 and 1195 ratings out of 1502 were rescued. Neither A/Admiral Phillips nor Captain Leach was among them.
At 1515 hours, HMAS Vampire left the scene followed at 1602 hours by HMS Electra after she had made a final search of the area. All three destroyers arrived at Singapore between 2300/10 and 0000/11. (4)
22 Dec 1941
Convoy BM 9B.
This convoy departed Bombay on 22 December 1941.
It was made up of the following (troop) transports; El Madina (British, 3962 GRT, built 1937), Jalarajan (British, 5076 GRT, built 1925), Rajput (British, 5521 GRT, built 1925), Risaldar (British, 5407 GRT, built 1940) and Talma (British, 10000 GRT, built 1923).
On departure from Bombay it was escorted by the Greek armoured cruiser RHS Georgios Averoff.
Around 1530EF/26, the light cruiser HMS Glasgow (Cdr. J.W. Cuthbert, RN) departed Colombo with the transport Madura (British, 8975 GRT, built 1921). They joined the convoy around 0730EF/27 in position 04°38'N, 80°40'E. The Georgios Averoff then parted company to proceed to Colombo. The transport Talma had apparently parted company on the 26th to proceed to Colombo.
Around 1415G/31, HMS Glasgow was relieved in position 00°27'S, 94°51'E by the light cruisers HMS Danae (Capt. F.J. Butler, MBE, RN) and HrMs Java (Capt. P.B.M van Straelen, RNN).
Around 1230GH/3, the destroyers HMS Electra (Cdr. C.W. May, RN), HMS Express (Lt.Cdr. F.J. Cartwright, RN) and HMS Stronghold (Lt.Cdr.(Retd.) G.R. Pretor-Pinney, RN) joined in approximate position 06°27'S, 103°00'E.
Around 0700GH/4, HrMs Java and the transport Madura parted company to proceed to Batavia.
Around 1200GH/4, the light cruisers HrMs De Ruyter (Cdr. E.E.B. Lacomblé, RNN and flagship of Rear-Admiral K.W.F.M. Doorman, RNN), HrMs Tromp (Cdr. J.B. de Meester, RNN) and the destroyers HrMs Piet Hein (Lt.Cdr. J.M.L.I. Chompff, RNN) and HrMs Banckert (Lt.Cdr. L.J. Goslings, RNN) joined in approximate position 05°15'S, 106°20'E. They had departed Banten Bay earlier in the day.
Around 0600GH/5, the minesweepers HMAS Burnie (T/A/Lt.Cdr. G.E. Gough, RANR(S)) and HMAS Goulburn (Lt. B. Paul, RANR(S)) joined the convoy.
Around 1200GH/5, the light cruiser HMAS Hobart (Capt. H.L. Howden, CBE, RAN) joined the convoy in Banka Strait in approximate position 02°40'S, 105°49'E.
After the passage of the Banka Strait had been completed the Dutch ships that had joined around 1200GH/4 parted company around 2000GH/5.
Around 1645GH/6, HMAS Hobart parted company with the convoy to proceed to Batavia.
The convoy arrived at Singapore around 1930GH/6.
The convoy arrived at Singapore (5)
8 Jan 1942
HMS Express (Lt.Cdr. F.J. Cartwright, RN) and HMS Thanet (Cdr.(Retd.) B.S. Davies, RN) are docked in AFD 9 at the Singapore Dockyard. (6)
10 Jan 1942
Convoys MS 2 and MS 2A.
Convoy MS 2 departed Sydney on 10 January 1942.
This convoy was made up of only one ship, the troopship Aquitania (British, 44786 GRT, built 1914).
On departure from Sydney convoy MS 2 was escorted by the heavy cruiser HMAS Canberra (Capt. G.D. Moore, RAN).
Convoy MS 2 arrived at Fremantle on 15 January and departed again in the same composition on the 16th.
On 19 January 1942, while approaching the Sunda Strait the convoy was joined by a local escort made up of the light cruisers HMS Dragon (Capt. R.J. Shaw, MBE, RN), HrMs Java (Capt. P.B.M van Straelen, RNN) and the destroyers HMS Express (Lt.Cdr. F.J. Cartwright, RN) and HMS Thanet ( Cdr.(Retd.) B.S. Davies, RN) which came from Batavia.
On 20 January 1942, the destroyer HrMs Van Nes (Lt.Cdr. C.A. Lagaay, RNN) joined. The convoy arrived at Ratai Bay, Sumatra later the same day.
On arrival at Lampung Bay, HrMs Java and HMS Thanet parted company to proceed to Batavia to fuel on completion of which they returned to Ratai Bay. HMAS Canberra and HMS Express fuelled at Ratai Bay.
At Lampung Bay the troops from the Aquitania were put onto smaller ships which were to take them to Singapore as Convoy MS 2A.
These were the merchant vessels; Both (Dutch, 2601 GRT, built 1931), Reael (Dutch, 2561 GRT, built 1931), Reijnst (Dutch, 2462 GRT, built 1928), Sloet van Beele (Dutch, 2977 GRT, built 1914), Taishan (British, 3174 GRT, built 1925), Van der Lijn (Dutch, 2464 GRT, built 1928) and Van Swoll (Dutch, 2147 GRT, built 1930).
To provide cover for the operation of putting the troops on board the smaller ships the heavy cruiser HMAS Canberra, light cruisers HMS Dragon, destroyers HMS Express, HMAS Vampire (Cdr. W.T.A. Moran, RAN), USS Barker (Lt.Cdr. L.G. McGlone, USN), USS Stewart (Lt.Cdr. H.P. Smith, USN), HrMs Evertsen (Lt.Cdr. W.M. de Vries, RNN), HrMs Van Nes, sloops HMIS Jumna (Cdr. W.R. Shewring, RIN), HrMs Soemba (Cdr. P.J.G. Huijer, RNN) and the patrol vessel USS Isabel (Lt. J.W. Payne, Jr., USN) were patrolling / present in the Bay.
Around 1045GH, convoy MS 2A departed Ratai Bay for Singapore. It was escorted by HMAS Canberra, HMAS Vampire and HMIS Jumna.
Around 1830GH/21, HrMs Java and HMS Thanet joined from Batavia.
At 1000GH/23, after the convoy had passed the Banka Strait HMAS Canberra parted company leaving HrMs Java in command of the escort. HMAS Canberra then proceeded to Batavia where she arrived the following day.
The convoy arrived at Singapore late in the morning of the 24th. (7)
19 Jan 1942
Convoy BM 11.
This convoy departed Bombay for Singapore on 19 January 1942.
On departure from Bombay it was made up of the following ships; British troop ships; Duchess of Bedford (20123 GRT, built 1928), Empress of Japan (26032 GRT, built 1930)
British merchant Empire Star (13479 GRT, built 1935).
American troop ships; USS Wakefield (24289 GRT, built 1931) and USS West Piont (26454 GRT, built 1940).
Escort was initially provided from 19 January to 22 January 1942 by HMS Caledon (A/Capt. H.J. Haynes, DSO, DSC, RN).
Around 1630F/22, HMS Glasgow (Capt. J.W. Cuthbert, RN) took over from HMS Caledon in position 05°10'N, 80°09'E.
Around 1500G/25, HMS Dragon (Capt. R.J. Shaw, MBE, RN) and HMS Durban (Capt. P.G.L. Cazalet, DSC, RN) joined the convoy.
On 26 January 1942, HMS Electra (Cdr. C.W. May, RN) and HMS Express (Lt.Cdr. F.J. Cartwright, RN) joined the convoy around noon.
Around 0645GH/27, HMS Exeter (Capt. O.L. Gordon, MVO, RN) and HMS Encounter (Lt.Cdr. E.V.St J. Morgan, RN) took over from HMS Glasgow in position 06°32'S, 102°29'E. HMS Glasgow then set course to return to Colombo.
It appears that HMS Exeter parted company with the convoy on 28 January and proceeded to Batavia.
The convoy arrived at Singapore on 29 January 1940. (8)
25 Jan 1942
The heavy cruiser HMAS Canberra (Capt. G.D. Moore, RAN) and the destroyers HMS Electra (Cdr. C.W. May, RN) and HMS Express (Lt.Cdr. F.J. Cartwright, RN) departed Batavia to pass through the Sunda Strait.
Later the same day the destroyers parted company to make rendezvous with convoy BM 11 which they joined around noon on the 26th.
HMAS Canberra set course for Fremantle.
[For more info on convoy BM 11 see the event ' Convoy BM 11 ' for 19 January 1942.] (9)
29 Jan 1942
HMS Rover (Lt.Cdr. G.H. Reynolds, RN) left Singapore for Batavia, Java, Netherlands East Indies in tow of HMS Express (Lt.Cdr. F.J. Cartwright, RN).
As no log is available for this period no map can be displayed. (10)
29 Jan 1942
HMS Dragon (Capt. R.J. Shaw, MBE, RN), HMS Durban (Capt. P.G.L. Cazalet, DSC, RN), HMS Electra (Cdr. C.W. May, RN), HMS Encounter (Lt.Cdr. E.V.St J. Morgan, RN) and HMS Express (Lt.Cdr. F.J. Cartwright, RN) arrived at Singapore with convoy BM 11. (11)
12 Feb 1942
Convoy SJ 1
This convoy departed Batavia, Netherlands East Indies on 12 February 1942. Destination for the majority of the convoy was Colombo where the convoy arrived on 21 February 1942
The convoy was made up of the following ships; British; Anglo-Indian (5609 GRT, built 1938), City of Canterbury (8331 GRT, built 1922), City of Pretoria (8049 GRT, built 1937), Clan Alpine (5442 GRT, built 1918), Halizones (3298 GRT, built 1920), Madura (9032 GRT, built 1921), Malancha (8124 GRT, built 1937), Yuen Sang (3229 GRT, built 1923), Dutch; Batavia (1279 GRT, built 1938), Van der Capellen (2073 GRT, built 1940) and Van Swoll (2147 GRT, built 1930).
Two damaged British warships were towed by two of the merchant vessels of the convoy. Both these warships had been damaged in 1941 while in action in the Mediterranean and had been sent to Singapore for repairs and refit. These were not completed when the Japanese attacked. Both ships had been towed from Singapore to Batavia. The warships were the destroyer HMS Isis (Lt. L.R.P. Lawford, DSC, RN) and the submarine HMS Rover (Lt.Cdr. G.H. Reynolds, RN). They were towed by the Malancha and the City of Pretoria respectively.
Escort was provided by the destroyer HMS Express (Lt.Cdr. F.J. Cartwright, RN) and the sloop HMIS Sutlej (Capt. P.A. Mare, RIN). On 14 February 1942 the heavy cruiser HMS Dorsetshire (Capt. A.W.S. Agar, VC, DSC, RN) joined until the 17th when she parted company with the convoy. On the 20th the convoy was joined by sloop HMS Falmouth (Cdr. U.H.R. James, RN). The Malancha with HMS Isis in tow and the City of Pretoria with HMS Rover in tow then parted company with the convoy and proceeded to Trincomalee where they arrived on 21 February 1942 escorted by HMIS Sutlej. The remainer of the convoy arrived at Colombo, also on the 21th, they were escorted by HMS Express and HMS Falmouth. HMS Express had suffered from a fire in the No.1 boiler room which could not be repaired at Singapore / Batavia / Surabaya so the was sent to Colombo for repairs.
28 Feb 1942
Convoy SU 1.
This convoy departed Colombo on 28 February 1942 and arrived at Fremantle on 15 March 1942.
This convoy was made up of the troopships / transports; City of London (British, 8956 GRT, built 1907), City of Paris (British, 10902 GRT, built 1922), Eastern Prince (British, 10926 GRT, built 1929), Egra (British, 5108 GRT, built 1911), Empire Glade (British, 7006 GRT, built 1941), Esperance Bay (British, 13837 GRT, built 1922), Gorgon (British, 3533 GRT, built 1933), Industria (British, 4850 GRT, built 1940), Kosciuszko (Polish, 6852 GRT, built 1915), Madras City (British, 5080 GRT, built 1940), Mathura (British, 8890 GRT, built 1920), Norden (Norwegian (tanker), 8440 GRT, built 1931), Penrith Castle (British, 6369 GRT, built 1929), Pundit (British, 5305 GRT, built 1919), Silverteak (British, 6770 GRT, built 1930), Silverwillow (British, 6373 GRT, built 1930) and Trevilley (British, 5296 GRT, built 1940).
The convoy was escorted by the British heavy cruiser HMS Cornwall (Capt. P.C.W. Manwaring, RN, the British destroyer HMS Express (Lt.Cdr. F.J. Cartwright, RN) and the British corvette HMS Hollyhock (Lt. T.E. Davies, OBE, RNR). On 1 March the battleship HMS Royal Sovereign (Capt. R.H. Portal, DSC, RN), armed merchant cruisers HMAS Manoora (A/Capt. A.H. Spurgeon, RAN) and the destroyers HMAS Nizam (Lt.Cdr. M.J. Clark, DSC, RAN) and HMAS Vampire (Cdr. W.T.A. Moran, RAN) joined in approximate position 05.00'N, 79.00'E coming from Trincomalee.
HMS Express and HMS Holyhock returned to Colombo on 3 March 1942. They most likely had parted company with the convoy when the ships coming from Trincomalee joined the convoy escort.
At 1800F/4, HMS Royal Sovereign, HMAS Nizam and HMAS Vampire parted company with the convoy to return to Trincomalee.
The convoy arrived at Fremantle on 15 March 1942 except for HMAS Manoora which was detached escorting the merchant vessels Empire Glade, Madras City, Mathura and Silver Widow to Adelaide where they arrived on 22 March 1942. (8)
11 Mar 1942
The battleships HMS Ramillies (Capt. D.N.C. Tufnell, DSC, RN), HMS Royal Sovereign (Capt. R.H. Portal, DSC, RN) and the destroyers HMAS Napier (Capt. S.H.T. Arliss, DSO, RN), HMAS Nestor (Cdr. A.S. Rosenthal, DSO and Bar, RAN), HMAS Nizam (Lt.Cdr. M.J. Clark, DSC, RAN), HMS Express (Lt.Cdr. F.J. Cartwright, RN) and HMS Tenedos (Lt. R. Dyer, RN) departed Trincomalee for exercises.
On completion of the exercises HMS Royal Sovereign, HMS Express and HMS Tenedos parted company and proceeded to Colombo.
The other ships returned to Trincomalee. (12)
13 Mar 1942
HMS Royal Sovereign (Capt. R.H. Portal, DSC, RN), HMS Express (Lt.Cdr. F.J. Cartwright, RN) and HMS Tenedos (Lt. R. Dyer, RN) arrived at Colombo. (13)
22 Mar 1942
HMS Truant (Lt.Cdr. E.F. Balston, DSO, RN) conducted D/G trails at Colombo following which she conducted attack exercises during which HMS Express (Lt.Cdr. F.J. Cartwright, RN) acted as target. Later A/S exercises were carried out with HMS Shoreham (Cdr. G.P. Claridge, RN) and HMS Aster (Lt. W.L. Smith, RNR). (14)
29 Mar 1942
Operations by the Eastern Fleet from 29 March to 13 April 1942. Enemy air attacks on Colombo and later Trincomalee and the loss of HMS Dorsetshire and HMS Cornwall on 5 April 1942 and HMS Hermes, HMAS Vampire on 9 April 1942.
Dispositions of the Eastern Fleet on 29 March 1942.
On 29 March 1942 the disposition of the Eastern Fleet was as follows; At Colombo: Aircraft carrier HMS Formidable (Capt. A.W.LaT. Bisset, RN), heavy cruisers HMS Dorsetshire (Capt. A.W.S. Agar, VC, DSO, RN) (refitting) and HMS Cornwall (Capt. P.C.W. Manwaring, RN), light cruisers HMS Enterprise (Capt. J.C.A. Annesley, DSO, RN), HMS Dragon (Capt. R.J. Shaw, MBE, RN) and HMS Caledon (A/Capt. H.J. Haynes, DSO, DSC, RN), the destroyers HMS Paladin (Cdr. A.D. Pugsley, RN), HMS Panther (Lt.Cdr. R.W. Jocelyn, RN), HMAS Nestor (Cdr. A.S. Rosenthal, DSO and Bar, RAN), HMS Hotspur (Lt. T.D. Herrick, DSC, RN), HMS Arrow (Cdr. A.M. McKillop, RN) and HMS Express (Lt.Cdr. F.J. Cartwright, RN).
At Trincomalee: The flagship of the Eastern Fleet, the battleship HMS Warspite (Capt. F.E.P. Hutton, RN, flying the flag of Vice-Admiral J.F. Somerville, KCB, KBE, DSO, RN), the aircraft carrier HMS Hermes (Capt. R.F.J. Onslow, DSC, MVO, RN), light cruisers HMS Emerald (Capt. F.C. Flynn, RN) and HrMs Jacob van Heemskerck (Cdr. E.J. van Holte, RNN), the destroyer HMAS Vampire (Cdr. W.T.A. Moran, RAN). HMS Warspite departed Trincomalee this day and arrived at Colombo in the evening. HMS Hermes and HMAS Vampire also departed Trincomalee on the 29th.
At Addu Atoll; The battleships HMS Resolution (Capt. A.R. Halfhide, CBE, RN , flying the flag of A/Vice-Admiral A.U. Willis, DSO, RN, second in command Eastern Fleet), HMS Ramillies (Capt. D.N.C. Tufnell, DSC, RN), HMS Royal Sovereign (Capt. R.H. Portal, DSC, RN), HMS Revenge (Capt. L.V. Morgan, CBE, MVO, DSC, RN) the aircraft carrier HMS Indomitable (Capt. T.H. Troubridge, RN, flying the flag of Rear-Admiral D.W. Boyd, CBE, DSC, RN) and the destroyers HMAS Napier (Capt. S.H.T. Arliss, DSO, RN), HMAS Norman (Cdr. H.M. Burrell, RAN), HMAS Nizam (Lt.Cdr. M.J. Clark, DSC, RAN), HMS Fortune (Lt.Cdr. R.D.H.S. Pankhurst, RN), HMS Foxhound (Cdr. G.H. Peters, DSC, RN), HMS Griffin (Capt. H.St.L. Nicolson, DSO, RN), HMS Decoy (Lt.Cdr. G.I.M. Balfour, RN) and HrMs Isaac Sweers (Cdr. W. Harmsen, RNN).
The Japanese had been operating in the Indian Ocean in early March and more attacks were expected in this area by the Allies. The most likely target would be the island of Ceylon and the harbours of Colombo and Trincomalee.
30 and 31 March 1942.
Planning
Admiral Somerville therefore planned to concentrate the Eastern Fleet on the late afternoon / early evening of 31 March 1942 in position 04°40’N, 81°00’E. The fleet would then be divided in two groups; Force A (the fast division) was made up of the flagships, battleship HMS Warspite, both fleet carriers, HMS Indomitable and HMS Formidable. They were escorted by the cruisers HMS Cornwall, HMS Enterprise, HMS Emerald and six destroyers; HMAS Napier, HMAS Nestor, HMS Paladin, HMS Panther, HMS Hotspur and HMS Foxhound. This force would try to intercept the enemy and deliver a night air attack on the enemy with their carriers as the main target.
Force A would be covered by the slower Force B which was made up of the battleships HMS Resolution, HMS Ramillies, HMS Royal Sovereign and the light carrier HMS Hermes. Escort to these ships was proviced by the cruisers HMS Dragon, HMS Caledon, HrMs Jacob van Heemskerck and a total of eight destroyers HMS Griffin, HMS Decoy, HMAS Norman, HMS Fortune, HrMs Isaac Sweers, HMS Arrow and one of the old destroyers that had managed to escape from the China station also joined, this was HMS Scout (Lt.Cdr.(Retd.) H. Lambton, RN). They were to remain about 20 nautical miles to the west of Force A. If Force A encountered a superior enemy force the would withdraw towards Force B.
At 1400/30 the ships mentioned earlier at the top of this article departed Colombo. HMS Hotspur and HMAS Nestor carried out an A/S sweep of the searched channel before Force A sailed.
By 1600/31 the fleet had made the pre-arranged rendez-vous and formed up. It then proceeded northwards. After dark, to avoid detection from the air by the enemy, Force A altered course to 080° and proceeded at 15 knots until about 0230 hours when it was thought they would be in the estimated position from where the enemy would fly off their aircraft for the expected attack on Ceylon. If nothing was sighted or located by 0230/1, Force A was to turn back to the south-west and to withdraw outside the enemy’s air search area. Force B was to act as a supporting force for Force A, keeping 20 miles to the west of it and confirming to the movements of Force A through the night. This procedure was carried out as planned during the night of 31 March / 1 April but nothing was seen or located.
In the late afternoon / early evening of 31 March HMS Indomitable briefly separated from the fleet for flying operations during which she was escorted by HMS Emerald. From 2100/31 to 0600/1 a search was carried out, to a depth of 120 miles from 050° to 110°, by three A.S.V. fitted Albacores from HMS Formidable. Also two Albacores fitted with long-range tanks were kept standing by for shadowing purposes if required. One of the Albacores crash landed on HMS Formidable upon return at 0340/1.
1 April 1942.
At 0940 hours HMS Decoy reported the breakdown of her main feed pumps. She was detached to Colombo to effect repairs.
Around noon several of the destroyers reported submerged contacts. HMS Scout reported sighting a periscope. The fleet took avoiding action in each case, but nothing further transpired from these contact which are now considered to be non-sub.
At 1400 hours, HMS Scout, one of the oldest destroyers of the Royal Navy with a short enducance, was detached to oil at sea from RFA Appleleaf (5892 GRT, built 1917, Master E. Mills) in position 04°00’N, 80°00’E. Upon completion of oiling HMS Scout was to proceed to position 05°40’N, 81°08’E by 0800/2. RFA Appleleaf and her escort, HMS Shoreham (Cdr. E. Hewitt, RD, RNR), were to proceed towards a new waiting position 05°00’N, 80°30’E.
In the afternoon, around 1420 hours, HMS Dorsetshire joined Force A. This cruiser had been refitting at Colombo but this refit was cut short to enable her to take part in this operation. Air searches were carried out from Ceylon as the days before but they sighted nothing of the enemy. Also from 1430/1800 hours a search was carried out by aircraft from HMS Indomitable between 142° to 207° to a depth of 215 miles. Admiral Somerville decided to carry out the same sweep to the north-east as had been done the previous night. Again nothing was seen and Force A made rendez-vous with Force B at daybreak on 2 April 1942.
2 April 1942.
At 0800 hours the destroyers HMS Fortune and HMAS Vampire were detached to fuel from RFA Appleleaf in position 05°00’N, 80°30’E. and an Albacore was ordered to search for HMS Scout and order her to rejoin the fleet. Shortly after noon the fleet sighted RFA Appleleaf, HMS Shoreham, HMS Fortune and HMAS Vampire. The last two ships then rejoined the fleet while the tanker and it’s escort were ordered to proceed towards Colombo at 1200/3.
During the day the Eastern Fleet cruised in an area about 50 miles further to the west then the previous day to avoid being detected by enemy submarines that had been reported. Throughout the day several of the escorting destroyers obtained unconfirmed echoes. Two more destroyers fuelled during the afternoon, HMAS Napier and HMS Arrow took in fuel from HMS Dorsetshire and HMS Cornwall.
As the enemy had not shown herself by 2100 hours, Admiral Somerville decided to proceed to Addu Atoll to fuel and to take on fresh water as the R-class battleships were running out of this as they had been unable to top up at Addu Atoll before they sailed.
3 April 1942.
At 0520 hours, the destroyer HMS Fortune was detached to search for survivors from the merchant vessel Glensheil (9415 GRT, built 1924) that had been torpedoed by the Japanese submarine I-7 in position 00°48’S, 78°35’E at 0230 hours. HMS Fortune picked up 88 survivors and then proceeded to Addu Atoll where she arrived at 1130/4.
As at this time Admiral Somerville felt confident that something must have held up the Japanese or that their intentions were incorrectly appreciated. At 0940 hours, he sent HMS Dorsetshire and HMS Cornwall to Colombo. The former to continue her refit and the latter to act as escort for the Australian troop convoy SU 4. HMS Hermes and the destroyer HMAS Vampire were also detached but to Trincomalee as HMS Hermes was to prepare for the upcoming operation ‘Ironclad’, the attack on Madagascar. HMS Hermes and HMAS Vampire arrived at Trincomalee on the 4th.
Late in the morning three of the destroyers of the screen oiled from the battleships; HMAS Norman from HMS Warspite, HMS Griffin from HMS Revenge and HMS Foxhound from HMS Royal Sovereign.
At 1820 hours Force A proceeded ahead to Addu Atoll at 19 knots followed by Force B at 15 knots. Force A arrived at Addu Atoll at 1200/4. Force B at 1500/4.
4 April 1942.
In the early morning hours, and while approaching Addu Atoll, a simulated air strike was carried out on Force B by aircraft from HMS Indomitable and HMS Formidable. One aircraft crashed into the sea, it’s crew was picked up by the Dutch AA-cruiser Jacob van Heemskerck. A second simulated air attack was made on Force A later in the morning.
At 1630 hours, Admiral Somerville received a report that a large enemy force was in position 00°40’N, 83°10’E at 1605/F. Enemy course was 315°. Shortly afterwards this report was confirmed by another report in which they gave an enemy course of 330°. This positioned the enemy in a position 155° from Dondra Head, 360 miles, the distance from Addu Atoll being 085°, 600 miles. There was no indication about the composition of this force.
The condition of the Eastern Fleet at Addu Atoll at that time was as follows; Owning to the limited number of oilers available, the vessels comprising Force A had taken about half their fuel and Force B had not yet commenced fuelling. In addition the ‘R’-class battleships were very short of water which had to be taken in before they could sail. This meant that Force A could sail immediately, minus HMS Emerald and HMS Enterprise. These cruisers could sail shortly after midnight. Force B could not leave until 0700 hours the following morning at the earliest.
It appeared that the enemy’s probable plan was as follows. All the evidence supported Admiral Somerville’s original appreciation that the enemy would attack Colombo (and possibly Trincomalee) with carrier borne aircraft either before dawn or shortly afterwards and would return to the carriers in a position about 150 miles south-east of Ceylon. On completion the whole force would then withdraw to the east. The enemy’s reported position made it apparent that this attack was to be made on the morning of 5 April 1942.
Admiral Somerville considered his possible courses of action were as follows: 1) Force A, less HMS Emerald and HMS Enterprise to proceed immediately at best speed to the area to the south of Ceylon and to be joined there by HMS Dorsetshire and HMS Cornwall coming from Colombo and attack any enemy force located. 2) Delay the sailing of Force A until HMS Emerald and HMS Enterprise, valuable units with their strong torpedo armament, had completed refuelling and sail about midnight. Force B could sail in the morning of the 5th and follow astern to act as a supporting force. 3) Delay the sailing of Force A until both force could leave together on the morning of the 5th. 4) Force A and Force B would remain at Addu Atoll and leave the RAF to deal with the enemy attack.
The choise Admiral Somerville made was governed by the following considerations: 1) First and foremost the total defence of the Indian Ocean and it’s vital lines of communication depend on the existence of the Eastern Fleet. The longer this fleet remained ‘in being’ the longer it would limit and check the enemy’s advances against Ceylon and further west. This major policy of retaining ‘a fleet in being’, already approved by Their Lordships, was, in Admiral Somerville’s opinion, paramount. 2) The only hope of dealing the enemy an affective blow was by means of a carrier borne air striking force preferably at night. To operate both carriers escorted by HMS Warspite out of supporting distance of the ‘R’-class battleships would offer the enemy an opportunity to cripple our only offensive weapon. Admiral Somerville considered it a cardinal point in any operation the Force A should not proceed out of the supporting distance from Force B unless it could be presumed that that enemy capital ships would not be encountered. 3) No matter what course of action Admiral Somerville would take the enemy force could not be intercepted either before or during the attack on Ceylon on the morning of the 5th. The only hope was that the air striking force from Ceylon might inflict damage to the enemy so that the Eastern Fleet could ‘finish them off’, or that the enemy attack on Ceylon would be delayed 24 hours.
Admiral Somerville therefore decided to adopt ‘plan 2’. So he sailed Force A including both E-class cruisers at midnight and ordered Force B to proceed as early as possible the following morning.
Admiral Somerville therefore instructed HMS Dorsetshire and HMS Cornwall to sail from Colombo and to make rendez-vous with Force A at 1600/5 in position 00°58’N, 77°36’E. The position of this rendez-vous was based on their expected time of departure from Colombo and estimated as being the earliest possible time at which they could cross the track of Force A, taking into consideration that HMS Dorsetshire had resumed her refit and was at extended notice. Admiral Somerville considered that the course to be steered should take them well clear of any enemy forces operating in the vicinity. Actually these instructions had been anticipated by the Deputy Commander-in-Chief, Eastern Fleet and these two cruisers, at his discretion, sailed at 2300/4 for Addu Atoll. On receipt of the signal from Admiral Somerville the Deputy Commander-in-Chief amended his instructions accordingly at 0409/5.
5 April 1942.
Force A sailed from Addu Atoll at 0015 hours and proceeded 070° at 18 knots towards a position which would bring it 250 miles south of Ceylon by dawn on the 6th. Shortly before departure the destroyer HMS Hotspur conducted an A/S search of the entrance to Addu Atoll.
During the night Admiral Somerville received reports from the Catalina reconnaissance aircraft on patrol from Ceylon of an enemy destroyer in position 01°59’N, 82°20’E, course 315°, speed 20 knots; six enemy destroyers in position 02°54’N, 82°10’E, course 325°, speed 21 knots; and at 0701 hours a report of one battleship, two cruisers an four other ships in position 195°, Dondra Head, 110 miles. Later this message was subsequently amplified to the effect that the vessels previously reported were definitely hostile and consisted of two battleships, two cruisers and destroyers.
At about 0825 hours an air raid on shipping and harbour facilities at Colombo was commenced in which some 75 aircraft were taking part. These were later reported to be mainly Navy ‘O’ fighters, armed with one bomb each. This enemy force withdrew from Colombo before 0900 hours and was seen by several merchant ships to the south-west of Ceylon probably returning to the carriers. In several cases these merchant were machine gunned.
From 0645 hours an air A/S patrol was maintained ahead of the fleet. HMS Indomitable also sent four Fulmars to commence a search to the eastward. This search covered the area between the arcs 055° to 105° to a depth of 215 miles. It proved negative except for the sighting of an enemy seaplane at 0855 hours, 076°, 150 miles from Force A. This suggested that the enemy was carrying out reconnaissance in a south-westerly direction by means of cruiser aircraft, or a seaplane carrier, in a position 70 miles of the main enemy force. There was no indication that this aircraft sighted any of our surface forces or our air search.
Between 0702 and 1145 hours, Admiral Somerville received reports of battleships in approximate positions 03°55’N, 80°40’E, steering 290° at 0648 hours, steering 120° at 0730 hours, and at 1004 hours in position 04°00’N, 80°25’E steering 282°. This suggested that the battleships were making time while the carriers recovered their aircraft. The estimated position of HMS Dorsetshire and HMS Cornwall at this time was 150 miles from the enemy and opening.
At 1327 hours a mutilated ‘Shad’ signal was received from what was thought to be Colombo but was identified half an hour later as coming from HMS Dorsetshire whose position was estimated as being 037°, 90 miles from Force A at 1400 hours. No contact could be established.
At 1344 hours an enemy air formation was detected by RD/F, 030°, 84 miles from Force A. This had faded after five minutes and it later it became clear that this was the enemy attacking the Dorsetshire and Cornwall. At 1552 hours, a reconnaissance aircraft from Force A, reported wreckage in position 02°08’N, 78°08’E.
The destroyer HMS Panther was then detached to search but was recalled about one hour later when a reconnaissance aircraft from Force A reported a force of 5 ‘unknown’ ships in position 03°38’N, 78°18’E at 100 hours. There was no indication of the course or speed of the enemy but it could be either a force previously unreported or the force previously and last reported 1004 hours.
No relief shadowers were however sent off by the Rear-Admiral aircraft carriers as soon s the report was received and Admiral Somerville omitted to obtain confirmation that this had been done. At 1700 hours, Admiral Somerville, received a report from Ceylon that there were indications of enemy aircraft carriers steering 230° at 24 knots from an unknown position at 1400 hours. This was thought to be subsequent to the attack on our 8” cruisers and Admiral Somerville’s deductions from this enemy moves were as follows. If the enemy held on this course they would at 0400 be in a position to deliver a night attack on Addu Atoll. This seemed quite a possible course of action. In any case it was necessary for Force A to keep clear to the southward and for Force B (estimated to be 135 miles astern of Force A) to steer to the southward so that Force A and B could close for supporting action at daylight the following morning (April 6th). It was also necessary for Force B to steer to the southward to keep clear of the enemy carrier force should it be proceeding to attack Addu Atoll.
At 1726 hours, therefore, Force A altered course to 210° at 18 knots and a signal was made to Vice-Admiral second-in-Command and to HMS Dorsetshire to steer south, although at this time Admiral Somerville feared about the fate of the two heavy cruisers. As he had received no signal from them that they had been attacked he thought it possible they had escaped and maintained W/T silence.
At 1800 hours Admiral Somerville received a signal from the Rear-Admiral Aircraft Carriers, stating that a reconnaissance aircraft reported the estimated enemy position as 020°, 120 miles at 1710 hours. This position was very close to the previous position reported at 1600 hours. The course of the enemy had not been given in either of these reports but the positions fitted in well with the course received earlier (230°).
At 1817 hours, a further signal was received from the Rear-Admiral Aircraft Carriers, adjusting the 1600 hours position of the enemy’s force, amplifying it to include two carriers and three unknown vessels and giving the course north-west. This was the first indication Admiral Somerville had of the enemy now proceeding to the north-west. He immediately ordered force A to alter course to 315° and instructed the Vice-Admiral, second-in-Command to conform. These movements had to object of keeping Force A within night air striking distance of the enemy force, trusting to an A.S.V. (airborne surface vessel radar) search to locate the enemy and to bring Force B within supporting distance should it be necessary to retire in that direction. A dawn rendez-vous was arranged with Force B in approximate position 03°00’N, 75°00’E.
As no news had been received of HMS Dorsetshire and HMS Cornwall it was assumed they had been sunk.
At 1930 hours a night search with A.S.V. aircraft was commenced to cover the sector 345° to 030° to a depth of 180 nautical miles. Northing was located on this search.
6 April 1942.
From 2100/5 to 0600/6 further A.S.V. searches were carried out to cover the sector 020° to 080° to a depth of 200 miles. These searches also failed to make any contact with the enemy but reported that Force B was 220°, 25 miles from Force A at 0400 hours.
At 0615 hours, Force A altered course to 135° and sighted Force B ten minutes later. By 0720 hours the Fleet was formed up and course was altered to 090°.
Whilst no furher information had been received regarding the enemy’s movements nothing had occurred to diminish the possibility of the enemy’s being in the vicinity of Addu Atoll, either to attack it by air this morning or to await the return of the Eastern Fleet.
Admiral Somerville intended to keep clear of the superior enemy forces by day. It was still his intention to get into a position to attack them with a night air striking force on their possible return from at Addu Atoll area, and also rescue the possible survivors from HMS Dorsetshire and HMS Cornwall. He therefore steered east and at 1115 hours course was altered to south-east in the direction of the wreckage that had been reported the previous evening. During the morning reports came in from merchant ships being attacked in the Bay of Bengal. There must be a second Japanese force operating there.
At 1300 hours HMS Enterprise, HMS Paladin and HMS Panther were detached to search for survivors in the vicinity of the wreckage position. Air search was provided to assist and fighter escort was sent to cover the operation. These ships were successful in picking up a total of 1122 survivors from both heavy cruisers. They rejoined the fleet at noon the following day. At 1800/6, when about 50 miles from the wreckage position course was reversed and the fleet retired to the north-west. All-round air searches were carried out to a depth of 200 miles but again nothing was seen.
At about 1400 hours a signal was received from the C-in-C, Ceylon estimating that a strong Japanese force was still somewhere between Addu Atoll and Colombo. Admiral Somerville therefore decided to keep clear of the Addu area until daylight on the 7th.
7 April 1942.
At 0200 hours the Eastern Fleet altered course to the west, 270°.
At 0427 hours, an A.S.V. aircraft located two submarines in position 02°08’N, 75°16’E and 02°46’N, 75°10’E, to the southward of the course of the Eastern Fleet. This indicated that the possibility of an enemy submarine patrol having been established to cover the eastern approaches to Addu Atoll. Admiral Somerville therefore decided to pass through Veimandu Channel to the west of the Maldives and make an unexpected approach to Addu Atoll from the west. At 0700 hours the course of the fleet was altered to 210°.
At 1335 hours, HMS Fortune was detached to investigate a ship contact made by HMS Emerald but no ship was sighted. Fortune only rejoined the fleet at about 0600/8.
At 1600 hours, HMS Enterprise, HMS Paladin and HMS Panther rejoined with the survivors they had picked up and medical stores were transferred from HMS Warspite to HMS Paladin for treatment of the wounded. Enterprise and Paladin were then detached to proceed immediately to Addu Atoll.
At 2100 hours, the Eastern Fleet altered course to 160°.
8 April 1942.
At 0700 hours aircraft were flown off from the carriers to carry out an all-round search to a depth of 175 miles. Again nothing was seen and at 1100 hours the Eastern Fleet entered Addu Atoll. Refuelling commenced immediately, Force B being refuelled first.
Admiral Somerville held a conference on board HMS Warspite with Flag and Commanding Officers in the afternoon.
Having discussed the situation Admiral Somerville decided to sent Force B to Kilindini and to proceed to Bombay with Force A. This later decision coincided with Their Lordships views as later in the day he received Their Lordships instructions that Force A was not to be sent to Colombo for the time being. Further by proceeding to Bombay the could arrange a meeting with the Commander-in-Chief, India and discuss the situation in the Far East with him.
At 1800 hours HMAS Nestor departed Addu Atoll to maintain an A/S patrol in the sector between 090° to 150° to a depth of 35 miles from the Port War Signal Station. One hour earlier HMS Resolution launched her Walrus aircraft for a ‘round the island’ A/S patrol. It returned at dusk.
9 April 1942.
Force B (less HMS Dragon sailed for Kilindini at 0200 hours where it was due to arrive on April 15th. Force A sailed at 0600 hours for Bombay shaping course to pass to the westward of the Maldives.
During the morning Admiral Somerville was informed of further Japanese attacks in the Bay of Bengal and on Trincomalee and the sinking of several ships, including HMS Hermes and HMAS Vampire but nothing could be done about this.
10 April 1942.
At 1000 hours HMS Paladin closed HMS Warspite to transfer Staff Officers for passage to Colombo where they were to inform the Deputy Commander-in-Chief, Eastern Fleet of Admiral Somerville’s views and make preliminary arrangements to transfer Admiral Somerville’s administrative staff and secretariat to Kilindini.
11 April 1942.
At 0705 hours, HMS Paladin rejoined Force A bringing back the Staff Officers who had been transferred to her on 10 April and also Rear-Admiral Danckwerts, Admiral Somerville’s Chief of Staff ashore.
Force A arrived at Bombay in the morning of the 13th (1040 hours) and commenced oiling.
Japanese operation in the Indian Ocean in late March 1942 and April 1942.
On 26 March 1942, the 1st Japanese Carrier Fleet departed Staring Bay, Celebes, Netherlands East Indies for a raid on Ceylon. This Fleet was made up of the aircraft carriers Akagi, Hiryu, Soryu, Zuikaku, Shokaku, battlecruisers Kongo, Haruna, Hiei, Kirishima, heavy cruisers Tone, Chikuma and the destroyers Urakaze, Tanikaze, Isokaze, Hamakaze, Kasumi, Arare, Kagero, Shiranuhi and Akigumo. This force then proceeded west of Timor and to a position to the south of Java where they fuelled from oilers on April 1st.
On 27 March the Japanese submarines I-2, I-3, I-4, I-5, I-6 and I-7 departed Penang to take up positions in the Indian Ocean for the upcoming operation.
On 1 April the Japanese Mayala Force departed Mergui for operations in the Bay of Bengal. This force was made up of the heavy cruisers Chokai, Kumano, Mikuma, Mogami, Suzuya, aircraft carrier Ryujo, light cruiser Yura, and the destroyers Fubuki, Shirayuki, Hatsuyuki and Murakumo. On 4 April the estroyers were substituted for four other destroyers; Amagiri, Asagiri, Shirakumo and Yugiri.
On 5 April the Japanse 1st Carrier Fleet launched their air attack on Colombo. 53 bombers, 38 dive bombers and 36 fighters were launched. They destroyed 19 Hurricane fighters, 1 Fulmar fighter and 6 Swordfish torpedo bombers. At Colombo the harbour facilities were heavily damaged and the armed merchant cruiser HMS Hector and destroyer HMS Tenedos were sunk.
Then around noon a reconnaissance aircraft from the Tone sighted the heavy cruisers HMS Dorsetshire and HMS Cornwall. The 1st Carrier Fleet immediately launched an attack force of 53 dive bombers that sank both cruisers with the loss of 424 members of their crews (Dorsetshire 234 and Cornwall 190). The Japanese then retired to the south-east.
In the evening of 5 April the Japanese Malaya-Force was ordered to commence attacking Allied shipping along the Indian east coast. On 6 April the northern group (Kumano, Suzuya and Shirakumo destroyed 9 ships off Puri (Orissa). The central group (Chokai, Yura, Asagiri and Yugiri) sank 4 ships. The southern group (Mikuma, Mogami and Amagiri sank 3 ships and damaged 2 more. Meanwhile aircraft from the carrier Ryuju, which operated with the central group, sank 4 more ships and damaged 1 more. In all about 92000 GRT of shipping was sunk.
On 8 April 1942 a Catalina aircraft spotted the Japanese 1st Carrier Fleet proceeding for an attack on Trincomalee but the Eastern Fleet was approaching Addu Atoll to refuel and could do nothing. Shipping at Trincomalee was ordered to leave port and proceed to the southward. In the morning of the following day 91 Japanese bombers and 41 fighters attacked Trincomalee. They destoyed 9 Hurricane and Fulmar fighters and 14 aircraft on the ground. The harbour most mostly empty but they sank a merchant vessel and 4 aircraft it had on board and not unloaded yet. Also the British monitor HMS Erebus (Capt. H.F. Nalder, RN) was damged. The Japanese 1st Carrier Fleet was then attacked by 9 Blenheim bombers but they inflicted no damage for 5 of their own lost to Japanese fighter cover. Then Japanese reconnaissance aircraft from the Haruna sighted ships escaping southwards. 85 Dive bombers and 3 fighters were then launched which sank HMS Hermes and HMAS Vampire as well as the corvette HMS Hollyhock (Lt.Cdr. T.E. Davies, OBE, RNR), two tankers and a merchant ship.
By mid-April 1942 all Japanese forces had returned to their bases. (15)
14 Jul 1942
HMS Valiant (Capt. L.H. Ashmore, RN) departed Durban for Simonstown. She is escorted by the destroyers HMS Anthony (Lt.Cdr. J.M. Hodges, RN) and HMS Express (Lt.Cdr. F.J. Cartwright, RN). (16)
17 Jul 1942
HMS Valiant (Capt. L.H. Ashmore, RN), HMS Anthony (Lt.Cdr. J.M. Hodges, RN) and HMS Express (Lt.Cdr. F.J. Cartwright, RN) arrived at Simonstown. (16)
25 Jul 1942
HMS Valiant (Capt. L.H. Ashmore, RN) conducted exercises off Simontown during which she was escorted by the destroyers HMS Anthony (Lt.Cdr. J.M. Hodges, RN) and HMS Express (Lt.Cdr. F.J. Cartwright, RN). (17)
27 Jul 1942
HMS Valiant (Capt. L.H. Ashmore, RN) conducted exercises off Simontown during which she was escorted by the destroyers HMS Anthony (Lt.Cdr. J.M. Hodges, RN) and HMS Express (Lt.Cdr. F.J. Cartwright, RN). (17)
28 Jul 1942
HMS Valiant (Capt. L.H. Ashmore, RN) conducted exercises off Simontown during which she was escorted by the destroyers HMS Anthony (Lt.Cdr. J.M. Hodges, RN) and HMS Express (Lt.Cdr. F.J. Cartwright, RN). (17)
1 Aug 1942
HMS Valiant (Capt. L.H. Ashmore, RN) conducted D/G and D/F calibration trials off Capetown after which she proceeded to Simonstown escorted by the destroyers HMS Anthony (Lt.Cdr. J.M. Hodges, RN) and HMS Express (Lt.Cdr. F.J. Cartwright, RN). (18)
19 Sep 1942
Convoy CM 32.
This convoy departed Durban on 19 September 1942.
The convoy was made up of the (troop) transports; City of Canterbury (British, 8331 GRT, built 1922), Demodocus (British, 6689 GRT, built 1912), Elizabethville (Belgian, 8351 GRT, built 1922) and Pulaski (Polish, 6345 GRT, built 1912).
On departure from Durban the convoy was escorted by the armed merchant cruiser HMS Ranchi (Capt.(Retd.) J.M. Alleyne, DSO, DSC, RN) and the destroyer HMS Express (Lt.Cdr. F.J. Cartwright, RN).
Around 1707C/21, ,HMS Ranchi parted company with the convoy as she had been ordered to search for the Vichy French transport Amiral Pierre (4388 GRT, built 1905) which was thought to be bound for Laurenco Marques.
Around 0740C/28, the armed merchant cruiser HMS Chitral (A/Capt.(Retd.) G.W. Hoare-Smith, RN) and the minesweepers HMS Cromarty (Lt.Cdr. C.G. Palmer, DSC, RNZNVR), HMS Cromer (Cdr. R.H. Stephenson, DSO, RN) and HMS Romney (Lt. W.E. Halbert, RNR) joined the convoy coming from Kilindini / Mombasa.
Around 1200C/28, HMS Express and the Demodocus were detached to Kilindini / Mombasa where they arrived on the 29th.
Around 2359C/1, HMS Chitral parted company with the convoy.
The convoy arrived at Aden on 5 October 1942.
30 Sep 1942
During 30 September / 1 October 1942, the battleship HMS Resolution (Capt. A.R. Halfhide, CBE, RN , flying the flag of A/Vice-Admiral A.U. Willis, DSO, RN, Second in Command, Eastern Fleet), heavy cruiser HMS Hawkins (Capt. G.A. French, RN) and the destroyers HMAS Nepal (Cdr. F.B. Morris, RAN), HMS Fortune (Lt.Cdr. R.D.H.S. Pankhurst, RN), HMS Express (Lt.Cdr. F.J. Cartwright, RN) and the escort destroyer HMS Catterick (Lt. A. Tyson, RN) conducted exercises off Kilindini / Mombasa. (19)
5 Oct 1942
Convoy WS 23.
This convoy was formed off Oversay on 5 October 1942.
It consisted of the following transports / troopships; Capetown Castle (British, 27002 GRT, built 1938), Empress of Russia (British, 16810 GRT, built 1913), Highland Monarch (British, 14139 GRT, built 1928), Kina II (British, 9823 GRT, built 1939), Moreton Bay (British, 14193 GRT, built 1921), Port Jackson (British, 9687 GRT, built 1937), Silverandal (British, 6770 GRT, built 1930) and Straat Malakka (Dutch, 439 GRT, built 1939).
Initial escort consisted of the light cruisers HMS Despatch (Capt. W.R.C. Leggatt, RN), HMS Durban (Capt. G.F. Stevens-Guille, DSO and Bar, OBE, RN), armed merchant cruiser HMS Queen of Bermuda (A/Capt.(Retd.) A.D. Cochrane, DSO, RN), destroyers HMS Beagle (Cdr. R.C. Medley, RN), HMS Wrestler (Lt. R.W.B. Lacon, DSC, RN) and the escort destroyers HMS Bicester (Lt.Cdr. S.W.F. Bennetts, RN), HMS Puckeridge (Lt. J.C. Cartwright, DSC, RN), HMS Zetland (Lt. J.V. Wilkinson, RN) and RHS Kanaris.
At 2200Z/6, HMS Durban parted company with the convoy to proceed to Ponta Delgada to fuel.
At 1850Z/8, HMS Beagle parted company with the convoy to return to the UK. HMS Zetland had a leaking Asdic dome and was apparently also detached on the 8th to return to the UK for a docking and repairs.
At 1000Z/9, HMS Puckeridge arrived at Ponta Delgada to refuel. She departed to rejoin the convoy at 1345Z/9. RHS Kanaris arrived at 1100Z/9 and departed again at 1430Z/9. [It is currently not known to us when they had left the convoy to proceed to Ponta Delgada.]
At 1545Z/9, HMS Durban rejoined the convoy. HMS Despatch was then detached to fuel at Ponta Delgada.
At 1900Z/9, HMS Puckeridge and RHS Kanaris rejoined the convoy.
At 0100Z/10, HMS Wrestler and HMS Bicester parted company with the convoy to fuel at Ponta Delgada after which they were to return to the UK.
At 0810/Z/13, HMS Antelope (Lt.Cdr. E.N. Sinclair, RN) joined the convoy shorly afterwards followed by HMS Velox (Lt. G.B. Barstow, RN).
On 16 October 1942 the convoy arrived at Freetown escorted by HMS Despatch, HMS Durban, HMS Queen of Bermuda, HMS Antelope, HMS Velox, HMS Puckeridge and RHS Kanaris.
----------------------------------------------------------------------------------------------------
The convoy departed Freetown for Durban on 20 October 1942.
The same ships made up the convoy plus the merchant vessels Hai Lee (Norwegian, 3616 GRT, built 1934) and Tamesis (Norwegian, 7256 GRT, built 1939).
On departure from Freetown the convoy escort was made up of the light cruisers HMS Despatch, HMS Durban, armed merchant cruiser HMS Carthage (A/Capt.(Retd.) W.V.H. Harris, DSC, MVO, RN), escort destroyers HMS Avon Vale (Lt.Cdr. P.A.R. Withers, DSO, RN), RHS Kanaris, sloop HMS Milford (Cdr.(Retd.) the Hon. V.M. Wyndham-Quin, RN) and the corvette HMS Tamarisk (Lt. S. Ayles, RNR).
At 1020A/23, HMS Avon Vale parted company. HMS Southern Gem (T/Lt. D.C. Hayes, RNVR) had joined just before. She had sailed from Takoradi on the 22nd.
At 1842A/23, HMS Durban parted company with the convoy to proceed to Takoradi to repair a defect. She arrived at Takoradi around 0745/24 and departed again around 0230A/25. She rejoined the convoy around 0945A/27.
Also detached on 23 October were the two Norwegian merchant vessels and the corvette HMS Tamarisk. These were also to proceed to Takoradi.
The corvette HMS Amaranthus (T/Lt. W.S. Thomson, RNR) joined on the 25th coming from Ponte Noire. After she joined HMS Southern Gem was detached to Ponte Noire due to engine trouble.
On the 26th, HMS Amaranthus parted company to join convoy CF 7.
On 30 October the destroyer HMAS Norman (Cdr. H.M. Burrell, RAN) and the corvettes HMS Rockrose (Lt. E.J. Binfield, DSC, RNR) and HMS Thyme (Lt. H. Roach, RNR) joined the convoy. These ships had sailed from Walvis Bay, the corvettes at 0600Z/29 and HMAS Norman at 2000Z/29. HMAS Norman joined the convoy around 1300B/30 and the corvettes around 1530B/30.
At 2100B/30, HMS Durban, HMS Despatch and HMS Milford were detached to fuel at Walvis Bay where they arrived around 0840/30. HMS Durban departed Walvis Bay aroud 1845B/31 and she rejoined the convoy around 1800B/1
On 2 November the transport / troopship Rimutaka (British, 16576 GRT, built 1923) joined the convoy coming from Capetown.
At 1330C/2, the destroyer HMS Express (Lt.Cdr. F.J. Cartwright, RN) and escort destroyer HMS Catterick (Lt. A. Tyson, RN) joined coming from Simonstown.
Around 1545C/2, RHS Kanaris parted company to refuel at Simonstown. She rejoined the convoy around 0100C/3.
At 2215C/2, HMS Rockrose and HMS Thyme were detached to search for survivors from ships that had been torpedoed by German submarines.
At 1950C/4, HMS Express was detached to search for survivors from a ship that had been torpedoed by a German submarines.
At 0530C/5, the escort destroyer HMS Derwent (Cdr. R.H. Wright, DSC, RN) joined.
The convoy arrived at Durban in the early afternoon of 5 November escorted by HMS Durban, HMS Carthage, HMAS Norman, HMS Catterick, HMS Derwent and RHS Kanaris.
----------------------------------------------------------------------------------------------------
The convoy departed Durban around noon on 9 November 1942, now made up of Capetown Castle, Empress of Russia, Highland Monarch, Kina II, Port Jackson, Silversandal and Straat Malakka.
On departure from Durban the convoy was escorted by the light cruiser HMS Dauntless (Cdr.(Retd.) N.G. Leeper, RN), armed merchant cruiser HMS Carthage, destroyers HMAS Norman, HMS Inconstant (Lt.Cdr. W.S. Clouston, RN), escort destroyers HMS Blackmore (Lt. H.T. Harrel, RN), RHS Kanaris and the corvettes HMS Genista (Lt.Cdr. R.M. Pattinson, DSC, RNR) and HMS Jasmine (Lt.Cdr.(Retd.) C.D.B. Coventry, RNR).
At 1700C/10, HMS Insconstant, HMS Genista and HMS Jasmine were detached.
At 1500D/11, HMS Dauntless, HMAS Norman, HMS Blackmore and RHS Kanaris were detached.
At 1830D/11, the cruiser HMS Hawkins (Capt. G.A. French, RN) joined.
At 1600E/16, HMS Mauritius (Capt. W.D. Stephens, RN) joined and at 1230E/16, HMS Hawkins parted company with the convoy to proceed to Kilindini taking the Empress of Russia with her. They arrived at Kilindini around 1700D/18.
At 1800E/17, the convoy was split up into the ' Aden section ' and the ' Bombay section '.
The ' Aden section ' was made up of the Highland Monarch, Kina II, Port Jackson and the Straat Malakka. They were escorted by HMS Carthage and arrived at Aden around 1300C/21. They had earlier been joined by the destroyer RHS Panther around 0615/20.
The ' Bombay section ' was made up of the other transports escorted by HMS Mauritius. They arrived at Bombay around 1000FG/24 except for the Silversandal which had been detached on November 22nd to proceed to Karachi where she also arrived on the 24th. (20)
7 Oct 1942
During 7/8 October 1942, the battleship HMS Valiant (Capt. L.H. Ashmore, RN) conducted exercises off Kilindini. These included night exercises. She was escorted by the destroyers HMAS Nepal (Cdr. F.B. Morris, RAN), HMS Fortune (Lt.Cdr. R.D.H.S. Pankhurst, RN), HMS Express (Lt.Cdr. F.J. Cartwright, RN) and the escort destroyer HMS Catterick (Lt. A. Tyson, RN).
8 Oct 1942
Around 1800C/8, the light cruiser HMS Birmingham (Capt. H.B. Crane, RN, flying the flag of Rear Admiral W.G. Tennant, CB, MVO, RN), heavy cruiser HMS Hawkins (Capt. G.A. French, RN) and the destroyers HMS Express (Lt.Cdr. F.J. Cartwright, RN) and HMS Fortune (Lt.Cdr. R.D.H.S. Pankhurst, RN) departed Kilindini / Mombasa.
Around 2345C/8, HMS Express and HMS Fortune were detached to return to Kilindini / Mombasa.
Around 2359C/8, HMS Hawkins parted company with HMS Birmingham. HMS Hawkins was to join convoy WS 22. [For more info on this convoy see the event ' Convoy WS 22 ' for 29 August 1942 on the page of HMS Hawkins.] HMS Birmingham was to proceed to Durban. (21)
9 Oct 1942
Around 0625C/9, HMS Express (Lt.Cdr. F.J. Cartwright, RN) and HMS Fortune (Lt.Cdr. R.D.H.S. Pankhurst, RN) returned to Kilindini / Mombasa from escort duty. (22)
19 Oct 1942
At 0815B/19, HMS Express (Lt.Cdr. F.J. Cartwright, RN) and HMS Catterick (Lt. A. Tyson, RN), which were on passage from Durban to Simonstown were ordered to search for a submarine indicated by D/F bearings in position 36°00'S, 24°00'E.
At 1220B/19, a signal from the merchant vessel Stephen A. Douglas (American, 7176 GRT, built 1942) was received stating that she had been attacked but missed with torpedoes in position 36°25'S, 13°34'E. A torpedo had passed underneath her stern. The attacker was U-68 which had fired two torpedoes.
At 1304B/19, the Stephen A. Douglas reported that she was being chased by an enemy submarine in position 36°32'S, 13°33'E.
At 1509B/19, HMS Foxhound (Cdr. C.J. Wynne-Edwards, DSC, RN) and HMAS Nizam (Lt.Cdr. M.J. Clark, DSC, RAN) were ordered to endeavour to intercept the Stephen A. Douglas and escort her to Capetown. (23)
18 Dec 1942
Convoy WS 25.
The convoy was assembled off Oversay on 18 December 1942.
It was made up of the following (troop) transports; Britannic (British, 26943 GRT, built 1930, 4955 troops), City of Lincoln (British, 8039 GRT, built 1938), Esperance Bay (British, 14204 GRT, built 1922, 1805 troops), Highland Brigade (British, 14134 GRT, built 1929, 1882 troops), Highland Princess (British, 14133 GRT, built 1930, 1930 troops), Mataroa (British, 12390 GRT, built 1922, 1897 troops), Orion (British, 23371 GRT, built 1935, 5335 troops), Rangitiki (British, 16698 GRT, built 1928, 2598 troops) and Tarifa (Norwegian, 7229 GRT, built 1936).
On assembly the convoy was escorted by the armed merchant cruisers HMS Carnarvon Castle (Capt.(Retd.) E.W. Kitson, RN), HMS Cheshire (A/Capt.(Retd.) R.D. King-Harman, DSO, DSC and Bar, RN), destroyers HMS Quilliam (Capt. S.H. Carlill, DSO, RN), HMS Wolverine (Lt. I.M. Clegg, RN), escort destroyer HMS Badsworth (Lt. G.T.S. Gray, DSC, RN), HMS Haydon (Lt. R.C. Watkin, RN) and HMS Rockwood (Lt. S.R. Le H. Lombard-Hobson, RN).
Around 1700Z/24, HMS Wolverine, HMS Badsworth and HMS Haydon parted company with the convoy to fuel at Ponta Delgada, Azores. They were not to rejoin the convoy. HMS Quilliam and HMS Rockwood had returned from fuelling at Ponta Delgada in the afternoon of the 24th, These two ships were to continue with the convoy to Freetown.
At 1225Z/26, the destroyer HMS Ilex (Lt.Cdr. V.A. Wight-Boycott, OBE, RN) joined the convoy.
Around 2005Z/28, HMS Rockwood parted company to fuel at Bathurst. She rejoined the convoy around 1100Z/30.
At 0900Z/29, HMS Ilex parted company with the convoy to proceed to Freetown. She rejoined around around 0900Z/31.
At 0545Z/30, the corvettes HMS Crocus (T/Lt. J.F. Holm, RNZNR) and HMS Woodruff (A/Lt.Cdr. F.H. Gray, RNR) joined the convoy.
The convoy arrived at Freetown in the afternoon of 31 December 1942.
-----------------------------------------------------------------------------------------------------------------
The convoy departed Freetown in the same composition on 3 January 1943.
The convoy was now escorted by the armed merchant cruisers HMS Alcantara (A/Capt.(retd.) J.D. Harvey, RN), HMS Cheshire destroyer HMS Quilliam, escort destroyer HMS Rockwood, corvette HMS Crocus and the minesweeper HMIS Baluchistan (Lt. D.A. McDonald, RIN).
Around 0715A/6, the corvette Commandant d'Estienne d'Orves joined the convoy coming from Takoradi.
Around 1900A/6, the Highland Brigade was detached to Takoradi escorted by the Commandant d'Estienne d'Orves and HMIS Baluchistan. they arrived at Takoradi on the 7th.
Between 0850A/9 and 1300A/9, HMS Quilliam was fuelled by HMS Alcantara.
At 1000A/9, HMS Crocus was detached to Pointe Noire.
Between 1330A/9 and 1915A/9, HMS Rockwood was fuelled by HMS Alcantara.
Around 1920A/9, HMS Alcantara parted company with the convoy to return to Freetown.
Around 1830C/14, the destroyer HMS Express (Lt.Cdr. F.J. Cartwright, RN) joined the convoy. HMS Quilliam then parted company to proceed to Simonstown.
Around 1600C/14, HMS Quilliam rejoined the convoy after having fuelled at Simonstown. By now HMS Rockwood had also parted company with the convoy to proceed to Simonstown after having been relieved by the corvette HMS Genista (Lt.Cdr. R.M. Pattinson, DSC, RNR). On HMS Quilliam rejoining the convoy HMS Genista was detached.
The convoy arrived at Durban on 18 January 1943. (20)
10 Jan 1943
Convoy MC 3.
This convoy departed Aden on 10 January 1943 and arrived at Durban on 23 January 1943.
The convoy was made up of the transports Aronda (British, 9031 GRT, built 1941), Ascanius (British, 10048 GRT, built 1910) and Felix Roussell (British, 17083 GRT, built 1930).
On departure from Aden the convoy was escorted by the heavy cruiser HMS Devonshire (Capt. D. Young-Jamieson, RN), armed merchant cruiser HMS Carthage (A/Capt.(Retd.) W.V.H. Harris, DSC, MVO, RN), destroyer RHS Panther and the minesweeper HMS Romney (Lt. W.E. Halbert, RNR).
At 1800C/11, RHS Panther parted company to return to Aden.
At 0800C/12, HMS Romney was detached to return to Aden.
Around 1300C/16, HMS Birmingham (Capt. H.B. Crane, RN) joined the convoy. HMS Devonshire then parted company to proceed to Kilindini.
Around 0345D/21 the destroyers HMS Express (Lt.Cdr. F.J. Cartwright, RN), HMS Hotspur (Lt. P. Bekenn, RN) and escort destroyer HMS Blackmore (Lt. H.T. Harrel, RN) joined the convoy escort.
Around 0345D/22, the destroyers HMS Fortune (Lt.Cdr. R.D.H.S. Pankhurst, RN) and HMS Inconstant (Lt.Cdr. W.S. Clouston, RN) joined the convoy escort.
The convoy arrived at Durban on 23 January 1943.
23 Jan 1943
HMS Birmingham (Capt. H.B. Crane, RN), HMS Carthage (A/Capt.(Retd.) W.V.H. Harris, DSC, MVO, RN), HMS Express (Lt.Cdr. F.J. Cartwright, RN), HMS Fortune (Lt.Cdr. R.D.H.S. Pankhurst, RN), HMS Hotspur (Lt. P. Bekenn, RN), HMS Inconstant (Lt.Cdr. W.S. Clouston, RN) and HMS Blackmore (Lt. H.T. Harrel, RN) arrived at Durban with convoy MC 3.
25 Jan 1943
Convoy CF 11.
This convoy, with troops and POW's, departed Durban, South Africa on 25 January 1943 and arrived in the Clyde, via Freetown, on 25 February 1943.
On departure from Durban the convoy was made up of the following (troop)transports; Britannic (British, 26943 GRT, built 1930), Indrapoera (Dutch, 10825 GRT, built 1925) and Orion (British, 23371 GRT, built 1935).
On departure from Durban it was escorted by the battleship HMS Valiant (Capt. L.H. Ashmore, RN) and the destroyers HMS Inconstant (Lt.Cdr. W.S. Clouston, RN), HMS Fortune (Lt.Cdr. R.D.H.S. Pankhurst, RN) and HMS Hotspur (Lt. P. Bekenn, RN).
The convoy arrived at Capetown on 27 December 1941. HMS Hotspur went to Simonstown for a quick docking.
------------------------------------------------------------------------------------------------------
On 30 January the convoy left Capetown in the same composition with the addition of an additional destroyer, HMS Express (Lt.Cdr. F.J. Cartwright, RN).
At 0500B/5, HMS Express and HMS Hotspur were detached to fuel at Pointe Noire. They rejoined at 1600B/5 after which HMS Fortune and HMS Inconstant were detached to fuel at Pointe Noire. They rejoined the convoy around 0930B/6.
The convoy arrived at Freetown around noon on 11 February 1943.
------------------------------------------------------------------------------------------------------
Two (troop)transports joined the convoy, which otherwise remained in the same composition, at Freetown. These were the Esperance Bay (British, 13837 GRT, built 1922) and the Troilus (British 7422 GRT, built 1921). Also the armed merchant cruiser HMS Ranchi (Capt.(Retd.) J.M. Alleyne, DSO, DSC, RN) joined the convoy for passage to the Clyde. The convoy departed from Freetown in the afternoon of February 14th.
Around 1800Z/16, the destroyers HMS Quadrant (Lt.Cdr. W.H. Farrington, RN) and HMS Redoubt (Lt.Cdr. N.E.G. Ropner, DSO, RN) joined the escort coming from Bathurst.
At 0745Z/17, the Esperance Bay parted company with the convoy to proceed to New York.
At 1815Z/17, the Troilus parted company with the convoy.
On 19 February HMS Valiant fuelled HMS Hotspur in the morning, HMS Fortune and HMS Inconstant in the afternoon and HMS Express in the evening.
At 1150Z/22, HMS Quadrant and HMS Redoubt were detached to Gibraltar and Casablanca respectively.
At 1615A/24, the frigate HMS Moyola (Lt.Cdr. H.N. Lawson, RD, RNR) joined.
At 1620Z/24, HMS Valiant, HMS Hotspur, HMS Fortune and HMS Inconstant parted company with the convoy to proceed to Plymouth where they arrived in the morning of the following day.
At 1930/25, the Britannic and Indrapoera parted company with the convoy to proceed to Liverpool escorted by HMS Express. They arrived at Liverpool on the 26th.
The remainder of the convoy arrived in the Clyde on the 26th. (24)
Media links
|
|
Sources
- ADM 53/110312
- ADM 53/114892
- ADM 199/2566
- ADM 234/330
- ADM 53/114033 + ADM 53/114230 + ADM 53/115714 + ADM 199/408 + Report of proceedings of HMAS Hobart from 9 December 1941 to 11 January 1942 + Files 2.12.03.6849 and 2.12.27.121 (Dutch Archives, The Hague, Netherlands)
- ADM 53/115714
- Report of proceedings of HMAS Canberra for January 1942 + Report of proceedings of HMAS Vampire for January 1942
- ADM 199/426
- Report of proceedings of HMAS Canberra for January 1942
- ADM 199/1833
- ADM 53/115850
- ADM 53/116490 + ADM 53/116604 + ADM 199/426
- ADM 53/116604 + ADM 199/426
- ADM 173/17660
- ADM 199/1389
- ADM 53/116727
- ADM 53/116651
- ADM 53/116728
- ADM 53/116043 + ADM 53/116044 + ADM 53/116539 + ADM 53/116540 + ADM 199/429
- ADM 199/1211
- ADM 53/115438
- ADM 53/116767
- ADM 199/653
- ADM 53/118668 + ADM 53/118669 + ADM 199/635 + ADM 199/2349 + ADM 199/2491
ADM numbers indicate documents at the British National Archives at Kew, London.
As an Amazon Associate uboat.net earns a commission from qualifying purchases.